Getting Started
Provides initial procedures for getting started with the device.
Components
|
|
|
|
| BioStation 3 Max (BS3M-ODB, BS3M-OAPB) | Wall Bracket (BS3M-ODB, BS3M-OAPB) | BioStation 3 Max (BS3M-DB, BS3M-APB) | Wall Bracket (BS3M-DB, BS3M-APB) |
|
|
|
|
| Connection Cables | Diode | 120 Ω Resistor | Fixing Screw x6 |


|
|
|
| Bracket Fixing Screw (Star Shaped) | Cable Cover | Quick Guide |


- Components may vary according to the installation environment.
- When assembling the product with the bracket, you can use the included bracket fixing screw (Star Shaped) instead of the product fixing screw for enhanced security.
Name and function of each part

-
LED Indicator: Indicates the operational status of the device with the color of the LED.
-
Green: Authentication success.
-
Red: Authentication failure.
-
Blue: Normal operation.
-
Blue/Green blinking:
-
When setting DHCP to use, unable to retrieve IP address.
-
When in Slave mode, the connection to the master device is disconnected.
-
-
Red/Purple blinking: Device is locked.
-
Yellow blinking: Waiting for input.
-
-
Microphone: Transmits the voice of the user when the interphone is connected.
- Covering or blocking the microphone may interfere with voice transmission.
-
Infrared Camera: Capture the infrared face image.
-
Visual Camera: Capture an actual face image.
-
Display: Provides a UI for operation.
-
RF card and mobile access card authentication unit: Part to scan a RFID card or mobile access card for entrance.
-
Fingerprint Recognition Unit: BS3M-ODB, BS3M-OAPB The part that recognizes fingerprints for access.
-
Speaker: Delivers sound.
-
Ethernet: Connect the Ethernet cable.
-
Input (4-pin): Connect the input cable.
-
Relay (3-pin): Connect the Relay cable.
-
RS-485 (4-pin): Connect the RS-485 cable.
-
USB Expansion Port (5-pin): Connect other accessory products.
-
Wiegand Output (4-pin): Connect the Wiegand Output cable.
-
Wiegand Input (4-pin): Connect the Wiegand Input cable.
-
Power Supply (2-pin): Connects the power supply cable.
-
USB (Type-C) Memory Slot: Connects the USB memory.
Cables and connectors
Power

| Pin | Name | Color |
|---|---|---|
| 1 | PWR +VDC | Red |
| 2 | PWR GND | Black |
Relay

| Pin | Name | Color |
|---|---|---|
| 1 | RLY NO | White |
| 2 | RLY COM | Blue |
| 3 | RLY NC | Orange |
RS-485

| Pin | Name | Color |
|---|---|---|
| 1 | 485 TRXP | Blue |
| 2 | 485 TRXN | Yellow |
| 3 | 485 GND | Black |
| 4 | SH GND | Gray |
Input

| Pin | Name | Color |
|---|---|---|
| 1 | INPUT0 | Red |
| 2 | INPUT1 | Yellow |
| 3 | INPUT2 | Orange |
| 4 | INPUT GND | Black |
Wiegand Input and Output

| Pin | Name | Color |
|---|---|---|
| 1 | WG D0 | Green |
| 2 | WG D1 | White |
| 3 | WG GND | Black |
| 4 | SH GND | Gray |
Set master administrator
The Master Admin feature enhances the overall admin privileges of the device to improve device security and prevent unauthorized access and configuration changes. Enroll a master administrator using this feature. Only the enrolled master administrator can access the administrator menu to change device setting.
What is a master administrator?
-
If you use the device without setting an administrator, anyone can access the administrator menu and change device settings. The master administrator feature enforces overall administrator settings to address these security vulnerabilities.
-
The master admin cannot delete directly and will be deleted only during Factory Default.
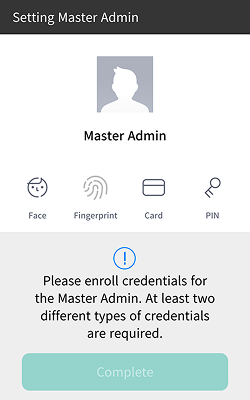
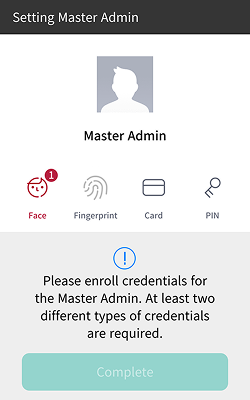
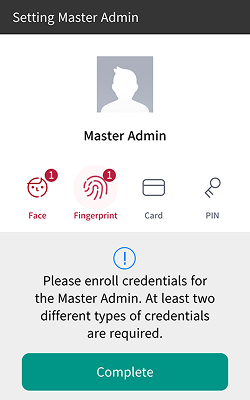
Register the master admin
On the Master Admin registration screen that appears at first boot, register Master Admin. If you do not register it, the device is restricted and you cannot move to the next screen.
Register Master Admin to use all features, even if you connect to BioStar X and assign a device-wide administrator.
-
Boot the product for the first time to display the Master Admin registration screen.
-
At least two different types of credentials must be enrolled to register Master Admin. Select and enroll two desired credentials.
The credentials that can be enrolled for Master Admin are as follows.
Credential type Number of enrollments Conditions Card Up to 4 Supports only CSN and Wiegand types
Duplication within the same type is not allowedFace Up to 2 Only enrollable on devices with the same algorithm Fingerprint Up to 2 - PIN 1 At least 8 characters long Enrollment conditions
-
You must enroll at least two types of credentials.
-
All credentials supported by the device can be used as authentication means.
-
-
After enrolling two or more types of credentials, press the Complete button to complete the registration of Master Admin.
Additional Information
-
Manual Device Hash Key Change
When manually changing the device hash key, a warning message will indicate that Master Admin PINs will be deleted. Please confirm the message before proceeding.
-
RS-485 Biometric Image Transmission Restriction
Biometric credential images are not transmitted over RS-485 communication, so substitute images appear when viewing the registered Master Admin face on slave devices.
Correct face enrollment and authentication method
Cautions for enrolling a faces
- Keep the distance between the device and your face at 60-100 cm when enrolling your face.
-
Do not change your face expression.
-
Do not wear masks, hats, or eye patches.
-
Do not enroll a face wearing a mask. It may increase the False Acceptance Rate (FAR) if both faces with and without a mask are enrolled.
-
Do not raise head up or lower head.
-
Do not wear thick makeup.
-
Do not close your eyes.
-
Make sure that both of your shoulders correctly appear on the screen.
-
Stand still and enroll your face by staring at the screen.
-
Be careful not to display two faces on the screen. Enroll one person at a time.
-
If you do not follow the instructions on the screen, the face enrollment may take longer or may fail.
Cautions for authenticating a face
-
Ensure that the face appears in the center of the device’s screen. When the guideline is displayed, follow the instructions shown on the screen to authenticate the face.
-
If a part of the face is covered with a hat, a mask, an eye patch, or sunglasses authentication may fail. Do not cover the face; allow the device to recognize both the eyebrows and the face.
-
Authenticate at a location 90-100 cm away from the device.
-
Make sure that both of your shoulders correctly appear on the screen. Authentication may fail if your shoulders are not at the same height. Stand still, and then authenticate your face.
Correct fingerprint input method BS3M-ODB, BS3M-OAPB
In order to improve the fingerprint authentication rate, enroll the fingerprint correctly. This product can authenticate fingerprints even if the user's fingerprint input angle and position change. If you enroll the fingerprint with attention to the following matters, the authentication rate can be improved.
Selecting a finger for fingerprint input

-
In preparation for the case that the fingerprint of a specific finger cannot be used, for example if the user is lifting a load with one hand or a finger gets hurt, up to 10 fingerprints for each user can be enrolled.
-
In the case of a user whose fingerprint cannot be recognized well, the authentication rate can be improved by enrolling the same finger twice repeatedly.
-
If a finger has a cut or the fingerprint is blurry, select another finger for the fingerprint.
-
It is recommended to use the index finger or the middle finger when scanning the fingerprint. The authentication rate can be reduced if it is difficult to place another finger at the center of fingerprint sensor accurately.
Fingerprint enroll method
- When the screen displays "Please input your fingerprint," place the finger you want to enroll on the fingerprint recognition unit and gently press it so that the fingerprint is authenticated well.

- When the re-input screen is displayed after a beep sound, scan the fingerprint of the enrolled finger again. (scan the fingerprint of a finger to be enrolled twice)
Cautions for fingerprint enrollment
When a fingerprint is recognized, it is compared with the initially enrolled fingerprint, so the initial fingerprint enroll is the most important. Pay attention to the following matters when enrolling the fingerprint.

-
Place the finger deep enough to contact with the sensor completely.
-
Place the center of the fingerprint in the center of the sensor.
-
If a finger has a cut or the fingerprint is blurry, select another finger for the fingerprint.
-
Scan the fingerprint correctly without moving according to the instruction on the screen.
-
If you make the finger upright so that the contact area with the sensor is decreased or the angle of finger is warped, fingerprint authentication may not be performed.
If fingerprint authentication does not work well
This product can authenticate fingerprints regardless of seasonal changes or changes in the condition of the fingers. However, the authentication rate may vary according to the external environment or fingerprint input method. If the fingerprint authentication cannot be done smoothly, it is recommended to take the following measures.
-
If the finger is smeared with water or sweat, dry off the finger and then scan the finger.
-
If the finger is too dry, blow your breath on the fingertips and then scan the finger.
-
If the finger has a cut, enroll the fingerprint of another finger.
-
Since the initially enrolled fingerprint is often not input correctly, please re-enroll the fingerprint according to the Cautions for fingerprint enrollment.
Notes on QR/Barcode and Device License
Correct QR/Barcode Authentication Method
You can issue a QR/barcode to the user for use as a means of authentication. To improve recognition rate, scan the QR/barcode correctly according to the guidance on the screen.

-
Keep the distance between the device's camera and the QR/barcode at 8-25 cm.
-
Position the QR/barcode so that it is centered in the device's scanning screen.
-
If authenticating with a QR/barcode downloaded to a mobile device, adjust the brightness of the mobile device to ensure the screen is clearly visible.
-
Failure to follow the instructions on the screen may result in slow recognition or failure of the QR/barcode.
Notes for device license
-
Using additional QR/Barcode authentication methods requires a separate device license. Contact the place of purchase to issue a device license.
-
The device license file is an encrypted file and cannot be modified arbitrarily.
-
Device licenses are issued based on device ID. If the device ID is changed in an unusual way, the warranty service for the license is not provided.