Device Information and Configuration Options
Administrators can select a registered device to view its basic information and configure operational settings such as network, authentication, and time and attendance management. Configuration options vary by device model. Expand the device entry to view the available options.
AirFob Edge
Detail
The Detail section provides basic information — such as the device name, model, serial number, and firmware version — and includes an action menu for controlling features and default settings.
Basic Information
View the device's basic information. This information cannot be edited.
-
Product: The product name.
-
Model Name: The device's model name.
-
Serial Number: The device's serial number.
-
Firmware Version: The firmware version installed on the device.
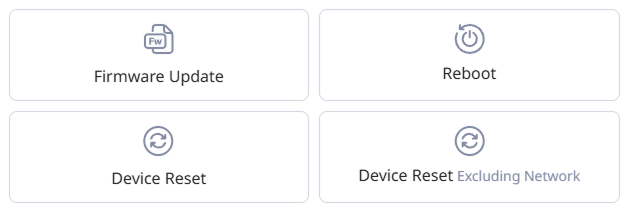
Actions
The Action feature lets you control the device's functions.
-
Update Firmware: Update the device firmware to the latest version.
-
Reboot: Reboot the device remotely when an issue or anomaly occurs.
-
Device Reset: Initialize all settings stored on the device. This action deletes all settings and data on the device.
-
Device Reset Excluding Network: Initialize all settings except the network settings. This action deletes all settings and data but keeps the network settings.
Initial Settings
Modify the device's default settings.
-
Nickname: The alias shown in the device list and logs. You can edit this field directly.
-
Timezone: Set the device time zone to keep logs consistent when the site and device clocks differ. Activate the Use DST option to apply daylight saving time (DST).
- Hands-Free: Extend the BLE range.
-
QR Reader: Confirm that an RS-485 QR reader is connected to the device.
-
When a QR reader is connected to the device, you cannot use another RS-485 device.
-
When using an SIO2, you cannot use a QR reader on the device connected to that door.
-
- NFC/RF Card: Activate or deactivate card authentication. DESFire and Felica card formats are supported.
- Beep Setting: Configure the success beep for access authentication.
Network
Modify the device's network settings.
-
Use DHCP: Configure the device to obtain an IP address automatically.
To set the network manually, disable Use DHCP and fill in the following fields.
- IP Address
- Gateway
- DNS Address
- Subnet Mask
T&A (Time & Attendance, T&A)
When this feature is enabled, T&A Event is logged in Event Log and used in T&A Report.
-
Use T&A: Click the toggle switch to turn attendance management on or off.
-
T&A Mode: Select the desired attendance mode.
- By Schedule: Attendance events change automatically according to the set schedule. You can select a schedule to apply to attendance events.
-
Fixed: Only the selected attendance event is available.
-
Mobile: When presenting a mobile credential, the Suprema Pass app lets the user select the attendance event.
For more information on configuring time and attendance, see Time & Attendance (T&A).
Wiegand Output
This feature integrates with external systems (e.g., alarm panels). Activate the Use Wiegand Output option to use this feature.
-
Output Mode: Configure the Wiegand signal output mode.
-
Regular: Scan cards using the configured Wiegand format.
- Use Fail Code: You can set error codes and choose the value to send when Wiegand card authentication fails.
-
Bypass: Send the CSN regardless of Wiegand authentication. Set this if you are using it as a device without door control functionality.
-
-
Output Info: Select the information output during authentication.
-
Pulse Width: Set the pulse width for the Wiegand signal.
-
Pulse Interval: Set the pulse interval for the Wiegand signal.
-
Mobile Consecutive Tag: Tag mobile cards consecutively without wait time.
-
Consecutive Tag Limit: Set the maximum number of consecutive mobile card tags.
The Mobile Consecutive Tag feature is supported in Suprema Pass app 2.9.0 or later.
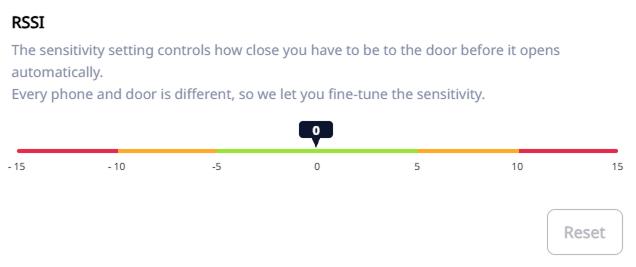
Sensitivity
Adjust the RSSI value to set how close the mobile device must be to unlock the door.
-
Lower values help block unintended activation.
-
Higher values improve detection in high-interference environments.
To reset the settings, click Reset.
Modules
Option to detect an OM-120 module connected to the device. Click Add to detect the module.
XPass 2
Detail
The Detail section provides basic information — such as the device name, model, serial number, and firmware version — and includes an action menu for controlling features and default settings.
Basic Information
View the device's basic information. This information cannot be edited.
-
Product: The product name.
-
Model Name: The device's model name.
-
Serial Number: The device's serial number.
-
Firmware Version: The firmware version installed on the device.
Actions
The Action feature lets you control the device's functions.
-
Update Firmware: Update the device firmware to the latest version.
-
Reboot: Reboot the device remotely when an issue or anomaly occurs.
-
Device Reset: Initialize all settings stored on the device. This action deletes all settings and data on the device.
-
Device Reset Excluding Network: Initialize all settings except the network settings. This action deletes all settings and data but keeps the network settings.
Initial Settings
Modify the device's default settings.
-
Nickname: The alias shown in the device list and logs. You can edit this field directly.
-
Timezone: Set the device time zone to keep logs consistent when the site and device clocks differ. Activate the Use DST option to apply daylight saving time (DST).
-
User RF Card Number: Enter the RF card number using the keypad to use it.
This feature is supported only on the XP2-GKDPB model, which has a keypad.
- Hands-Free: Extend the BLE range.
-
QR Reader: Confirm that an RS-485 QR reader is connected to the device.
-
When a QR reader is connected to the device, you cannot use another RS-485 device.
-
When using an SIO2, you cannot use a QR reader on the device connected to that door.
-
- Beep Setting: Configure the success beep for access authentication.
Card
In the Card section, you can modify card authentication settings.
NFC/RF Card
-
NFC/RF Card: Click the toggle switch to enable or disable card access authentication. Select the card types supported for card authentication.
- EM4100 (125 KHz)
- Mifare Classic/Mifare DESFire/FeliCa
-
Byte Order
-
MSB: Processes card data in order from large byte units to small byte units, sequentially storing the card serial number (CSN) from left to right.
-
LSB: Processes card data in order from small byte units to large byte units, storing the card serial number (CSN).
-
-
Data Reading Method: Select CSN (default) or Wiegand format.
Wiegand supports 5 default formats. Add more formats in Settings → Card Format. For more information about custom card format settings, see Custom Wiegand card format.
Proprietary Cards
For Wiegand cards, you can select iClass (SE / SEOS) and HID Prox. Click the toggle to enable the feature, then select the desired card format in Proprietary Cards.
-
Support may vary by device.
-
Wiegand supports 5 default formats. Add more formats in Settings → Card Format. For more information about custom card format settings, see Custom Wiegand card format.
Network
Modify the device's network settings.
-
Use DHCP: Configure the device to obtain an IP address automatically.
To set the network manually, disable Use DHCP and fill in the following fields.
- IP Address
- Gateway
- DNS Address
- Subnet Mask
Authentication
-
Auth Mode: Add authentication methods. Click Add to add an authentication method.
-
XP2-MDPB / XP2-GDPB: Only RF cards can be selected as the authentication method.
-
XP2-GKDPB: You can use a combination of an RF card and a PIN as the authentication method.
-
-
Auth Timeout: Authentication fails if the credential is not authenticated within the set time.
This feature is supported only on the XP2-GKDPB model.
You can configure different authentication methods for the selected schedule. For example, you can allow card-only authentication during work hours and allow card-and-PIN authentication outside work hours.
T&A (Time & Attendance, T&A)
When this feature is enabled, T&A Event is logged in Event Log and used in T&A Report.
-
Use T&A: Click the toggle switch to turn attendance management on or off.
-
T&A Mode: Select the desired attendance mode.
- By Schedule: Attendance events change automatically according to the set schedule. You can select a schedule to apply to attendance events.
-
Fixed: Only the selected attendance event is available.
-
Mobile: When presenting a mobile credential, the Suprema Pass app lets the user select the attendance event.
For more information on configuring time and attendance, see Time & Attendance (T&A).
Wiegand Output
This feature integrates with external systems (e.g., alarm panels). Activate the Use Wiegand Output option to use this feature.
-
Output Mode: Configure the Wiegand signal output mode.
-
Regular: Scan cards using the configured Wiegand format.
- Use Fail Code: You can set error codes and choose the value to send when Wiegand card authentication fails.
-
Bypass: Send the CSN regardless of Wiegand authentication. Set this if you are using it as a device without door control functionality.
-
-
Output Info: Select the information output during authentication.
-
Pulse Width: Set the pulse width for the Wiegand signal.
-
Pulse Interval: Set the pulse interval for the Wiegand signal.
-
Mobile Consecutive Tag: Tag mobile cards consecutively without wait time.
-
Consecutive Tag Limit: Set the maximum number of consecutive mobile card tags.
The Mobile Consecutive Tag feature is supported in Suprema Pass app 2.9.0 or later.
Secure Tamper
If a tamper event occurs, configure the device to delete all user information, all logs, and security keys stored on the device.
Sensitivity
Adjust the RSSI value to set how close the mobile device must be to unlock the door.
-
Lower values help block unintended activation.
-
Higher values improve detection in high-interference environments.
To reset the settings, click Reset.
Modules
Option to detect an OM-120 module connected to the device. Click Add to detect the module.
X-Station 2
Detail
The Detail section provides basic information — such as the device name, model, serial number, and firmware version — and includes an action menu for controlling features and default settings.
Basic Information
View the device's basic information. This information cannot be edited.
-
Product: The product name.
-
Model Name: The device's model name.
-
Serial Number: The device's serial number.
-
Firmware Version: The firmware version installed on the device.
Actions
The Action feature lets you control the device's functions.
-
Update Firmware: Update the device firmware to the latest version.
-
Reboot: Reboot the device remotely when an issue or anomaly occurs.
-
Device Reset: Initialize all settings stored on the device. This action deletes all settings and data on the device.
-
Device Reset Excluding Network: Initialize all settings except the network settings. This action deletes all settings and data but keeps the network settings.
Initial Settings
Modify the device's default settings.
-
Nickname: The alias shown in the device list and logs. You can edit this field directly.
-
Timezone: Set the device time zone to keep logs consistent when the site and device clocks differ. Activate the Use DST option to apply daylight saving time (DST).
- Hands-Free: Extend the BLE range.
-
QR Reader: Confirm that an RS-485 QR reader is connected to the device.
-
When a QR reader is connected to the device, you cannot use another RS-485 device.
-
When using an SIO2, you cannot use a QR reader on the device connected to that door.
-
- NFC/RF Card: Activate or deactivate card authentication. DESFire and Felica card formats are supported.
Network
Modify the device's network settings.
-
Use DHCP: Configure the device to obtain an IP address automatically.
To set the network manually, disable Use DHCP and fill in the following fields.
- IP Address
- Gateway
- DNS Address
- Subnet Mask
T&A (Time & Attendance, T&A)
When this feature is enabled, T&A Event is logged in Event Log and used in T&A Report.
-
Use T&A: Click the toggle switch to turn attendance management on or off.
-
T&A Mode: Select the desired attendance mode.
- By Schedule: Attendance events change automatically according to the set schedule. You can select a schedule to apply to attendance events.
-
Fixed: Only the selected attendance event is available.
-
Mobile: When presenting a mobile credential, the Suprema Pass app lets the user select the attendance event.
For more information on configuring time and attendance, see Time & Attendance (T&A).
Sensitivity
Adjust the RSSI value to set how close the mobile device must be to unlock the door.
-
Lower values help block unintended activation.
-
Higher values improve detection in high-interference environments.
To reset the settings, click Reset.
Modules
Option to detect an OM-120 module connected to the device. Click Add to detect the module.
BioEntry W3
Detail
The Detail section provides basic information — such as the device name, model, serial number, and firmware version — and includes an action menu for controlling features and default settings.
Basic Information
View the device's basic information. This information cannot be edited.
-
Product: The product name.
-
Model Name: The device's model name.
-
Serial Number: The device's serial number.
-
Firmware Version: The firmware version installed on the device.
Actions
The Action feature lets you control the device's functions.
-
Update Firmware: Update the device firmware to the latest version.
-
Reboot: Reboot the device remotely when an issue or anomaly occurs.
-
Device Reset: Initialize all settings stored on the device. This action deletes all settings and data on the device.
-
Device Reset Excluding Network: Initialize all settings except the network settings. This action deletes all settings and data but keeps the network settings.
Initial Settings
Modify the device's default settings.
-
Nickname: The alias shown in the device list and logs. You can edit this field directly.
-
Timezone: Set the device time zone to keep logs consistent when the site and device clocks differ. Activate the Use DST option to apply daylight saving time (DST).
- Hands-Free: Extend the BLE range.
Card
In the Card section, you can modify card authentication settings.
NFC/RF Card
-
NFC/RF Card: Click the toggle switch to enable or disable card access authentication. Select the card types supported for card authentication.
- EM4100 (125 KHz)
- Mifare Classic/Mifare DESFire/FeliCa
-
Byte Order
-
MSB: Processes card data in order from large byte units to small byte units, sequentially storing the card serial number (CSN) from left to right.
-
LSB: Processes card data in order from small byte units to large byte units, storing the card serial number (CSN).
-
-
Data Reading Method: Select CSN (default) or Wiegand format.
Wiegand supports 5 default formats. Add more formats in Settings → Card Format. For more information about custom card format settings, see Custom Wiegand card format.
Proprietary Cards
For Wiegand cards, you can select iClass (SE / SEOS) and HID Prox. Click the toggle to enable the feature, then select the desired card format in Proprietary Cards.
-
Support may vary by device.
-
Wiegand supports 5 default formats. Add more formats in Settings → Card Format. For more information about custom card format settings, see Custom Wiegand card format.
Network
Modify the device's network settings.
-
Use DHCP: Configure the device to obtain an IP address automatically.
To set the network manually, disable Use DHCP and fill in the following fields.
- IP Address
- Gateway
- DNS Address
- Subnet Mask
Authentication
- Auth Mode: Add authentication methods. Click Add to add an authentication method. You can use a combination of an RF card and facial recognition as the authentication method.
You can configure different authentication methods for the selected schedule. For example, you can allow card-only authentication during work hours and allow card-and-PIN authentication outside work hours.
Face
Security
-
Fake Detection: Prevent user authentication with spoofed faces such as photos.
-
Duplicate Check: Check for duplicate registrations when enrolling facea.
Detection
-
Motion Sensor Sensitivity: Set the sensitivity for detecting movement around the device.
-
Maximum Head Pose Angle: Set the maximum rotation angle allowed for a face.
-
Wide Search: Expand the area in the camera view where faces are recognized.
-
Detection Distance (cm): Set the minimum and maximum recognition distance.
-
Enrollment Time (sec): If a face is not enrolled within the set time during enrollment, the process is canceled.
Mask Detection
Activate the Mask Detection option to configure mask detection.
-
Mask Detect Level: Select mask detection sensitivity.
-
If Mask Detection Fails
-
Deny Access: Users not wearing a mask are denied authentication, and a mask-non-compliance event log is recorded.
-
Allow Access After Logging: Users not wearing a mask can still authenticate, but a mask-non-compliance event log is recorded.
-
-
Mask Check
-
After Access: After authentication, check mask usage or measure temperature.
-
Before Access: Check mask usage or measure temperature before authentication. In this case, users not wearing a mask or exceeding the threshold temperature cannot authenticate.
-
Without Access: Use the device only to check mask usage or measure temperature. Users wearing a mask or having a temperature below the threshold can enter regardless of authentication.
-
-
Authenticate QR or Barcode with Device Camera: Set whether to allow QR/barcode authentication via the device's camera.
-
Authenticate Card Number with QR: Set authentication to accept a QR code containing the same data as the CSN card or Wiegand card issued to the user. This feature is available when the Authenticate QR or Barcode with Device Camera option is enabled.
When using non-face credentials, the timing of "before" and "after" is usually important.
T&A (Time & Attendance, T&A)
When this feature is enabled, T&A Event is logged in Event Log and used in T&A Report.
-
Use T&A: Click the toggle switch to turn attendance management on or off.
-
T&A Mode: Select the desired attendance mode.
- By Schedule: Attendance events change automatically according to the set schedule. You can select a schedule to apply to attendance events.
-
Fixed: Only the selected attendance event is available.
-
Mobile: When presenting a mobile credential, the Suprema Pass app lets the user select the attendance event.
For more information on configuring time and attendance, see Time & Attendance (T&A).
Wiegand Output
This feature integrates with external systems (e.g., alarm panels). Activate the Use Wiegand Output option to use this feature.
-
Output Mode: Configure the Wiegand signal output mode.
-
Regular: Scan cards using the configured Wiegand format.
- Use Fail Code: You can set error codes and choose the value to send when Wiegand card authentication fails.
-
Bypass: Send the CSN regardless of Wiegand authentication. Set this if you are using it as a device without door control functionality.
-
-
Output Info: Select the information output during authentication.
-
Pulse Width: Set the pulse width for the Wiegand signal.
-
Pulse Interval: Set the pulse interval for the Wiegand signal.
-
Mobile Consecutive Tag: Tag mobile cards consecutively without wait time.
-
Consecutive Tag Limit: Set the maximum number of consecutive mobile card tags.
The Mobile Consecutive Tag feature is supported in Suprema Pass app 2.9.0 or later.
Sensitivity
Adjust the RSSI value to set how close the mobile device must be to unlock the door.
-
Lower values help block unintended activation.
-
Higher values improve detection in high-interference environments.
To reset the settings, click Reset.
BioStation 3
Detail
The Detail section provides basic information — such as the device name, model, serial number, and firmware version — and includes an action menu for controlling features and default settings.
Basic Information
View the device's basic information. This information cannot be edited.
-
Product: The product name.
-
Model Name: The device's model name.
-
Serial Number: The device's serial number.
-
Firmware Version: The firmware version installed on the device.
Actions
The Action feature lets you control the device's functions.
-
Update Firmware: Update the device firmware to the latest version.
-
Reboot: Reboot the device remotely when an issue or anomaly occurs.
-
Device Reset: Initialize all settings stored on the device. This action deletes all settings and data on the device.
-
Device Reset Excluding Network: Initialize all settings except the network settings. This action deletes all settings and data but keeps the network settings.
Initial Settings
Modify the device's default settings.
-
Nickname: The alias shown in the device list and logs. You can edit this field directly.
-
Timezone: Set the device time zone to keep logs consistent when the site and device clocks differ. Activate the Use DST option to apply daylight saving time (DST).
- Hands-Free: Extend the BLE range.
Card
In the Card section, you can modify card authentication settings.
NFC/RF Card
-
NFC/RF Card: Click the toggle switch to enable or disable card access authentication. Select the card types supported for card authentication.
- EM4100 (125 KHz)
- Mifare Classic/Mifare DESFire/FeliCa
-
Byte Order
-
MSB: Processes card data in order from large byte units to small byte units, sequentially storing the card serial number (CSN) from left to right.
-
LSB: Processes card data in order from small byte units to large byte units, storing the card serial number (CSN).
-
-
Data Reading Method: Select CSN (default) or Wiegand format.
Wiegand supports 5 default formats. Add more formats in Settings → Card Format. For more information about custom card format settings, see Custom Wiegand card format.
Proprietary Cards
For Wiegand cards, you can select iClass (SE / SEOS) and HID Prox. Click the toggle to enable the feature, then select the desired card format in Proprietary Cards.
-
Support may vary by device.
-
Wiegand supports 5 default formats. Add more formats in Settings → Card Format. For more information about custom card format settings, see Custom Wiegand card format.
Network
Modify the device's network settings.
-
Use DHCP: Configure the device to obtain an IP address automatically.
To set the network manually, disable Use DHCP and fill in the following fields.
- IP Address
- Gateway
- DNS Address
- Subnet Mask
Authentication
- Auth Mode: Add authentication methods. Click Add to add an authentication method. You can choose a combination of RF card, face, ID, and PIN for authentication.
-
Display User Name / Display User ID: Choose whether to show the user name or ID on the authentication screen. Select Hidden to hide them.
-
Auth Timeout: Authentication fails if the credential is not authenticated within the set time.
You can configure different authentication methods for the selected schedule. For example, you can allow card-only authentication during work hours and allow card-and-PIN authentication outside work hours.
Face
Security
-
Fake Detection: Prevent user authentication with spoofed faces such as photos.
-
Duplicate Check: Check for duplicate registrations when enrolling facea.
Detection
-
Motion Sensor Sensitivity: Set the sensitivity for detecting movement around the device.
-
Maximum Head Pose Angle: Set the maximum rotation angle allowed for a face.
-
Wide Search: Expand the area in the camera view where faces are recognized.
-
Detection Distance (cm): Set the minimum and maximum recognition distance.
-
Enrollment Time (sec): If a face is not enrolled within the set time during enrollment, the process is canceled.
Mask Detection
Activate the Mask Detection option to configure mask detection.
-
Mask Detect Level: Select mask detection sensitivity.
-
If Mask Detection Fails
-
Deny Access: Users not wearing a mask are denied authentication, and a mask-non-compliance event log is recorded.
-
Allow Access After Logging: Users not wearing a mask can still authenticate, but a mask-non-compliance event log is recorded.
-
-
Mask Check
-
After Access: After authentication, check mask usage or measure temperature.
-
Before Access: Check mask usage or measure temperature before authentication. In this case, users not wearing a mask or exceeding the threshold temperature cannot authenticate.
-
Without Access: Use the device only to check mask usage or measure temperature. Users wearing a mask or having a temperature below the threshold can enter regardless of authentication.
-
-
Authenticate QR or Barcode with Device Camera: Set whether to allow QR/barcode authentication via the device's camera.
-
Authenticate Card Number with QR: Set authentication to accept a QR code containing the same data as the CSN card or Wiegand card issued to the user. This feature is available when the Authenticate QR or Barcode with Device Camera option is enabled.
When using non-face credentials, the timing of "before" and "after" is usually important.
T&A (Time & Attendance, T&A)
When this feature is enabled, T&A Event is logged in Event Log and used in T&A Report.
-
Use T&A: Click the toggle switch to turn attendance management on or off.
-
T&A Mode: Select the desired attendance mode.
- User Selects: When the attendance key appears on the screen, the user selects the attendance event during authentication.
- By Schedule: Attendance events change automatically according to the set schedule. You can select a schedule to apply to attendance events.
- Last Choice: The user continues to use the last selected attendance event.
-
Fixed: Only the selected attendance event is available.
-
Mobile: When presenting a mobile credential, the Suprema Pass app lets the user select the attendance event.
For more information on configuring time and attendance, see Time & Attendance (T&A).
Display & Sound
Display
-
Use Screensaver: Reduce LCD brightness when the device is not in use to lower unnecessary power consumption.
-
Always On Backlight: Keep the backlight always on or dim it after inactivity.
-
Backlight Timeout: Set the time before the backlight turns off automatically.
-
Language: Set the language shown on the device screen.
-
Home Screen: Configure the items displayed on the device’s home screen background.
-
Normal: Display the default image on the home screen.
-
Logo: Display a user-registered image on the home screen.
-
Notice: Display administrator input on the home screen.
After clicking Update and saving, the image or notice no longer appears in the edit screen but remains on the device.
-
Sound
-
Use Voice Instruction: Use voice guidance instead of notification tones.
-
Device Volume: Adjust the volume of sounds generated by the device.
-
Intercom Speaker Volume / Intercom Microphone Volume: Adjust the output or input volume when using the IP intercom feature.
Wiegand Output
This feature integrates with external systems (e.g., alarm panels). Activate the Use Wiegand Output option to use this feature.
-
Output Mode: Configure the Wiegand signal output mode.
-
Regular: Scan cards using the configured Wiegand format.
- Use Fail Code: You can set error codes and choose the value to send when Wiegand card authentication fails.
-
Bypass: Send the CSN regardless of Wiegand authentication. Set this if you are using it as a device without door control functionality.
-
-
Output Info: Select the information output during authentication.
-
Pulse Width: Set the pulse width for the Wiegand signal.
-
Pulse Interval: Set the pulse interval for the Wiegand signal.
-
Mobile Consecutive Tag: Tag mobile cards consecutively without wait time.
-
Consecutive Tag Limit: Set the maximum number of consecutive mobile card tags.
The Mobile Consecutive Tag feature is supported in Suprema Pass app 2.9.0 or later.
Intercom
-
Use Intercom: Activate or deactivate the IP intercom feature.
-
SIP Server Transport: Choose the SIP transport method when configuring the intercom’s SIP server.
-
SIP Server Address: Enter the SIP server address.
-
SIP Server Port: Enter the SIP server port.
-
Registration Duration: Enter the registration duration. The device attempts to register with the SIP server every time the registration duration expires.
-
SIP Username: Enter the SIP account username.
-
Password: Enter the SIP account password.
-
Authorization ID: Enter the SIP account authorization ID.
-
Outbound Proxy Server: Use a separate outbound proxy server for SIP services if required.
-
Extension Number: Add or edit extension numbers.
-
Video Resolution: Select the video resolution when using the intercom.
-
Open Door Button: Specify a button to unlock the door during a call.
Secure Tamper
If a tamper event occurs, configure the device to delete all user information, all logs, and security keys stored on the device.
RTSP
Configure details for Real Time Streaming Protocol (RTSP) streaming. The device's camera can stream live video.
-
Use RTSP: Turn RTSP streaming on or off.
-
Address: RTSP server address.
-
Port: Enter the RTSP server port.
-
ID / Password: Enter the RTSP server ID and password.
-
RTSP Video Resolution: Select the video resolution when using RTSP.
The RTSP streaming feature is supported only on BioStation 3.
Sensitivity
Adjust the RSSI value to set how close the mobile device must be to unlock the door.
-
Lower values help block unintended activation.
-
Higher values improve detection in high-interference environments.
To reset the settings, click Reset.