Use Device Management Feature
This guide explains how to use additional features of BioStar X. It provides options for reconnecting the device, synchronization, batch information editing, and deleting the device.
Manage a Single Device
Use the following steps to manage a single device.
-
Click Settings on the Launcher page.
-
Click Device in the left sidebar.
-
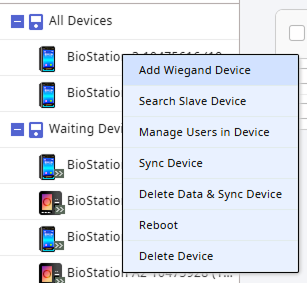
Select the device from the All Devices list and right-click. Or, click the checkbox for the device you want in the device list.
-
Select the desired action from the pop-up menu or from the top of the device list.
Refer to the features below. The features provided may vary depending on the device.
-
Reconnect: Reconnect the selected device. This option is available when one device is selected. Use this feature when the connection to BioStar X is lost.
InfoThis feature is not supported by devices connected with the Device ▶ Server Connection option. For more information on registering devices, see Register Device.
-
Sync Device: Synchronize all user information registered on the device with BioStar X. This synchronization is based on the BioStar X database, and user information registered only on the device will be deleted. Use the Manage Users in Device feature to upload user information to BioStar X.
-
Delete Data & Sync Device: Delete all setting information and user information stored on the device and resend it. This feature can also be accessed by selecting the device from the list and clicking the button.
-
Manage Users in Device: Upload or delete user information registered on the device in BioStar X. For more information, see Manage Users Registered on Device.
-
Firmware Upgrade: Easily upgrade the device firmware. For more information, see Upgrade Firmware.
-
Reboot: Restart the selected device. Use this feature when the device is not operating normally.
-
Delete Device: Delete the selected device from the list. Devices set as doors or zones cannot be deleted.
-
For more information on the Add Wiegand Device feature, see Register Wiegand Credentials.
-
For more information on the Search Slave Device feature, see Register Slave.
Manage Multiple Devices
Use the following steps to manage one or more devices.
-
Click Settings on the Launcher page.
-
Click Device in the left sidebar.
-
Click the checkbox for the device you want in the device list. You can select 1 or more devices.

-
Select the desired feature at the top of the device list.
Refer to the features below. The features provided may vary depending on the device.
-
Sync Device: Synchronize all user information registered on the device with BioStar X. This synchronization is based on the BioStar X database, and user information registered only on the device will be deleted.
-
Batch Edit: Batch edit information for the selected devices. Click the button to open the Device Batch Edit window.
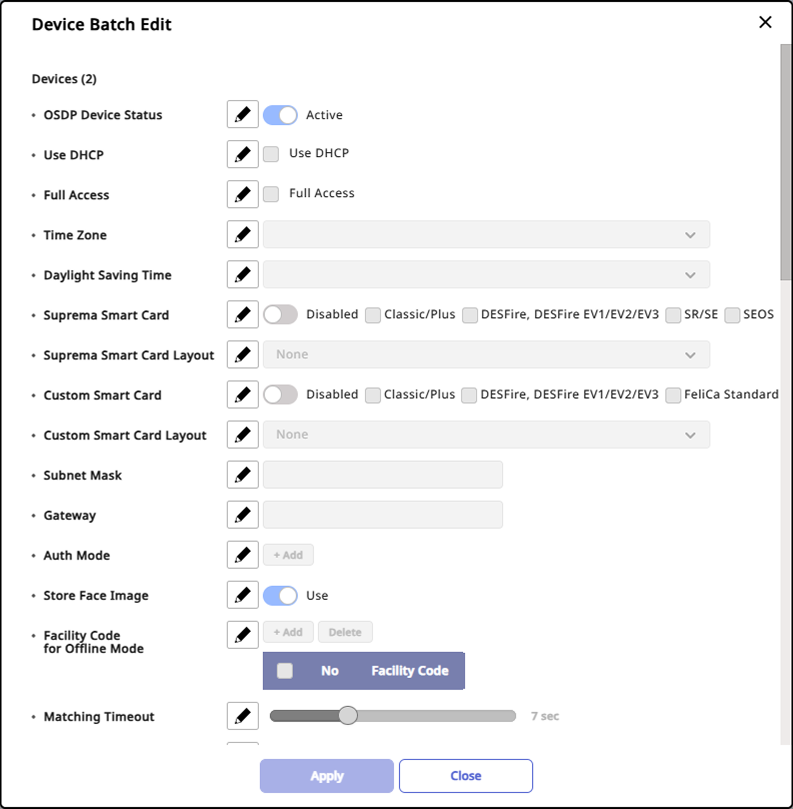 Info
Info-
The details displayed in the Device Batch Edit window may vary depending on the selected device types.
-
When selecting a master device and slave devices simultaneously for batch editing, only certain items within Authentication and Display/Sound can be modified.
-
Auth Mode can only be batch edited when devices with the same model name are selected.
-
-
Firmware Upgrade: Easily upgrade the device firmware. For more information, see Upgrade Firmware.
-
Delete Device: Delete the selected device from the list. Devices set as doors or zones cannot be deleted.
Delete Event Logs From a Device
You can delete event logs stored on the device.
-
Click Settings on the Launcher page.
-
Click Device in the left sidebar.
-
Click the checkbox for the device you want in the device list. You can select 1 or more devices.
-
Click → Delete All Event Logs in Device at the top of the device list.

-
If a warning dialog appears, review the message and click the Continue button.
When the device event log deletion is complete, a pop-up message appears. View the number of target devices, successful devices, and failed devices.
Event logs deleted from a device cannot be recovered and cannot be resent from the server to the device. Before proceeding with deletion, confirm the device event logs are stored on the server. Also, if the selected devices include slave, virtual, or Wiegand devices, those devices do not store logs and are excluded from log deletion.
-
Only users with the Administrator Role permission can use this feature.
-
View the device event log deletion history at Settings → System → Audit Trail.
Additional features
Use additional features such as printing the device list or changing column settings.
Print device list
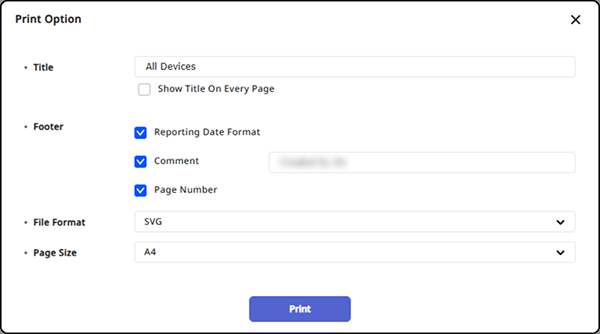
Save the device list as a PDF or SVG file for printing.
-
Click Settings on the Launcher page.
-
Click Device in the left sidebar.
-
Click at the top of the device list.
-
Click Print in the popup menu.
-
When the Print Option window appears, select your desired format in the File Format options and set the other options.
-
Click Print.
You can print the PDF or SVG file that opens through the browser.
Device List Column (Column) Settings
You can change the column (Column) settings displayed in the device list. Through column settings, you can select the columns to be displayed or change the order of the columns.
-
Click Settings on the Launcher page.
-
Click Device in the left sidebar.
-
Click at the top of the device list.
-
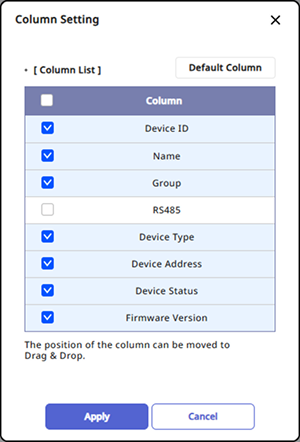
Click Column Setting in the popup menu.
-
When the Column Setting window appears, select or deselect the desired columns.
-
To change the order of the columns, click and drag the desired column to change its position.
-
Click Apply to save the settings.
To initialize the column settings, click the Default Column button.