Manage Access Groups
This guide shows how to query and manage users based on access groups. Use Access Explorer to check registered users by access group and explore the access permission hierarchy through the tree structure.
To check access doors or floors belonging to an access group in Access Explorer, you must first set up the access control feature. For more information, see Access Control Settings.
Check users by access group
-
Click User on the Launcher page.
-
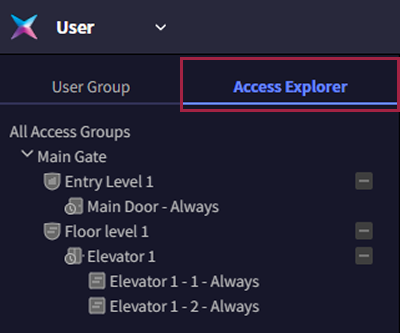
Click the Access Explorer tab in the tree structure menu.
-
Click the desired access permission group in All Access Groups.
You can view users belonging to the selected access permission group in the user list.
To expand or collapse access levels or floor levels under the access group, click or .
Learn about the tree structure
The tree structure menu is composed of the following structure.
-
Access group is the upper layer that includes access levels, floor levels, user groups, and users. You can manage access permissions through the access group. See Manage Access Groups For more information on creating access groups.
-
Access level sets the times when users can enter and grants permission to access doors during this time. See Manage Access Levels For more information on creating access levels.
-
You can manage the floors users can access via elevators through the floor level. See Manage Floor Levels For more information on creating floor levels.
-
Schedule is a feature that efficiently operates access control and attendance management by setting access and holiday schedules. See Schedule Settings For more information on registering schedules.
-
You can register elevators and manage the floors accessible via the elevators. For more information on registering an elevator, see Register Elevator.
The elevator registration feature is available through additional options for Advanced licenses and above. For more information on licensing policies, see License Policy.