Suprema - C•CURE Integration Installation
Pre-requisites
-
Software House C•CURE 9000 (version 2.90, 3.0, 3.10)
-
Suprema BioStar 2 (version 2.9.0 and later)
You must install BioStar 2 server and C•CURE 9000 Server in the SAME machine.
Considerations
-
For specific instructions on how to install and configure C•CURE 9000 or BioStar 2, please refer to the installation manual for each of these platforms.
-
If you are using MS SQL 2014 Express (a newer version is better), install the Service Pack 2 by referring to the following web page.
https://www.microsoft.com/en-us/download/details.aspx?id=53168
-
Please bear in mind that due to security reasons this integration does not support HTTP, only HTTPS (over TLS 1.2) then please make sure your BioStar 2 is set to handle HTTPS only.
-
The default value for the ports used are as follows. If another program uses the same port the pre-requisites or this integration may not work properly.
-
Suprema - C•CURE Integration
Type Port Description Port 7733 HTTPS over TLS 1.2 Port 51211 Suprema Devices -
Suprema BioStar 2 backend service
Type Port Description Port 443 HTTPS over TLS 1.2 Port 3312 When MariaDB schema is used. Port 9002 Web Socket -
C•CURE 9000 v2.9 or v3.0
Type Port Description Port 161 For collecting and organizing information about devices. Port 2901/2 iSTAR Ultra G2 GCM listening port for IP-ACM2 SSL encrypted connection with default certificate/key. Port 28014 TLS 1.3 Signed Certificate delivery port. iSTAR Ultra G2 opens the port. Host delivers the signed certificates. -
Microsoft SQL server
Type Port Description Port 1433 Or as configured.
-
-
The data is transferred under TLS 1.2 with private certificates, sensitive data (user, passwords, configurations) besides the encryption in transport layer, are stored encrypted.
-
Before Installation starts, please ENSURE that MS SQL is being configured to:
-
Allow IP connections in the desired port (1433 default), from the desired IP address (es) as shown in the following images.
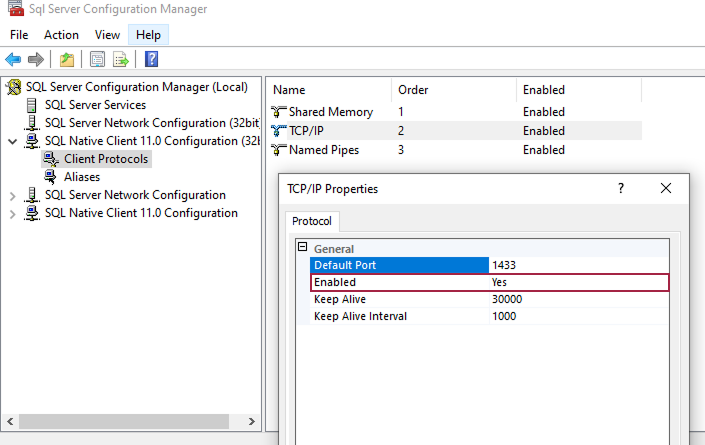
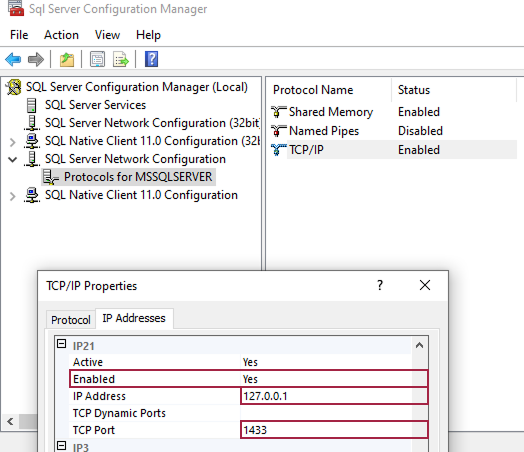
InformaciónA PC restart/reboot might be required for the new settings to take effect in MS SQL.
-
-
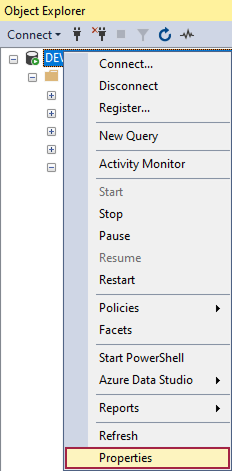
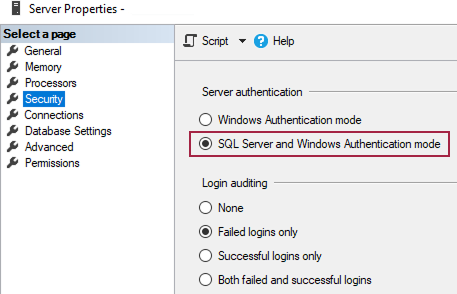
Allow SQL Authentication:
-
In the SQL Server Management Studio: Object Explorer, right click on the Server → Properties → Security → Select SQL Server and Windows Authentication mode → Apply.
-
Windows Authentication and SQL Authentication (Local and Domain based) are supported for this integration.
-
For Windows Authentication please be aware that the current Windows user account (where the integration has been installed) must have clearance to C•CURE databases, either for local or domain users. Otherwise, the Integration CT will fail to connect.
-
Please mind specific Database configurations when integrating with Active Directory, if you get any issue with the Database connection, please open a ticket to request technical support.
-
Installation Procedure
The previous BASIC version of this integration has been deprecated. Currently only the ADVANCED version is supported, a specific installer shall be provided to you depending on the integration version you may want to work with.
This guide is for the ADVANCED version.
Install Server Integration
CrossFire Services may be stopped completely before starting with this installation and start them back again after finishing it.
-
Double click on the setup program (Suprema-CCURE_Integration-v2.x.exe).
-
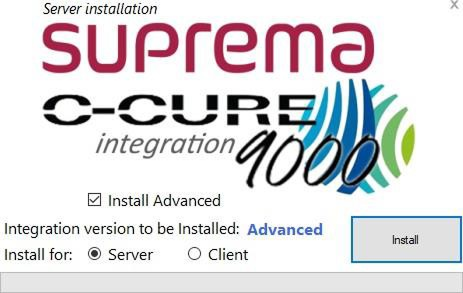
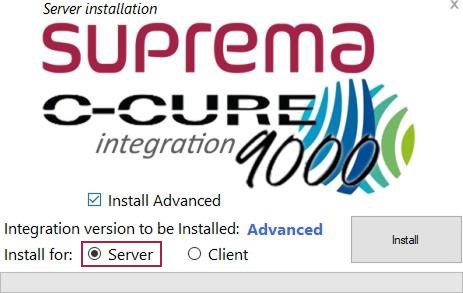
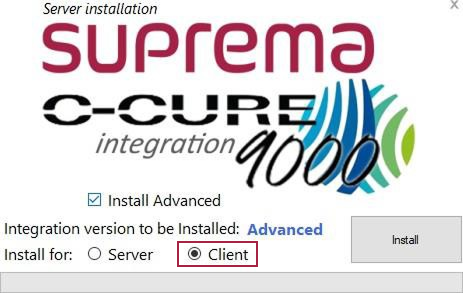
First of all, choose which version will you install:

-
Check the option for Server, then click install and it will allow you to start the Installation process for the server integration.
 Información
As this is a Stub installer you must be aware that a constant Internet connection MUST be provided.
-
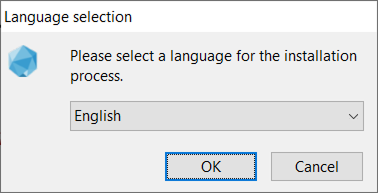
Once the download is finished it will show you the following. Select a language and click OK.
-
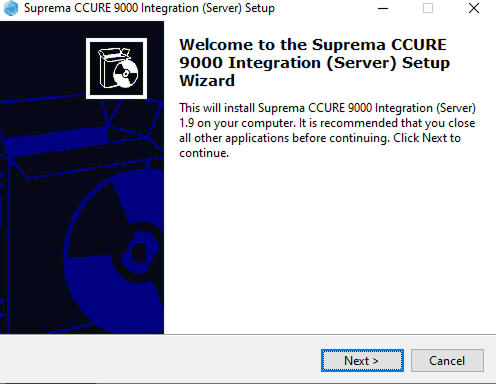
The wizard will guide you through the installation process.
-
To continue with the installation, accept the license agreement, and click Next.
-
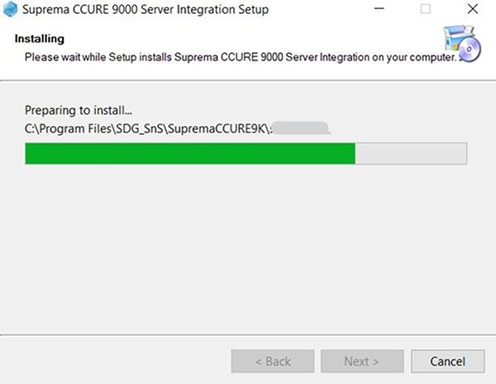
You will observe the Setup performing the installation process.
-
The Integration Installer may show a couple of CMD windows while showing the setup message:

-
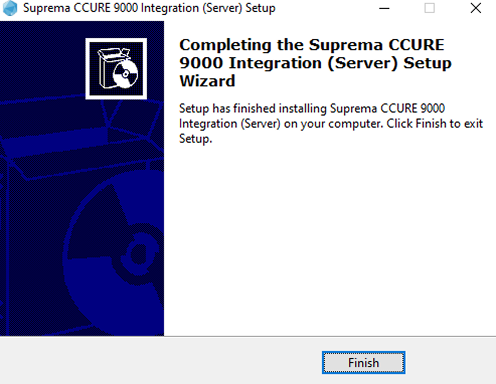
Once the installation has finished, the setup will show.
-
A system restart may be needed after the installation.
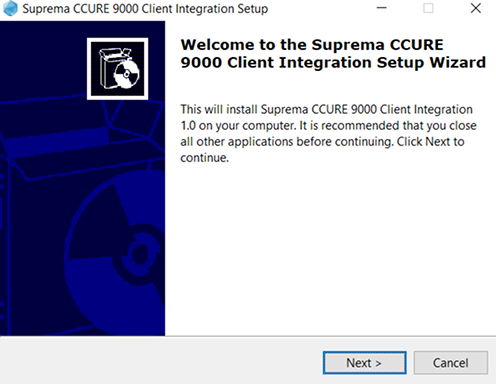
Install Client Integration
All Administrator Workstation and Monitoring Station instances must be closed before starting with this installation.
-
Double click on the setup program (Suprema-CCURE_Integration-v2.x.exe).
-
First of all, choose which version will you install:
-
Check the option for Client, then click install and it will allow you to start the Installation process for the client integration.
 Información
As this is a Stub installer you must be aware that a constant Internet connection MUST be provided.
-
Once the download is finished it will show you the following. Select a language and click OK.
-
The wizard will guide you through the installation process.
-
To continue with the installation, accept the license agreement, and click Next.
-
The Integration Installer may show a couple of CMD windows while showing the setup message:
-
Close the window once the setup has finished.
-
You MUST ensure that the PC has internet access throughout the installation.
-
Make sure you turn off the anti-virus during the installation as sometimes it blocks the installation process.
-
The Suprema - C•CURE Integration Server setup must be installed in the same PC where C•CURE server and BioStar 2 server are installed.
Login
The Suprema - C•CURE Integration Configuration Tool is a web-based tool which you can access from anywhere in your Network as long as you have access to the machine where it was installed.
Through this Configuration Tool you can adjust many settings from this integration.
First run
-
Run your web browser.
We recommend Brave Browser, Microsoft Edge, or Google Chrome browser.
-
The Suprema - C•CURE Integration Configuration Tool can be accessed by:
https://BioStar 2_server_IP_or_Domain_Name:PORT/modules/SupremaCCURE/index.html
Where the PORT should be the same as in the BioStar 2 Server configuration. You can find the appropriate port by checking the BioStar 2 Settings app from the Start Menu on the PC where you’ve installed Both C•CURE 9000 Server and BioStar 2 Server.
InformaciónTroubles finding the IP address or domain name? Please refer to the Troubleshooting section.
-
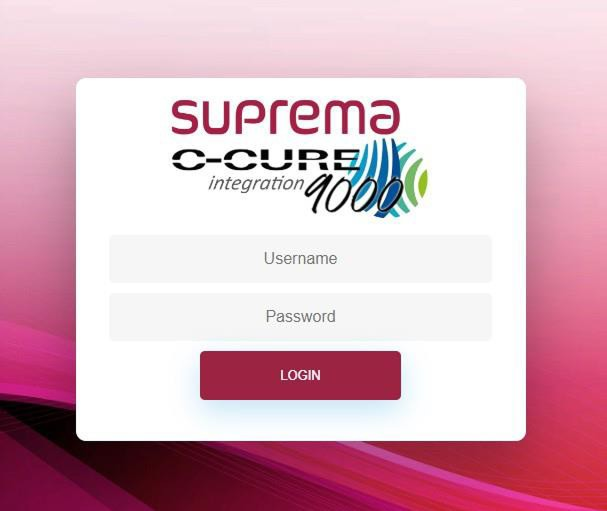
You shall login with the Suprema Administrator credentials, the administrator account ID is admin and the password is the one you configured when installing BioStar 2 server.
-
When you log in for the first time, you may see the "Not secure" warning in screen, this is because private (auto signed) certificates are used, please click OK and you’ll see the following login screen.
If right after the previous screen shows, the following notice shows:
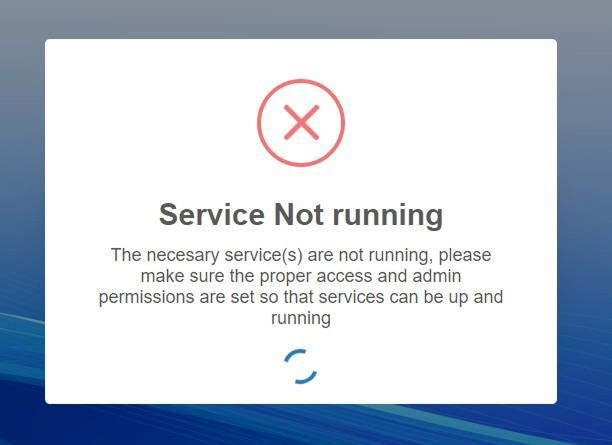
Please go to the troubleshooting section: what to do when the Service Not running notice shows in the Integration CT.
-
In the first run or when you do not have a valid license in the system, you will see the following notice on your screen:
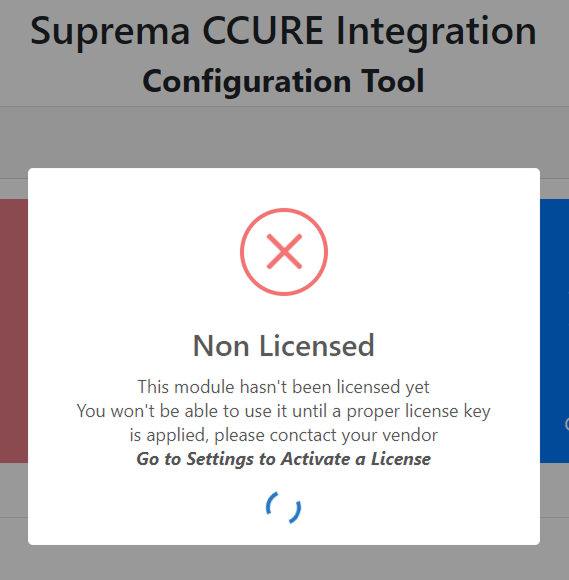
-
The Integration Configuration Tool shall show a warning message saying you need to go to System Settings.
-
Once in the System Settings you will be able to activate your license(s).
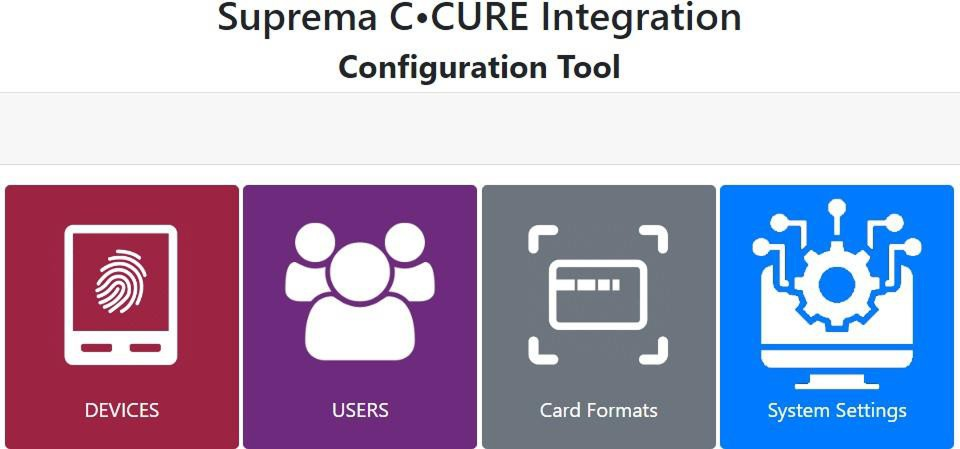
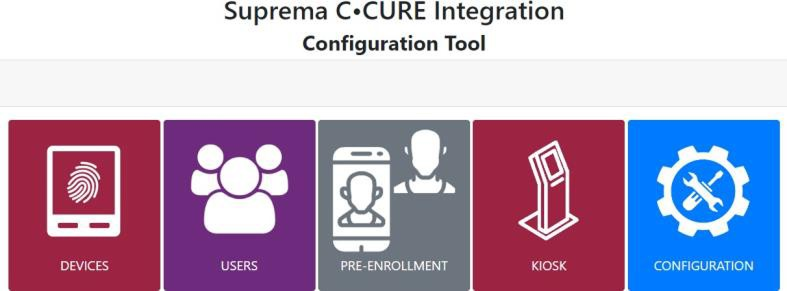
Main Menu
The following menu will be shown:
Adding Devices
After you perform the physical connections between your iStar Controller and the Suprema Devices, you can add the devices to the platform using the ADD DEVICES menu from the Suprema - C•CURE Integration Configuration Tool.
Allows you to add or delete new devices to the system. Once selected, click the Add/Update button. Currently added Devices will appear on the left column (if any).
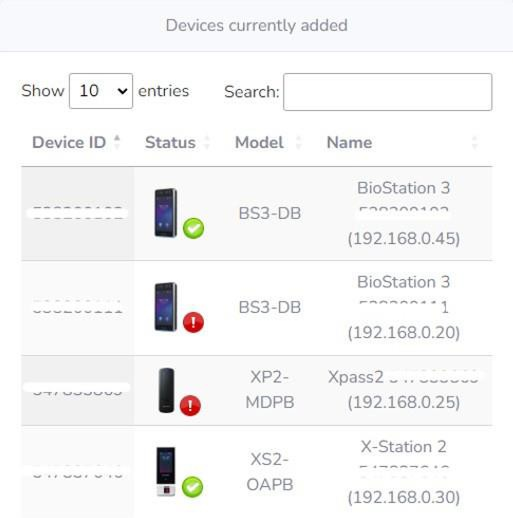
Right next to the device icon you’ll see the device status, if green means the devices is online and well, if red the device is not online.
You will also visualize the Device ID, specific model, and the name with which was registered.
If you want to add more devices, you can refer to the column on the right side of your screen:

After clicking the Search button.

The results may appear as shown in the following image.
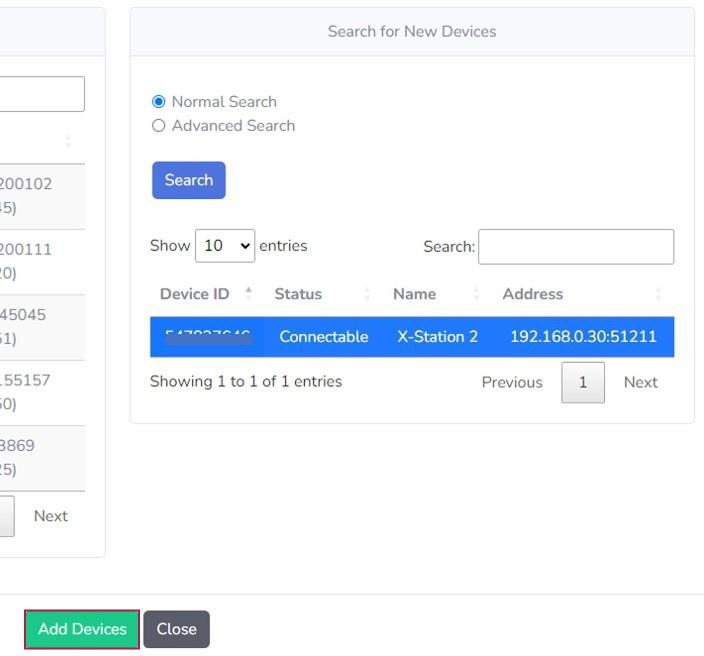
Please click the devices you may want to add to the platform and click the Add Devices button to perform the action.
Now, the Normal search will perform a UDP search for Suprema devices on your network, while the Advanced Search:
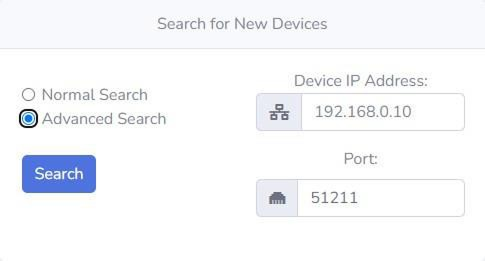
Will perform a TCP Search to a specific pair of IP address and Port to locate one device at a time.
The results will appear in your screen.
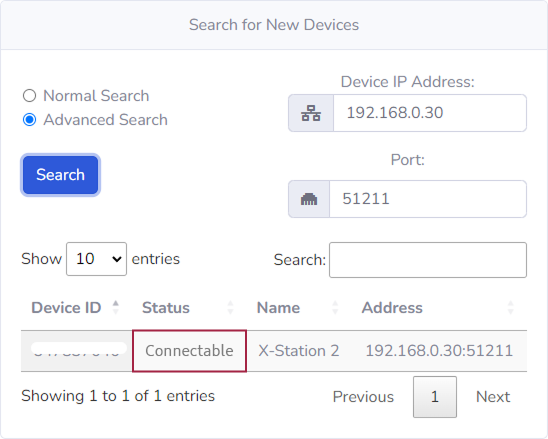
Similarly, as the previous case with the Normal Search, once you select at least one device the Add Devices button will enable and let you perform the action.
After you add at least one device and those added devices are properly configured against the iStar Panel you will be able to add Biometrics to the users from C•CURE 9000 v2.90, v3.0, v3.10.
-
Please note that your Suprema devices must be properly licensed before adding them to the integration. If they are not licensed, you will not be able to add or to work with them.
-
If you have any questions about device licenses, please refer yourself to the QnA section at the end of this document.
Massive Operations with the Suprema - C•CURE Integration
These operations are available for your convenience as a way to cold-start with the Integration if you have an system with a number of existing users and credentials under CCURE.
Users Sync
The Users Menu is available in the Integration Configuration Tool’s Main Menu:
You can use this Feature to batch sync All users from CCURE 9000 into Suprema Devices, once you click the menu you will see the following:
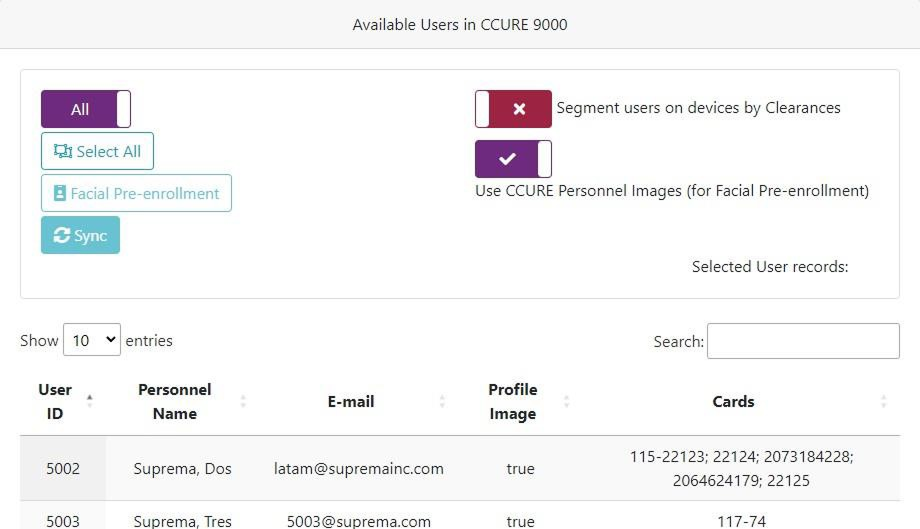
The available options:
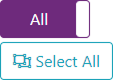
Will allow you to select ALL users or if you click the All switch button it will change to:

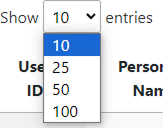
That is, to select all users in the current page, that will depend on whether you have set the interface to show 10, 25, 50 or 100 entries at a time as displayed in the following image:
For either option you select, once you click the Select button, you will see the users record to get automatically selected and the Selected User records will automatically show how many users have already been selected:

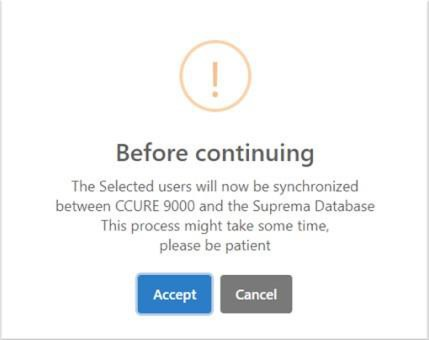
After you have selected the amount of users you want to sync massively, go ahead and click the  button, the following notice will be displayed.
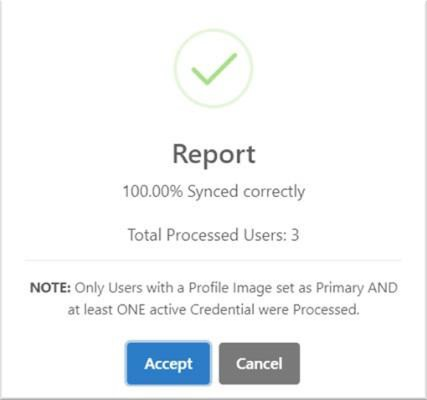
Once the process finishes you will see a notice like:
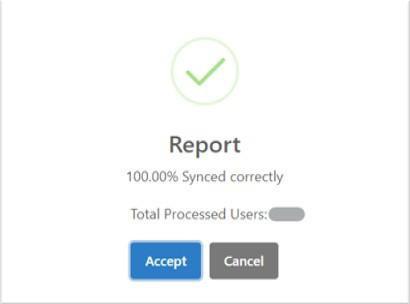
Reporting back to you the results of the operation, showing as well, the amount of successfully processed users, and in case of existing an error with any users the report also will allow you to download a list of the users with error to easy the troubleshooting process.
The following options:

The first option as its name states: allows you to make an automatic segmentation of Users depending on the C•CURE Clearances, when you click to activate the option, it will show the following notice:

There is a guide included in the this configuration GUIDE link provided. Therefore, please mind the careful reading of such guide prior applying such change in the users to devices sync process.
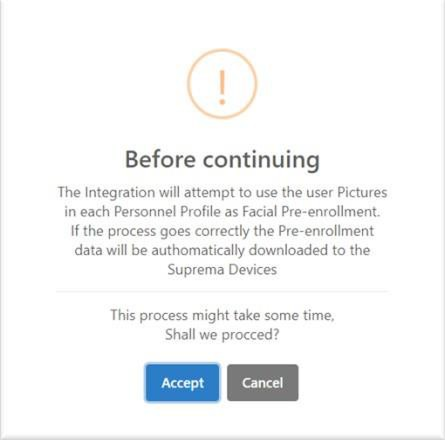
The second option as partially covered in previous section will allow you to Use the C•CURE Personnel Images for Pre-enrollment of Facial Credentials.
In this menu it will activate the option and will activate the option of carrying out this feature at your demand.
Then, please follow the same previously explained procedure to select the users you want to include in the process and then click the  button, please beware that only uses with a profile Image in C•CURE will be processed.
The following notice will be shown asking you to confirm before continuing:
As in the previous feature, this process will finish with a report:
Please bear in mind that before starting this option, you need to Sync the users. Unless you are sure that the selected users have already been synced to the Suprema devices.
The GUI will show you how many users have retrieved from CCURE, for example:

Please bear in mind that the amount shown in here may differ from the number of users shown in C•CURE as the integration will only retrieve user that are:
-
Not disabled.
-
Have at least ONE active credential, i.e., those credentials that have not set as lost, expired, disabled, revoked, etc.
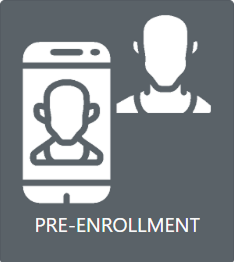
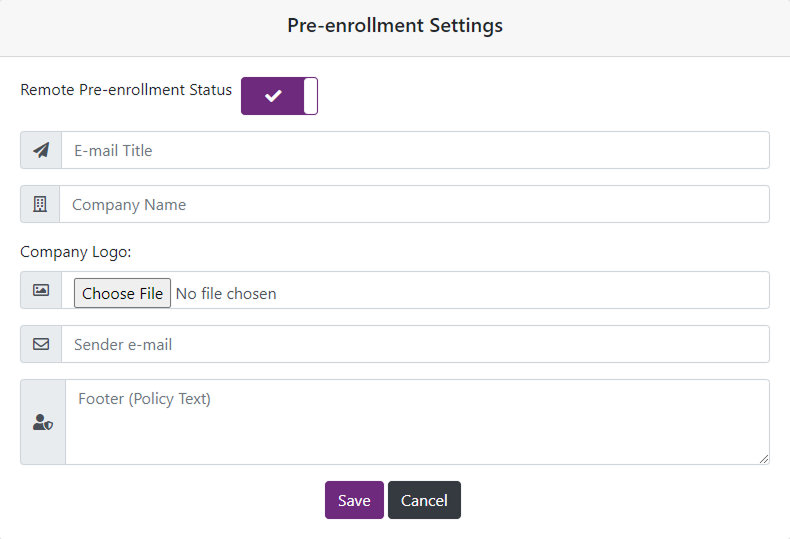
Pre-Enrollment
The Pre-Enrollment Menu is available in the Integration Configuration Tool:
The Data shown in this dialog will allow you to select individually or massively send an E-mail to users to enable Facial Biometrics Pre-Enrollment from their mobile devices.
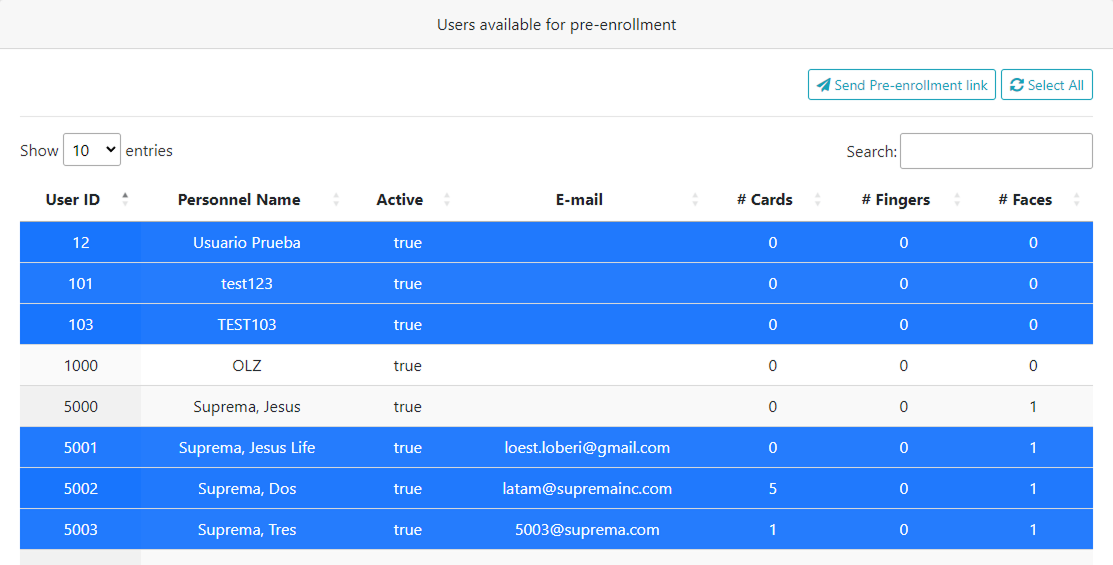
Please be aware that although you select a user if the selected user(s) doesn’t have an email address already set in their profiles, they will not be included in the process.
This feature also validates that all needed pre-requisite settings have been already configured, if not it will show you a feedback window for you to know what you still need to configure prior sending the Pre-enrollment links, for example:
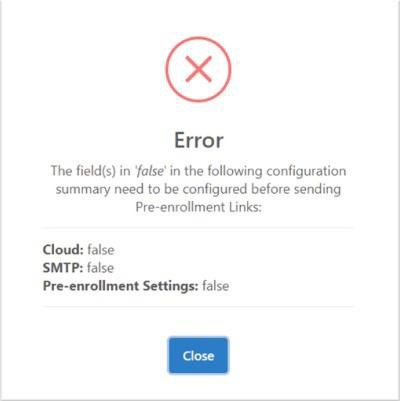
With this feedback you can direct yourself to the specific setting and revise your configuration, after you do that, you can select the  button once again and the process will flow correctly.
After the process have finished you will be able to receive an email as the one show below:
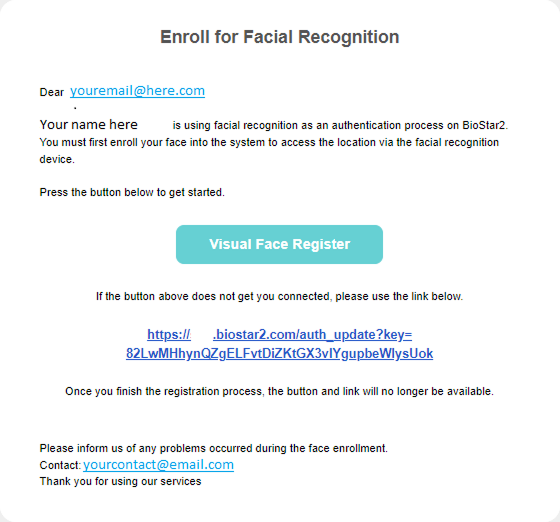
You should follow the instructions given in the URL shown in the email message, and once it is done your pre-enrollment facial credential will be ready the first time you step in front of any supported Suprema device.
Further available settings for configuration
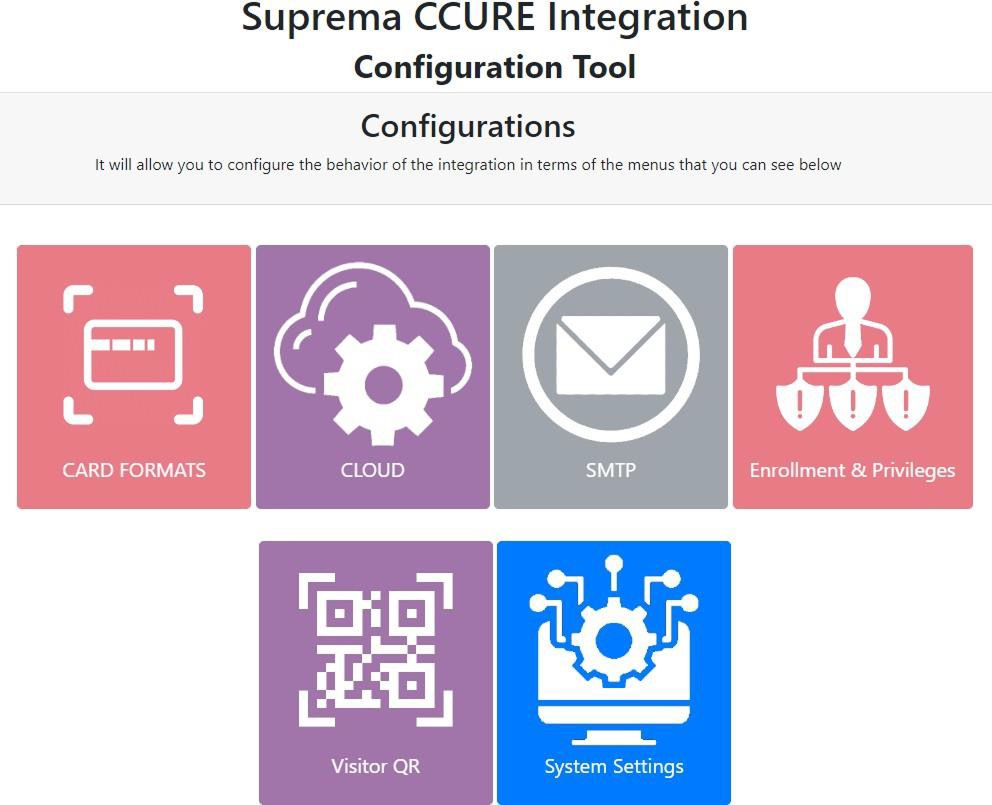
After you click on the Configuration Menu:

The following settings will be shown:
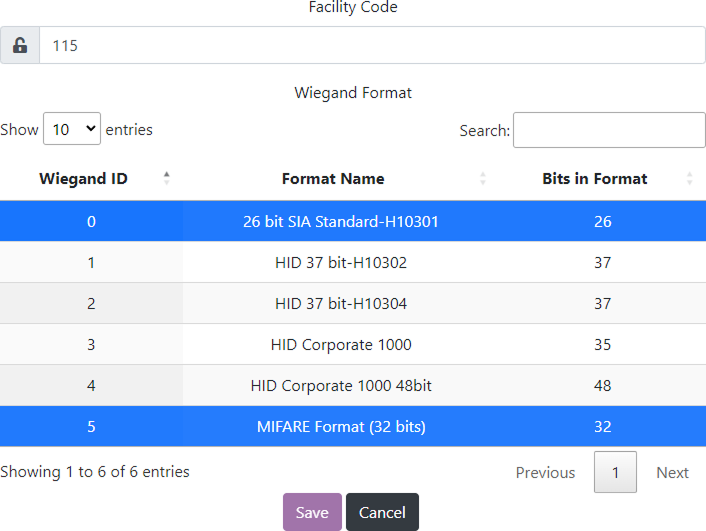
Card Formats
-
Allows you to configure a Global Facility Code.
-
Select and set Wiegand formats to configure the interface between the iStar panel and the Suprema Devices.
-
Be advised that if your site has more than one Facility Code, each and every one of the cards under the Credentials tab in the Personnel View MUST have their own Facility Code. Otherwise the synchronization may behave unexpectedly.
Cloud
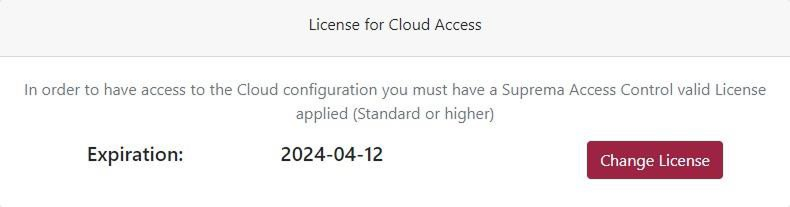
Allows you to validate a Suprema AC license so that you can made use of the Suprema Cloud functionality.
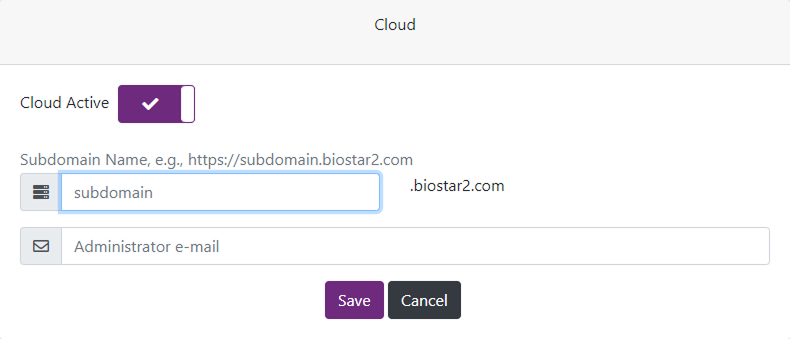
Once the license is validated you will be able to configure a subdomain name for your server.
SMTP
Will enable you to set-up the SMTP access for your server so that you can make use of the pre-enrollment feature (both individual and massive).
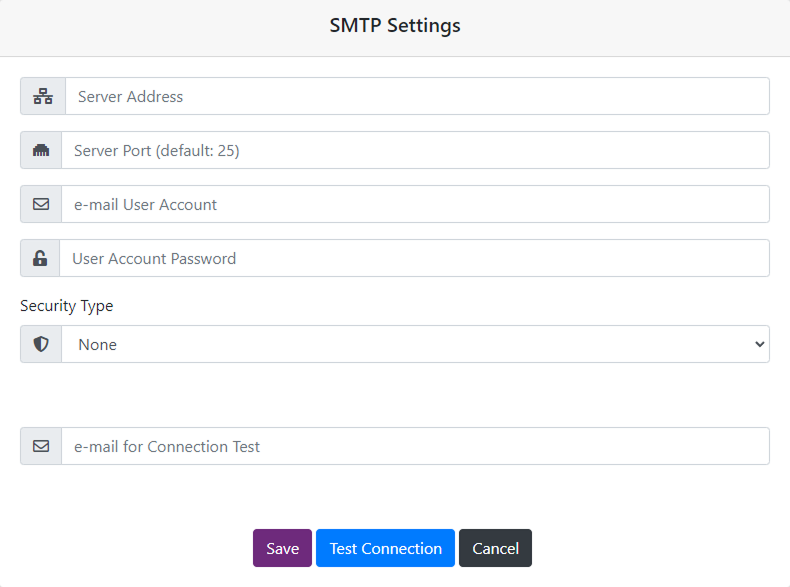
It also gives you the ability to customize the mail that is going to be sent to your customers or users.
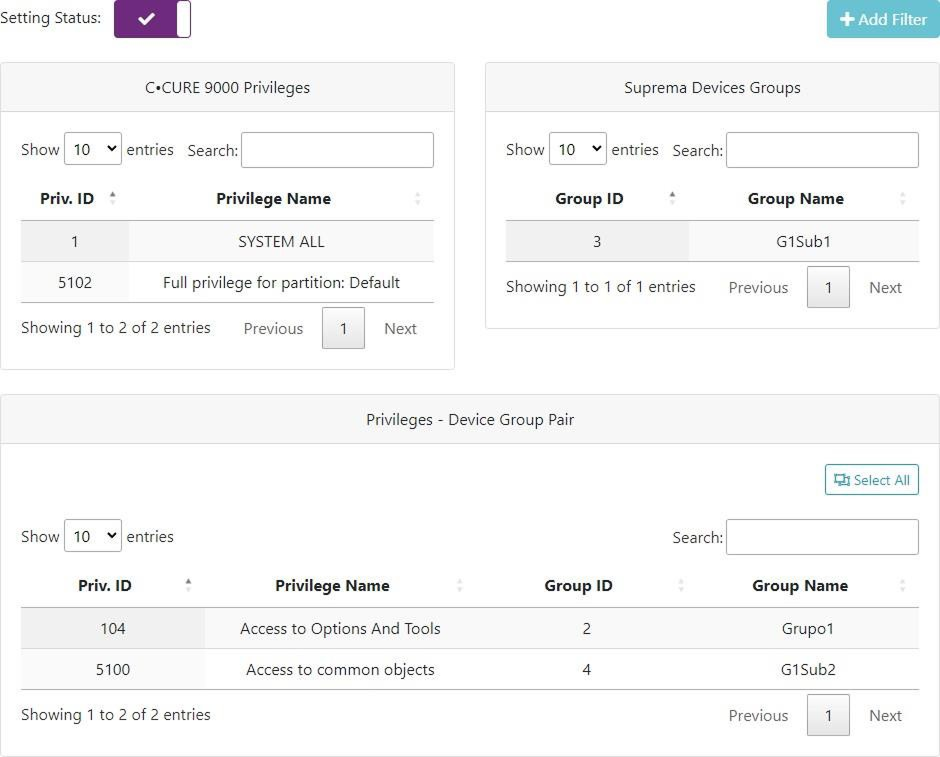
Enrollment and Privileges
This menu will enable you to create filters for the enrolling devices available for specific operators according to their respective assigned privileges.
Therefore, if the operator logged into C•CURE does not have any required privilege for enrolling biometrics, no device will appear available to enroll biometrics for users.
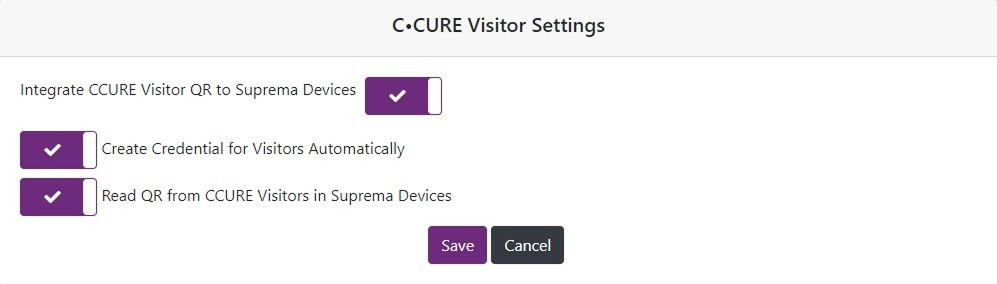
Visitor QR
This menu enables you to use the C•CURE Visitor QR as a Access Control credential, that is, when you create a visitor user from C•CURE Portal and send the visitor QR to each visit you are planning to host in your facility this Integration will take care of generating the proper credentials with the exact validity as you selected in the visit period.
Suprema Devices require a License validation to enable this feature.
System Settings
You have two options for finding the System Settings. The first one and more direct one is going to the upper navigation bar menu  . The second one is going first to Configuration from the main Menu:

Once you are in the System Settings you may configure the following:
-
A valid license.
-
Suprema’s Credentials (user and password).
-
C•CURE 9000 Connection Credentials.
-
Other settings.
Before applying the license, all settings will be disabled until you validate the license.
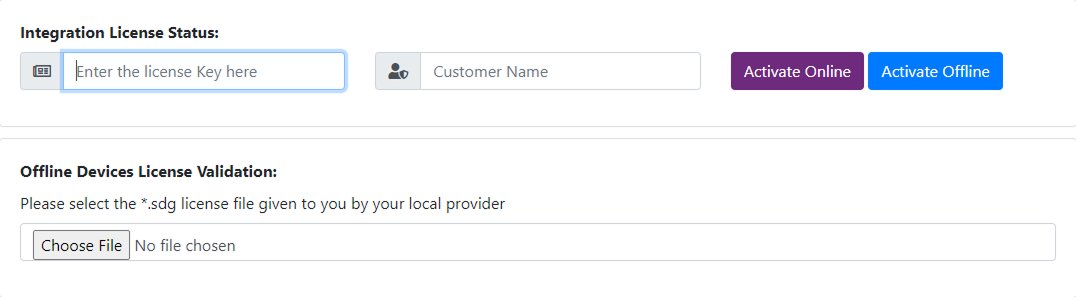
With the Advanced license you will have the option to activate your license offline, if you have a basic license the activation will be performed online only.
As you can see in the previous image with an Advanced license you will also have the feature available of validating Devices licenses offline.
In this menu you will also see:

This menu will allow you to validate or to activate other types of Server licenses as in the case of the Autoenrollment Kiosk, for example.
If you are performing a Server offline license validation:
-
You must enter first your license key and name and then click the Activate Offline button.

-
Follow the first step in getting the
*.reqfile and send it to your sales representative. -
Once you get the license file you may go to step number 2.
After applying the license

After applying the license, the other settings will be enabled.
-
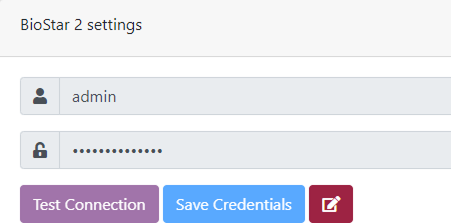
BioStar 2 settings
-
You shall use an administrator type account for the integration to work properly.
-
After you type the admin account and its password, click Test Connection.
-
If the connection is successful, the Save Credentials button will unblock.
-
The Edit button will allow you to modify the credentials in case you need.
-
-
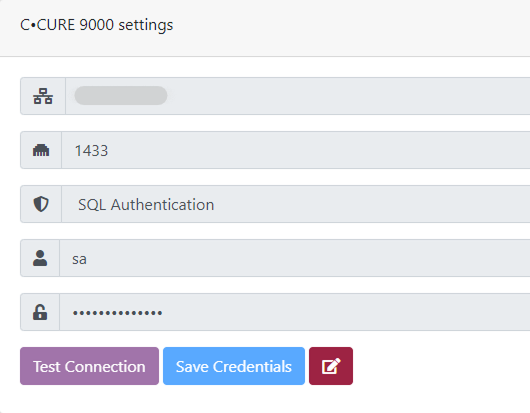
C•CURE 9000 settings
-
In the host field you should enter the IP address or Domain name where the database is installed.
Example: LOCALHOST\SQLSERVER
-
SQL Server port.
-
SQL Authentication or Windows Authentication.
-
SQL User and password for the SQL Auth used.
-
-
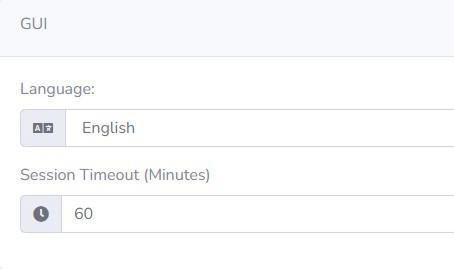
GUI
-
The Integration Configuration Tool is offered in English and Spanish.
-
Session Timeout is the time for the GUI auto logout (to avoid any unauthorized access).
-
Autoenrollment Kiosk
Once you activate a server license for this feature, the following menu will appear in the integration’s main menu.
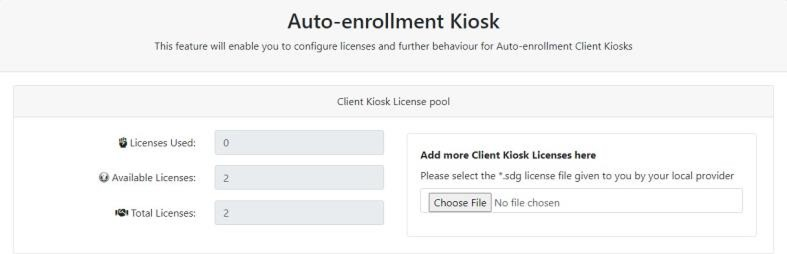
The previous information is only valid for an Advanced version of this integration.
For more information on how to use the Autoenrollment Kiosk, please refer to the specific user guide and installation manual related to it.