Configuration
Gallagher Command Center Configuration
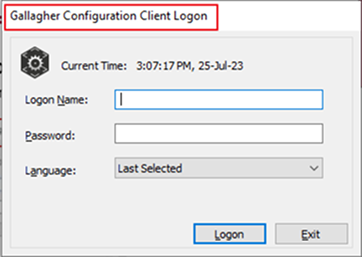
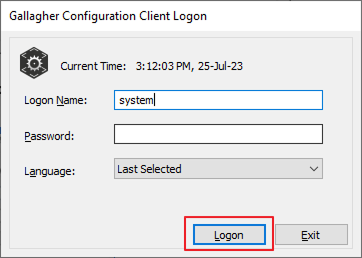
Gallagher Configuration Client Logon
-
Click The Start Menu & Open Configuration Client.
-
Set Logon Name as system password will be none and press the Logon button.
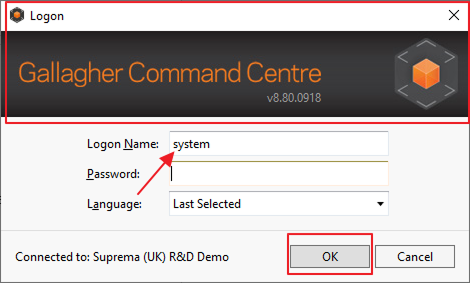
Gallagher Command Centre
Process to generate Gallagher API Key.
-
Open Gallagher Command Centre, set the Logon name as a system, and press the OK button.
-
Set Logon Name as a system and set the password for Gallagher Command Centre and press OK.
-
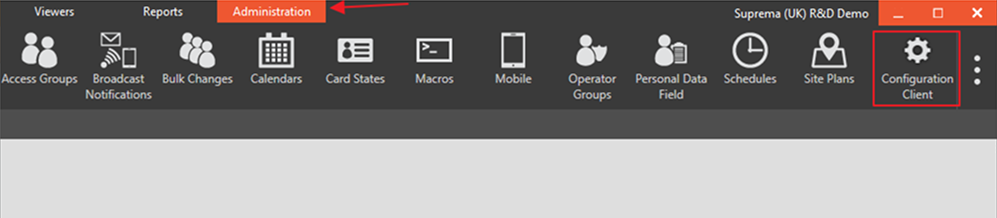
Now, go to Administration from the top left corner and select Configuration Client, the window will be open.
-
The below tab will be open.

-
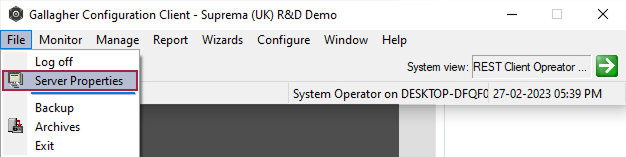
To configure server properties, Select File → Server Properties.
-
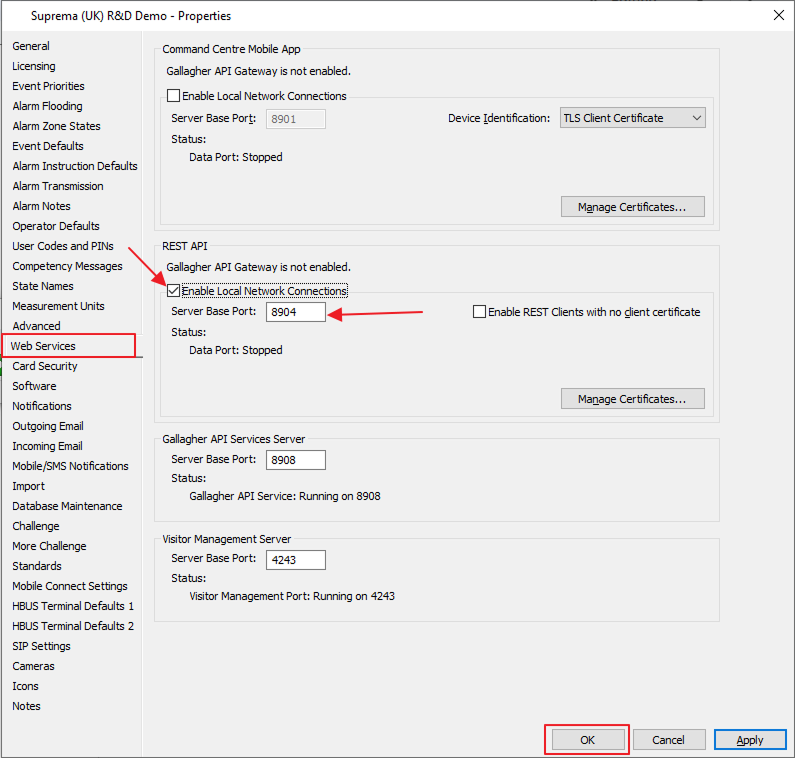
The new window will open, now go to Web Services, in the REST API section, enable local network connection, set the server port as 8904, uncheck the Enable REST client with no client certificate, and press the OK button.
-
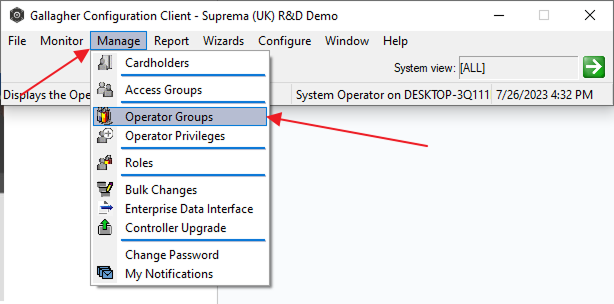
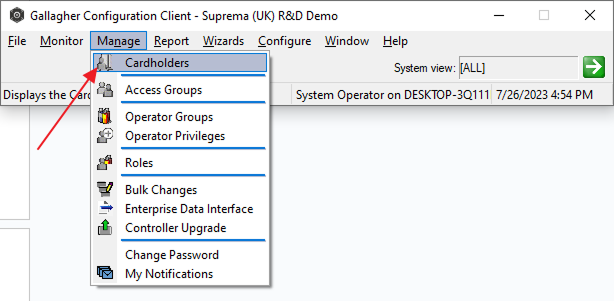
Click over to Gallagher Client.
Click on Manage. Within the Dropdown, please select Operator Groups.
-
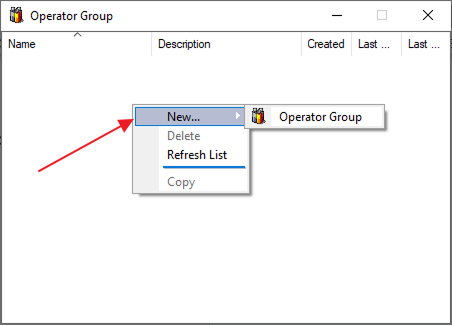
The Operator Group window will open, press right-click and select New → Operator Group.
-
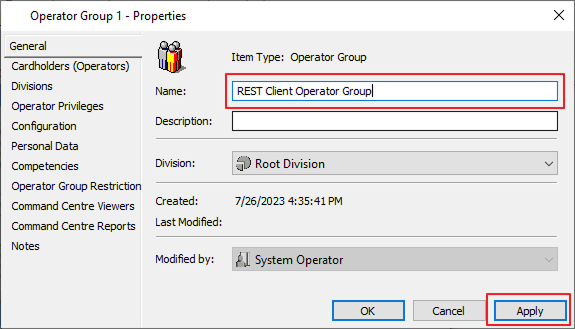
In the general setting, the name should be set as REST Client Operator Group. Then click Apply.
-
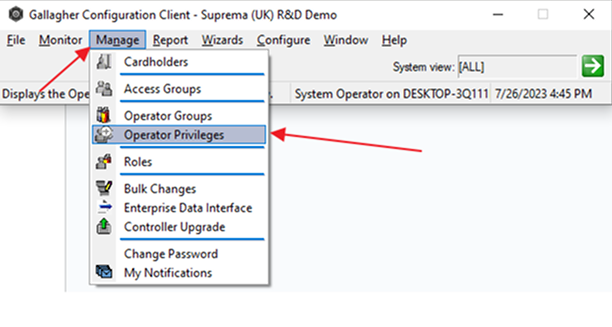
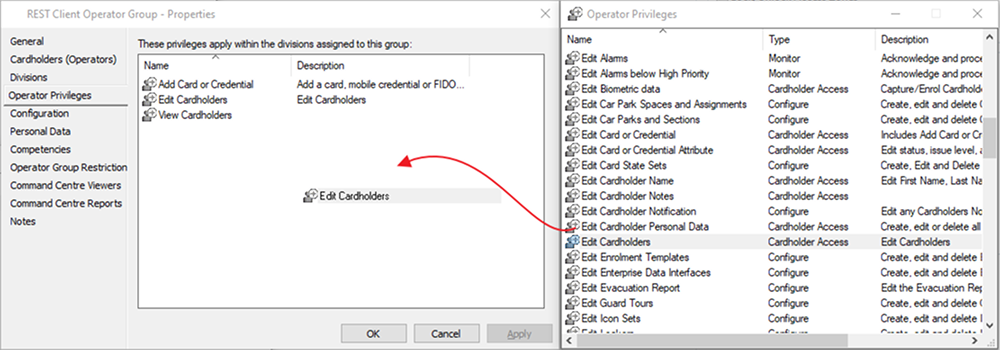
Now select the Operator Privileges setting on Operator group and go to the Gallagher configuration client window Manage → Operator Privileges. Now drag and drop.
You need to add 3 privileges to the Operator Group (Add Card or Credential, Edit Cardholders, View Cardholders) from operator privileges to operator group and press the OK button, and close the operator privileges.
-
Go to Configuration Client and select Cardholders.
-
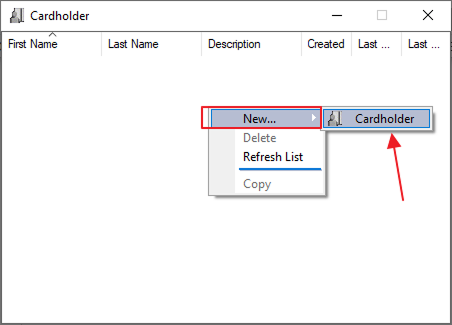
Press right-click New → Cardholder.
-
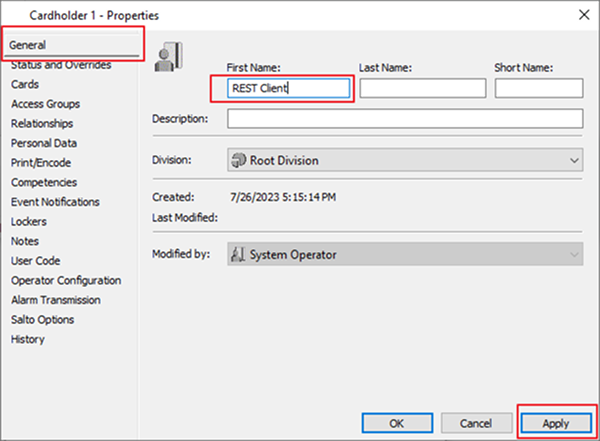
In the general setting, the First Name as REST Client, and press Apply.
-
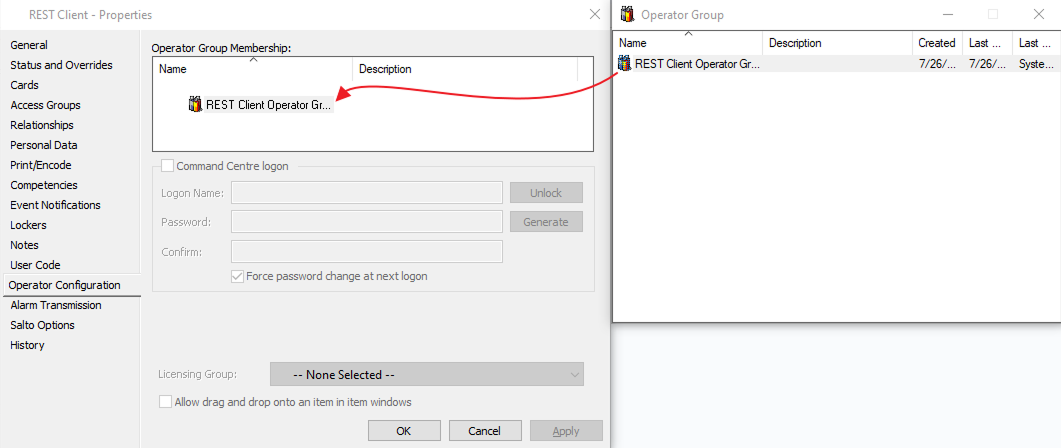
Click on the Operator Configuration tab on the left side within the REST Client Properties. Drag and Drop the REST Client operator group that we have created from Operator Group to Operator Group Membership.
-
Drag the REST Client Operator Group over to Operator Group Membership: like the image below:
-
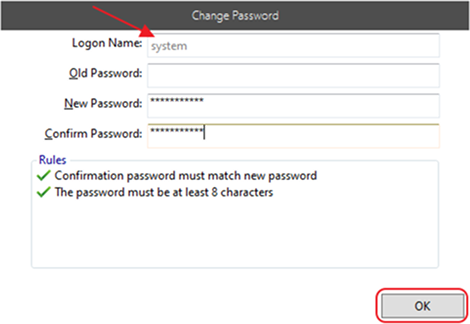
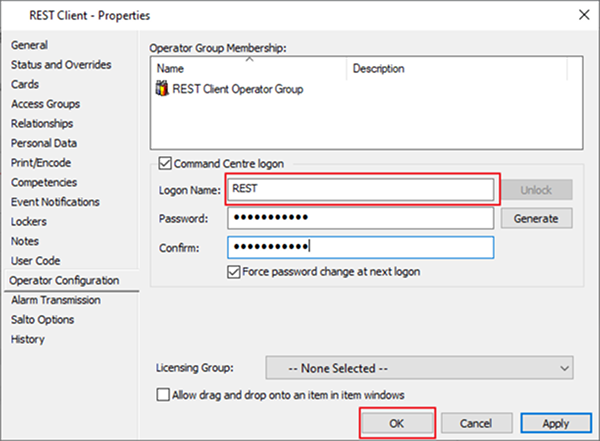
Set the Logon name to REST and set the password the same as we set for Gallagher Command Centre. Click OK, and also Close the Operator Group window.
-
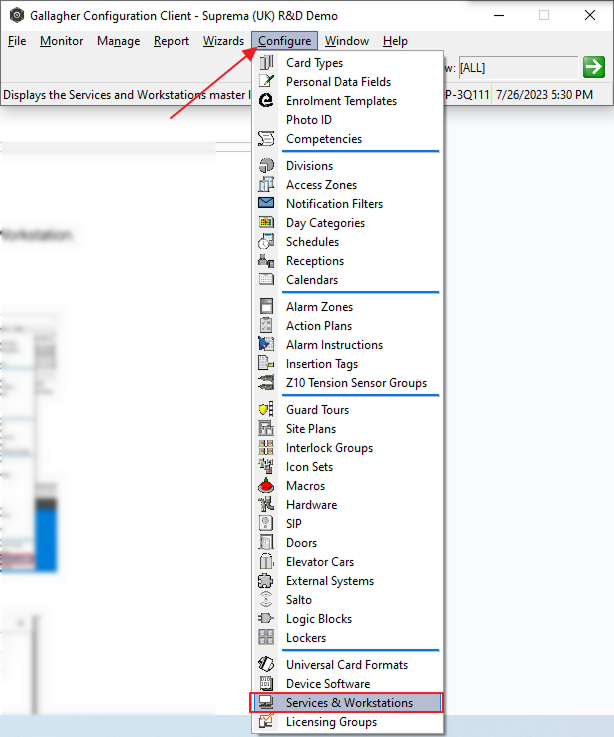
On Configuration Client go to Configure → Services & Workstations.
-
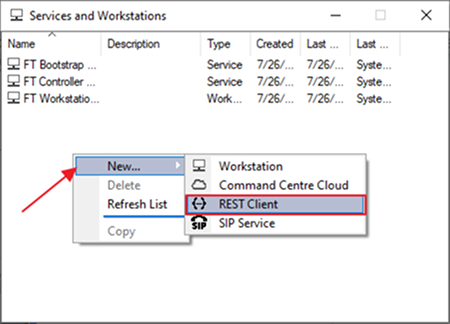
Now right-click New → REST Client.
-
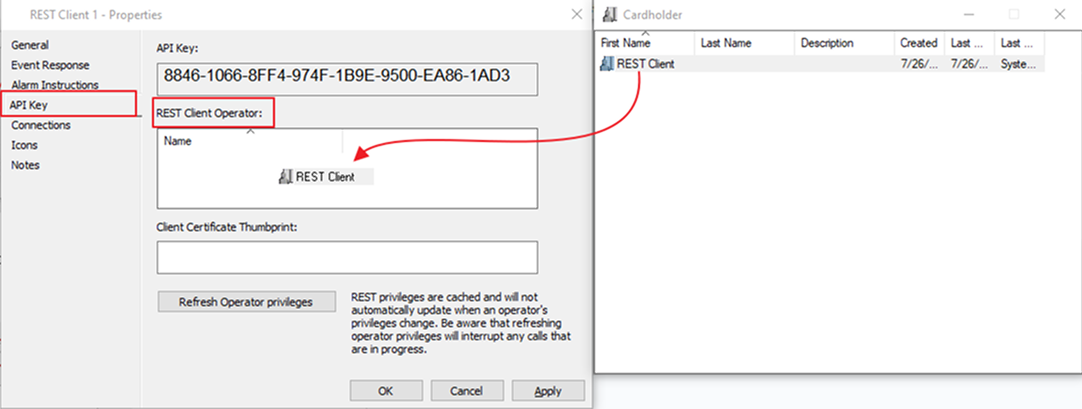
In the API key section Drag and Drop the REST Client from Cardholder to REST Client Operator. Click Apply. Close the Cardholder window.
-
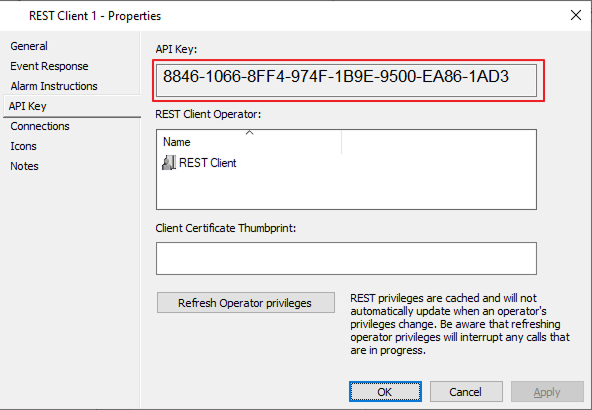
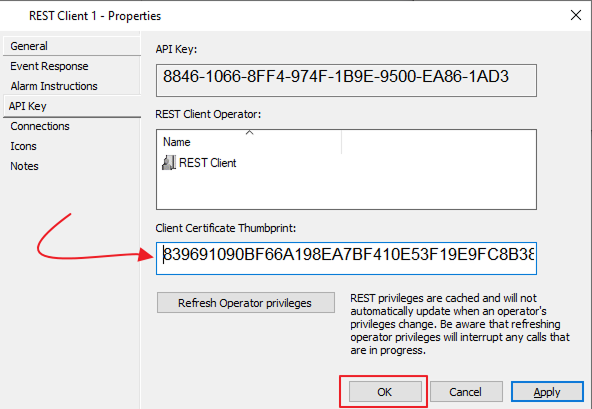
The Gallagher API key is there, in the API key section.
InformaciónSave the Gallagher API Key in a safe place.
-
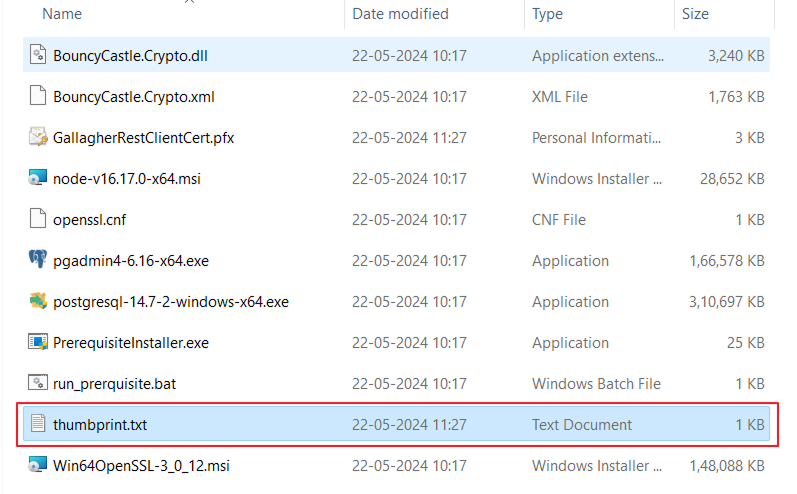
To get the thumbprint, go to the
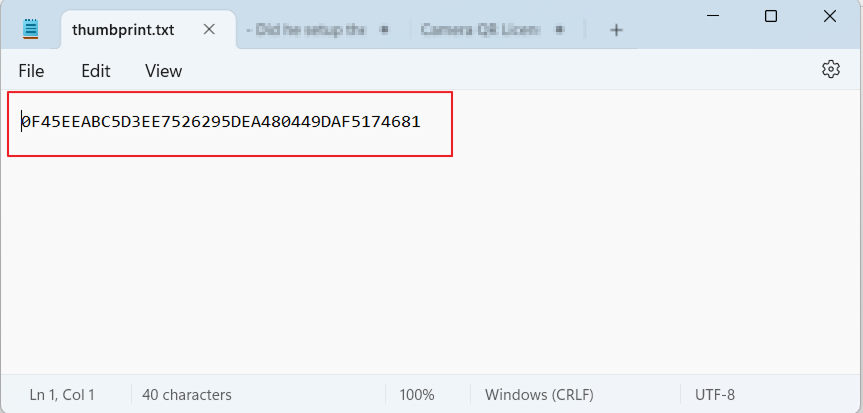
C:\Program Files\Suprema Integration with Gallagher\Prerequisites, open the thumbprint file, and copy the value of the thumbprint inside it.InformaciónIf the thumbprint file is missing. If thumbprint is not generated while running the EXE file.
-
Copy the thumbprint and Paste the Client Certificate Thumbprint key into the Client Certificate thumbprint section press the OK button and also Close the Services and Workstations.
Check the Gallagher API Key
-
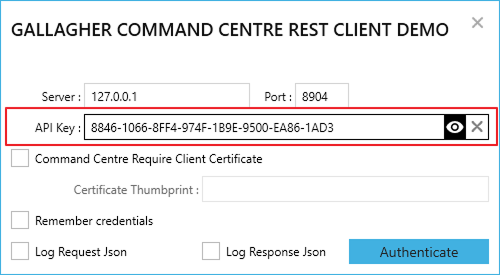
Go to Command Centre iso → utilities → REST API → RestClient_v8.60.072 → win-x64 → RestClientDemo, move that to the desktop, and open the
RESTClientDemo.exe. -
Enter the Gallagher API key as shown in image.
-
Tick the Command Centre Requirement Client Certificate and fill in the Certificate Thumbprint, also tick the Remember credentials (Optional).
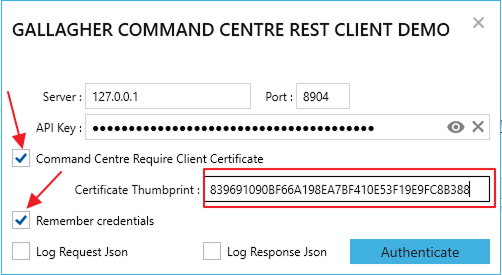
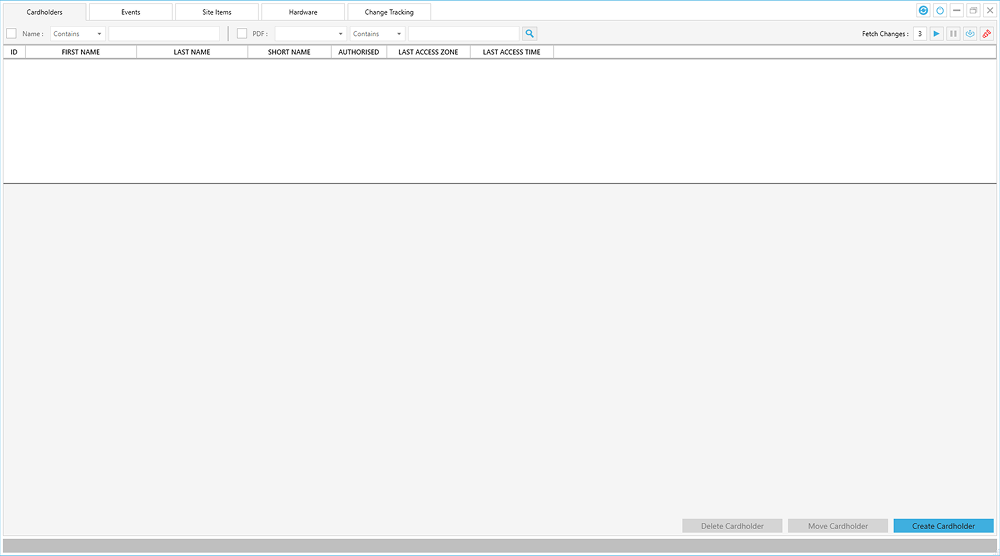
If there is an error it will show in the terminal else a new screen will open as shown in the below image. And after testing you can close this window.
Hardware configuration
-
Skip to BioStar 2 Setup if the hardware has already been configured.
-
We are using controller 6000 as a reference, if you have another controller please do the steps accordingly.
-
First, we have to create controller 6000 (or any other controller you have) to connect to the Gallagher controller.
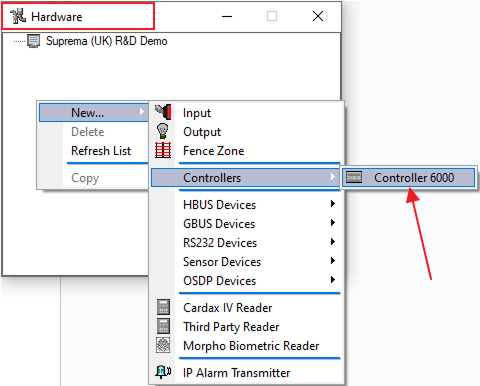
Open the Gallagher Configuration Client window and go to Configure → Hardware.
-
In the hardware window press right-click then New → Controllers → Controller 6000 (if you have a different controller it will display here) and press apply. It will create a controller in hardware.
-
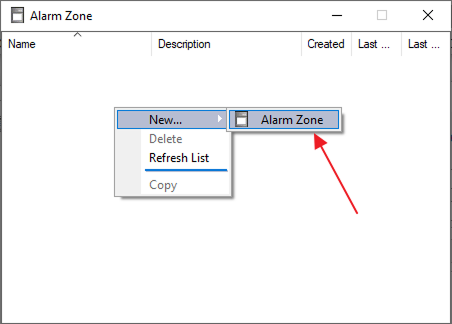
Then go back to Gallagher Configuration Client and go to configure → Alarm Zones and press right-click to create a new alarm zone.
-
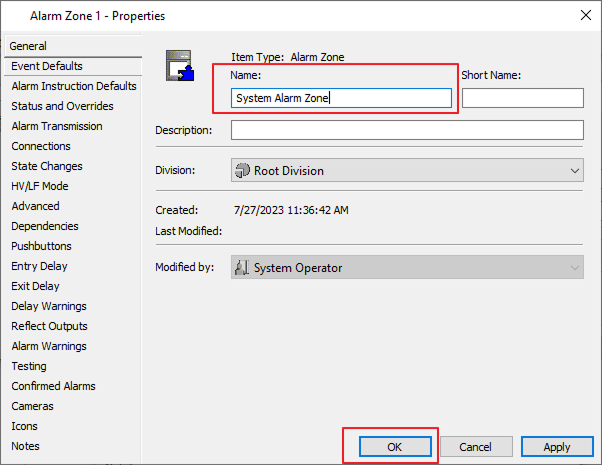
To configure the Alarm zone in General settings change the name to System Alarm Zone and press the OK button.
-
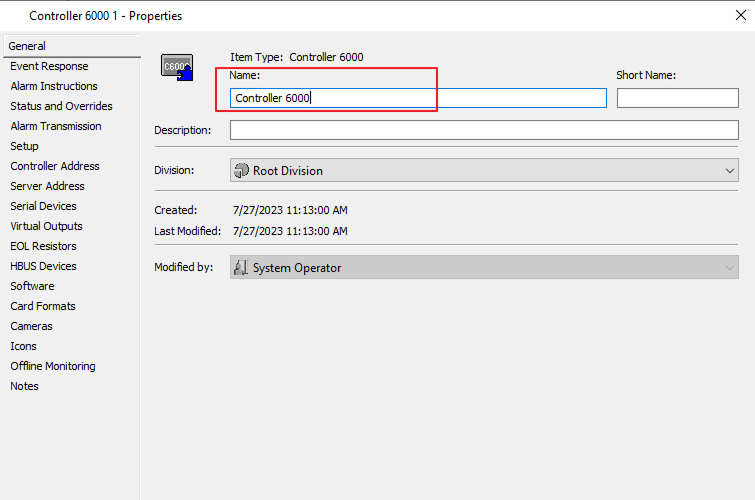
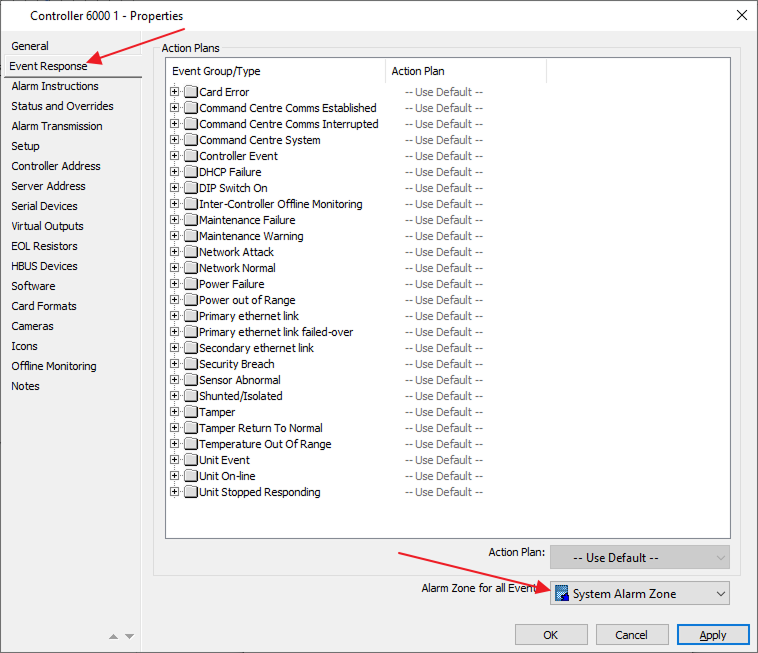
Let’s configure Controller 6000, In the General setting set the name as Controller 6000 (set name same as your controller).
-
Now go to Event Response and select Alarm Zone for all events and select System Alarm Zone. And press the Apply button.
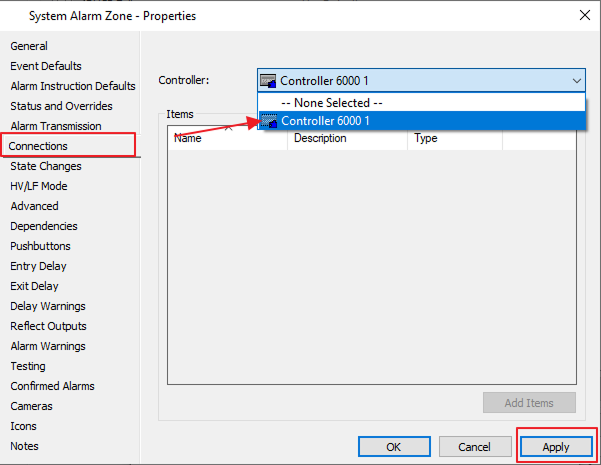
Now go to System Alarm Zone Properties and select Connections and in the controller dropdown choose Controller 6000. Press the OK button and close the Alarm Zone window.
-
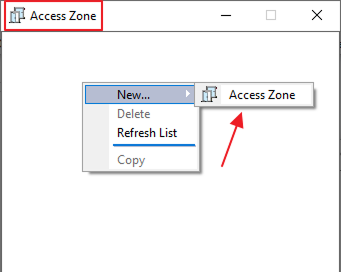
Now, we have to create an Access Zone in configure.
Go to the Access Zone and the window will open up. Now press right-click in the Access Zone Window and Select New → Then click on Access Zone, and it will create an access zone.
-
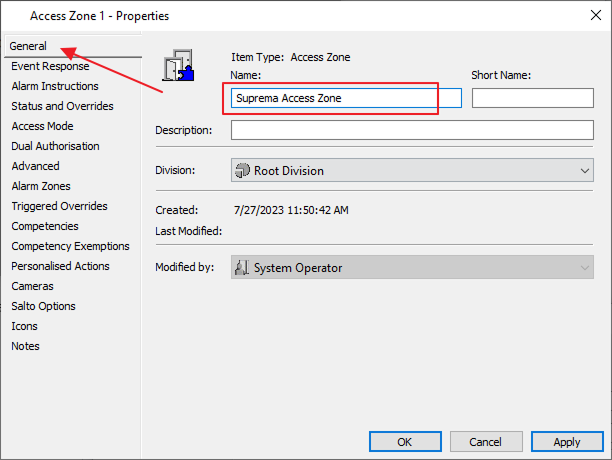
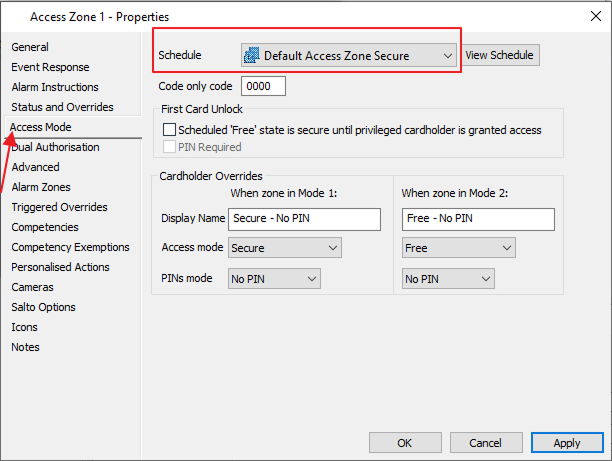
Open the Access Zone Properties that we have created in the General Setting. Then set the name as Suprema Access Zone.
-
Go to Access Mode Tab Setting. Select Schedule as Default Access Zone Secure and press the OK button.
-
Now go to the Hardware Window then right-click on Controller 6000. Select New → HBUS Devices → HBUS I/O. This step will create HBUS under Controller.

-
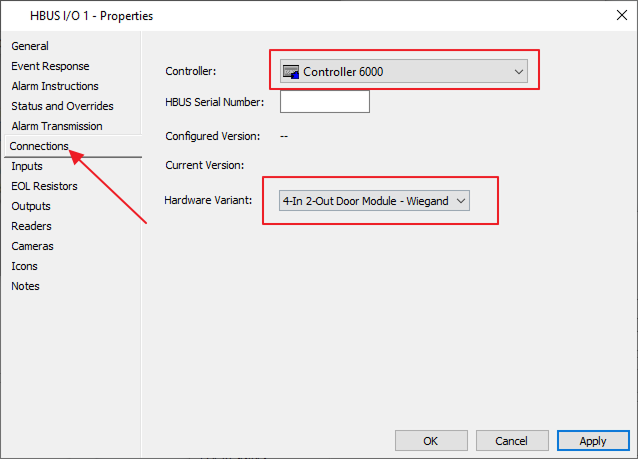
Let's Configure the HBUS that we have created by double-clicking on it to edit the properties. In the general setting, set the name as HBUS I/O Wiegand Module (Suprema).
Go to the Connections Tab and choose Controller as Controller 6000, set Hardware Variant as 4 in 2 out, and then press the OK button.
-
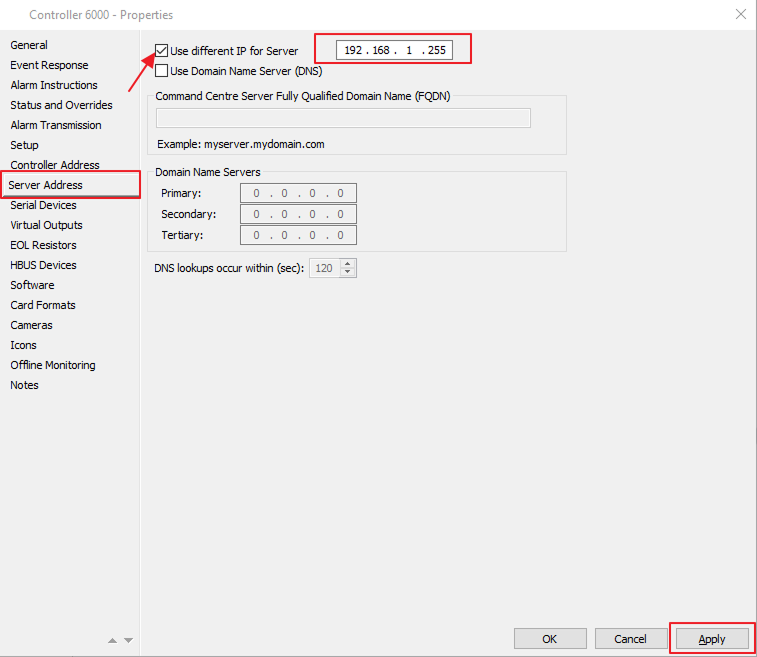
To connect your Gallagher Controller to the system, open Controller 6000 properties and click on the Server Address Tab. Tick use different IP for the server and type your PC/ServerIP address. Then press the Apply button.
-
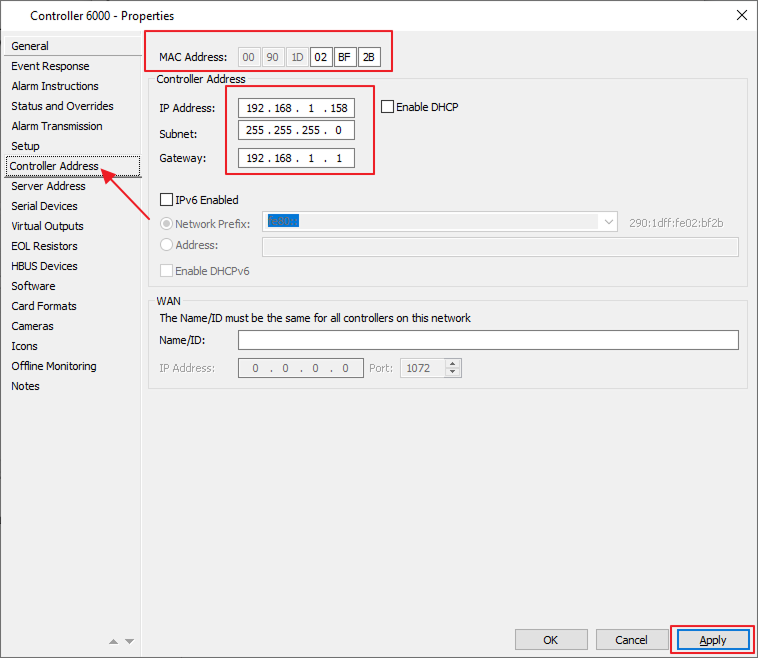
In the Controller Address setting set your controller MAC address (Please look at your C6000 controller), Also set the IP address assigned for the Controller, Subnet, and Gateway. Press the Apply button.
-
In the Setup Tab, set Plug in Module as 4H Module (choose according to your controller) and in Hardware RS485 Bus 1 as OSDP and RS485 Bus 2 as HBUS and press Apply.
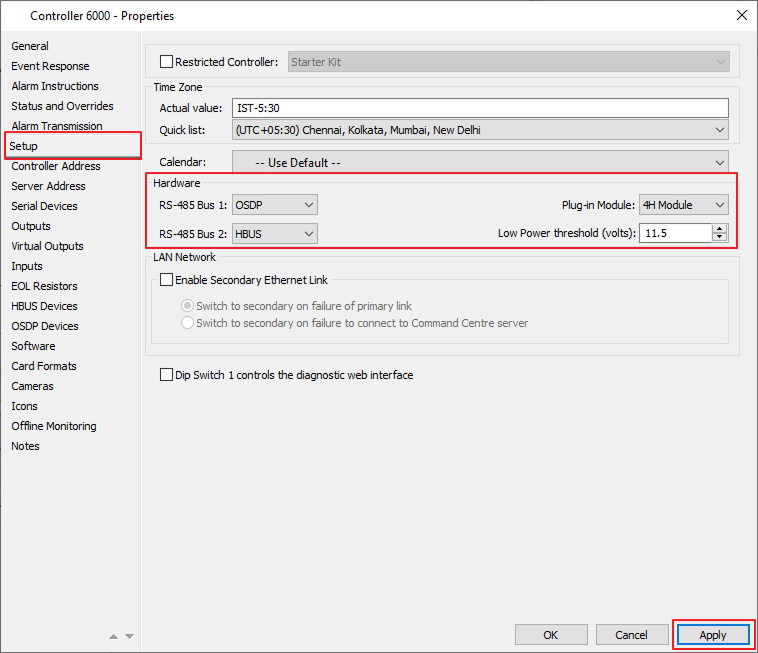 Información
Your Setting could vary depending on your Gallagher devices & components.
-
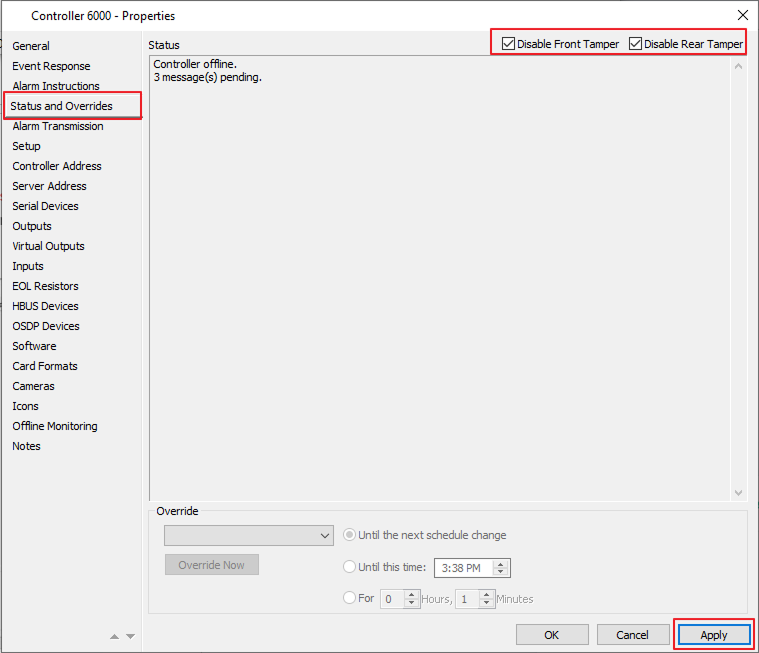
In the Status and Overrides options tick both checkboxes Disable Front Tamper and DisableRear Tamper.
-
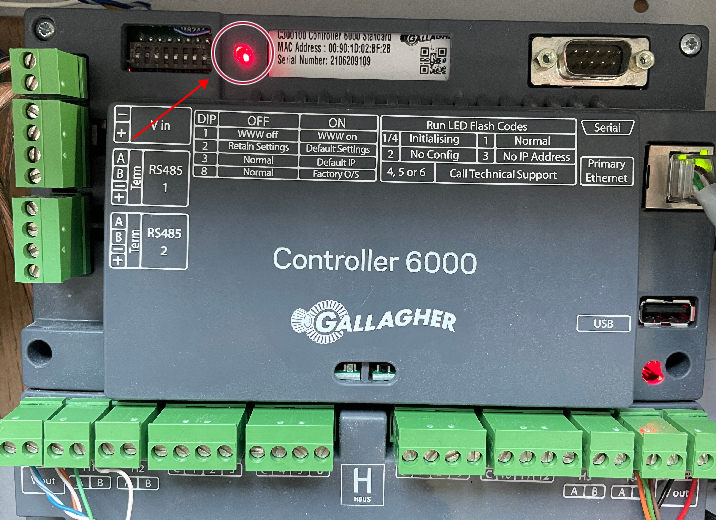
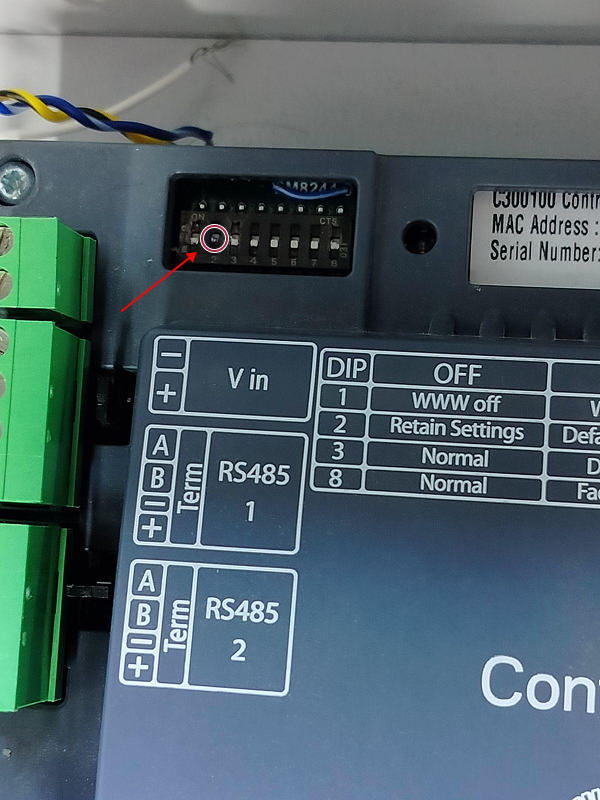
To connect your controller to the system, turn off the controller, and wait until the red light goes off. Then turn on the 2nd button from the left.
InformaciónBefore performing this step, please ensure that your PC firewall is turned off.
-
When the status on the controller turns normal then turn off 2nd button (down/dip the 2nd button).
InformaciónOnce the controller is online and normal, you can turn all dip switches off including 2.
Additional note first time power-up and new controller connection:
You only need #2 on when you first power up a new controller and connect to a server.
Also, Jumper #2 can be used when doing some resetting of the controller. You want it to be fixed if you are doing upgrades to the controller.
 Información
Connect Devices to access HBUS in the controller HBUS setting. (To connect devices please refer to BioStar 2 setup.)
-
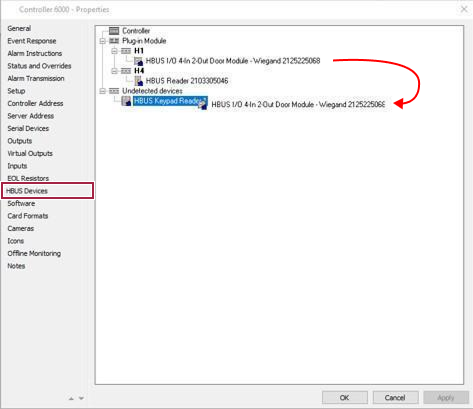
In the HBUS Devices option of Controller 6000 drag and drop HBUS I/O 4 in 2 Out module - Wiegand from Plugin Modules to Undetected devices HBUS I/O.
-
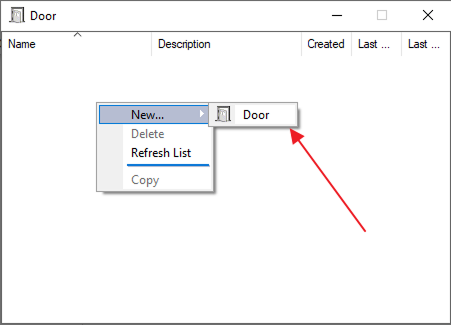
To Create Door go to Configure, Door then press right-click and create a new door.
-
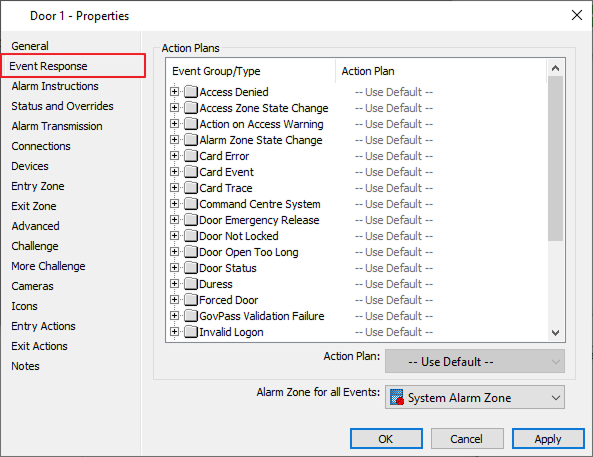
Set the Door name as Suprema Door and go to Event Response and choose alarm as System Alarm Zone.
-
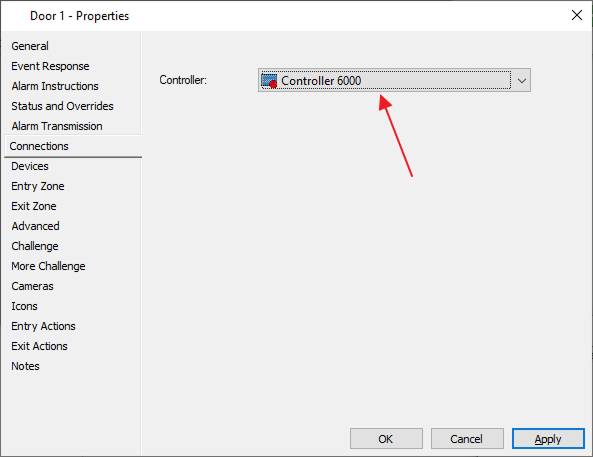
In Connections select Controller as Controller 6000 and press Apply and OK.
-
To create an OSDP connection; right-click on the Hardware window. Select New → OSDP Device → Then click on OSDP Reader, to create OSDP Reader on Hardware.
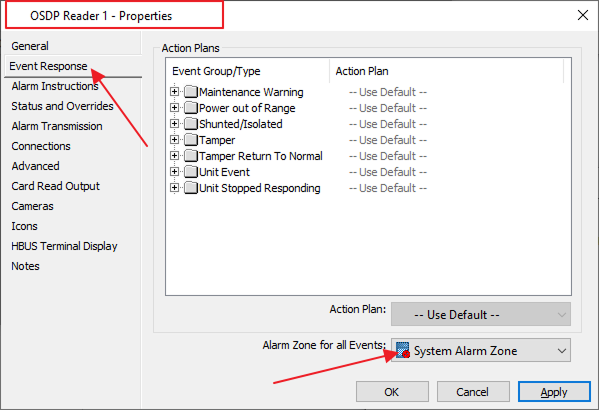
A new window opens up. Set its name as Suprema OSDP Reader, and in the Event Response settings, tab set Alarm Zone for all events: as System Alarm Zone. Then click Apply & press OK to save the changes.
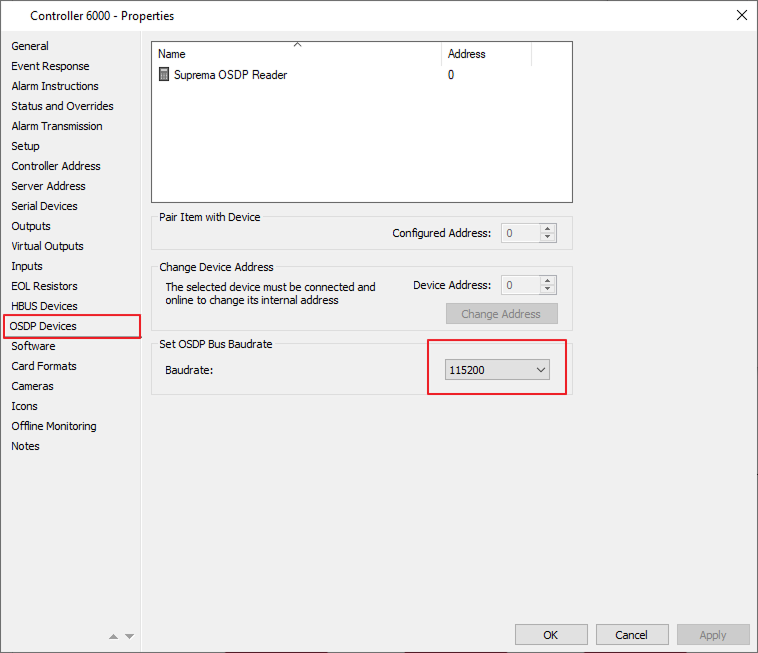
Go back to the Hardware Window. Double click on Controller 6000 for the Properties. Click on OSDP Devices Tab.
-
Drag the OSDP reader from the Hardware Window to the Controller properties in the OSDP Devices Tab. Set Configured Address as 0, Suprema OSDP Device Address as 0, and Baudrate as 115200.
 Información
If you have a 2x OSDP Reader please change the OSDP address within BioStar 2.
-
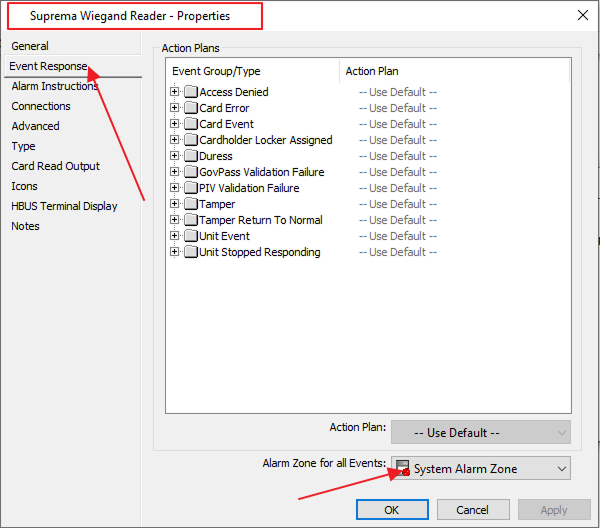
To create the Wiegand Reader. Right-click on the Hardware Window. Click on New → Third-Party Reader. A New Window appears; Set its name as Suprema Wiegand Reader, then in the Event Response Tab. Choose the Alarm Zone as System Alarm Zone and press OK.
-
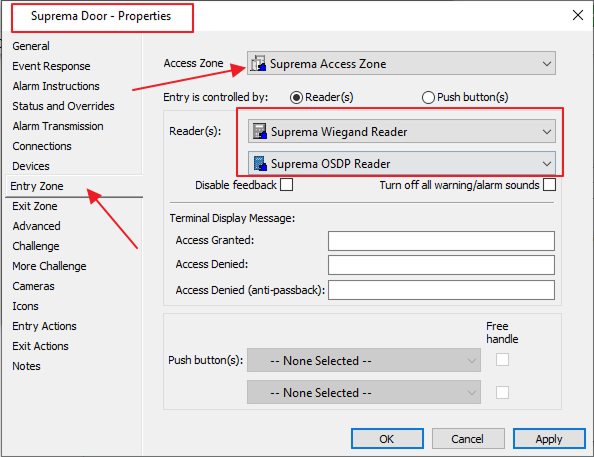
Go to the Door that we have created in properties Entry Zone set Access Zone as Suprema Access Zone and reader as Suprema Wiegand Reader and Suprema OSDP Reader, and press the OK button.
-
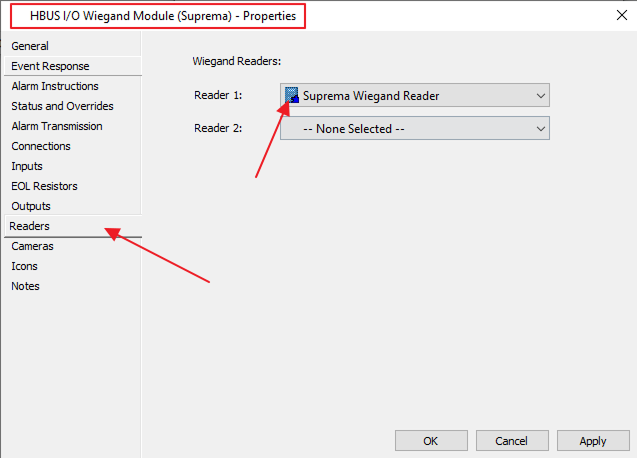
In HBUS I/O properties go to Reader settings and set Reader 1 as Suprema Wiegand Reader, press the OK button. Close the door and Controller window.
-
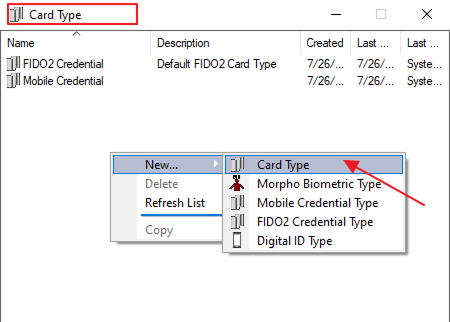
To create a card type Configure → Card Type right-click and create a new Card Type. Set its name as Suprema Card Type.
Información-
A QR Device license is needed to read the Gallagher QR Code. Please contact Suprema for it.
-
Please use the same terms as mentioned for the fields.

-
-
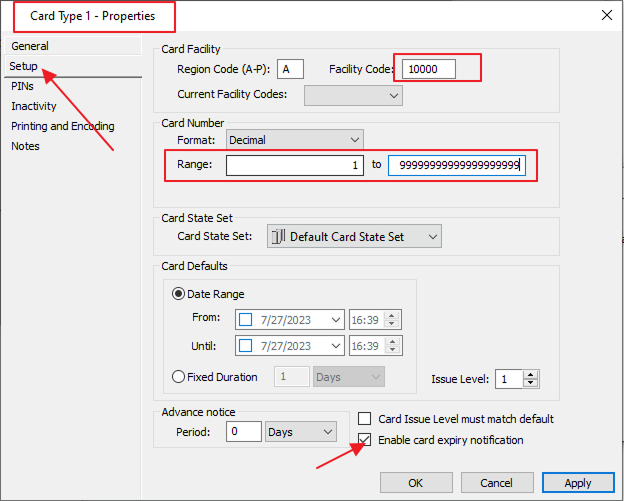
In Card type properties go to setup option Region code as A and Facility code as 10000 card number range as 1 to 99999999999999999999 (20 times) and enable card expiry notification. Press OK.
-
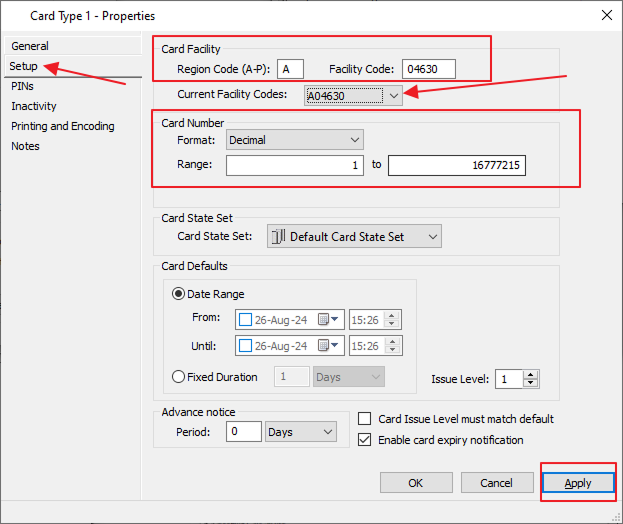
Create another card type Configure → Card Type right-click and create a new Card Type. Set its name as HID Seos Corporate. And go to the properties (setup) to set up card type. Use the below configurations to configure the card and press Apply and OK.
-
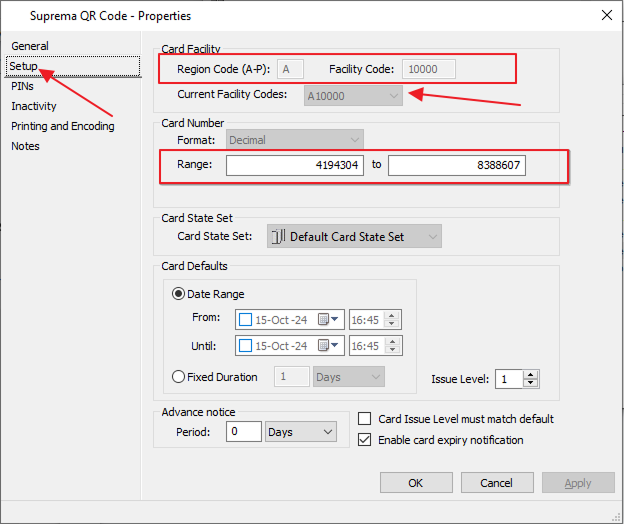
Create another card type Configure → Card Type right-click and create a new Card Type. Set its name as Suprema QR Code.
-
In Card type properties go to setup option Region code as A and Facility code as 10000 card number range as 4194304 to 8388607 and enable card expiry notification. Press OK.
-
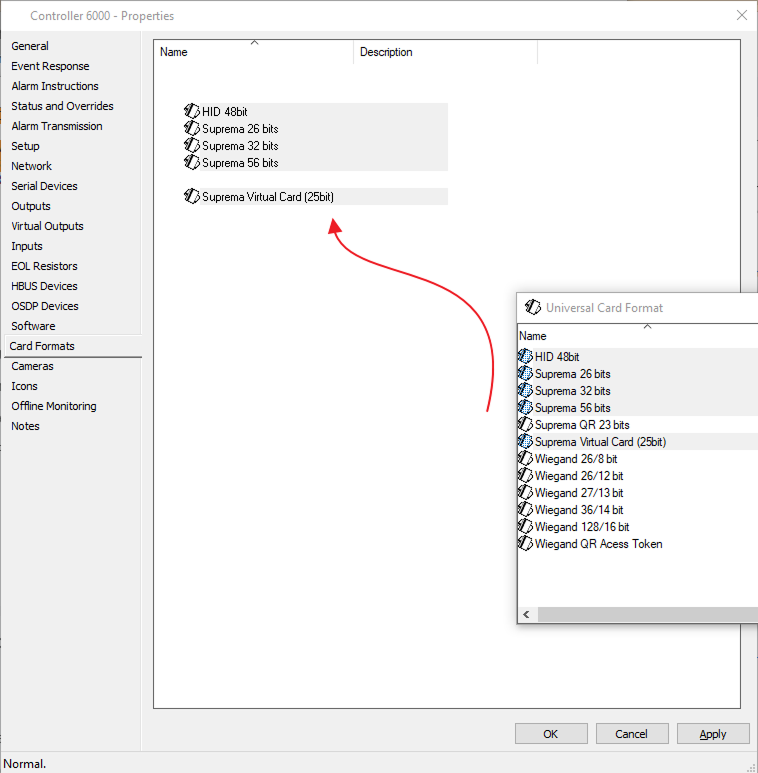
To create a universal card type Configure → Universal Card Format right-click and create a new universal card format. We have to make 4 card formats.
-
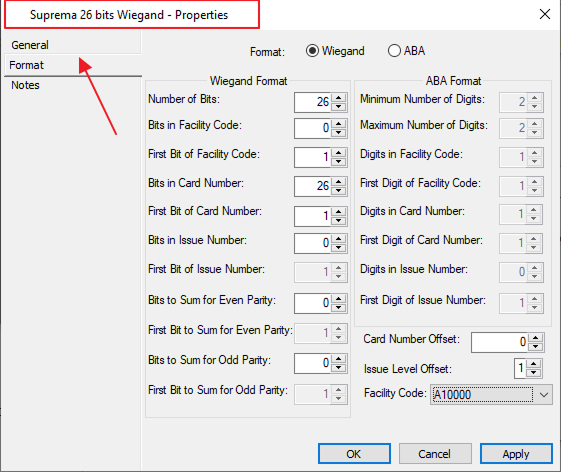
Create a new format name as Suprema 26 bits Wiegand and set the format as the below image:
-
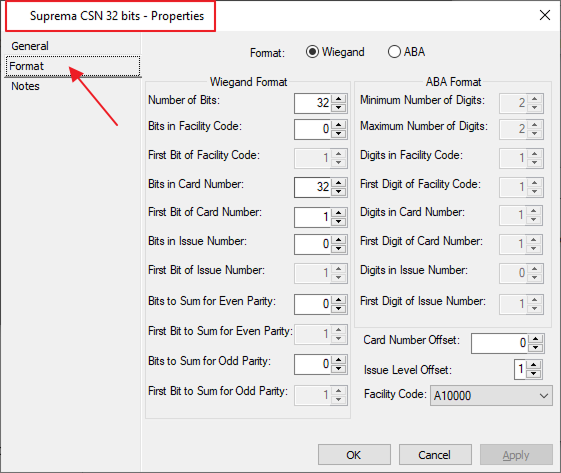
Create a second card format as Suprema CSN 32 bits, and in the format set as shown below.
-
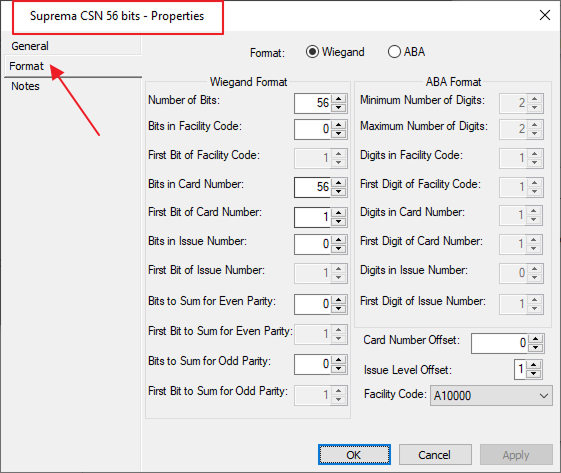
Create a third card format as Suprema CSN 56 bits, and in the format set as shown below.
-
Create a fourth card format as Suprema Virtual Card (25bit), and in the format set as shown below.
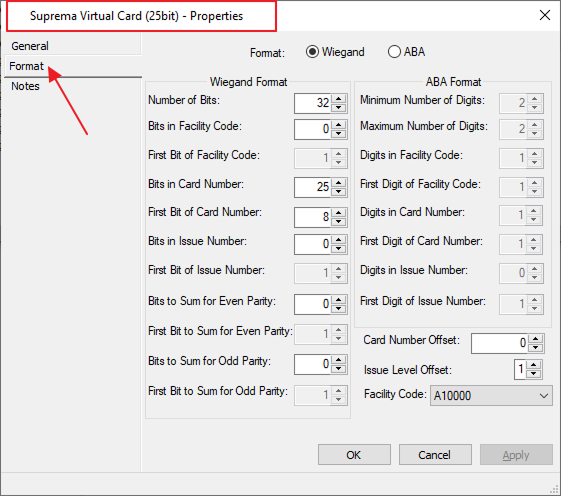
-
Create a fifth card format as HID 48bit, and in the format set as shown below.
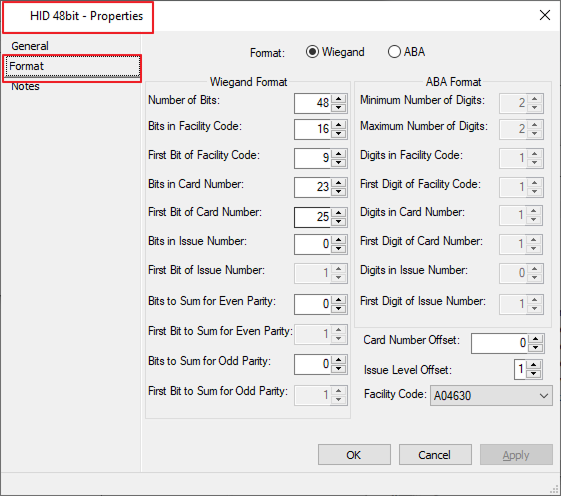
-
Create a sixth card format as Suprema QR 23 bits, and in the format set as shown below.

-
-
Drag all six card types and drop them on Controller properties, Card Format Setting, and Apply the settings. Press the OK and Close all the windows of Gallagher Configuration Client.
-
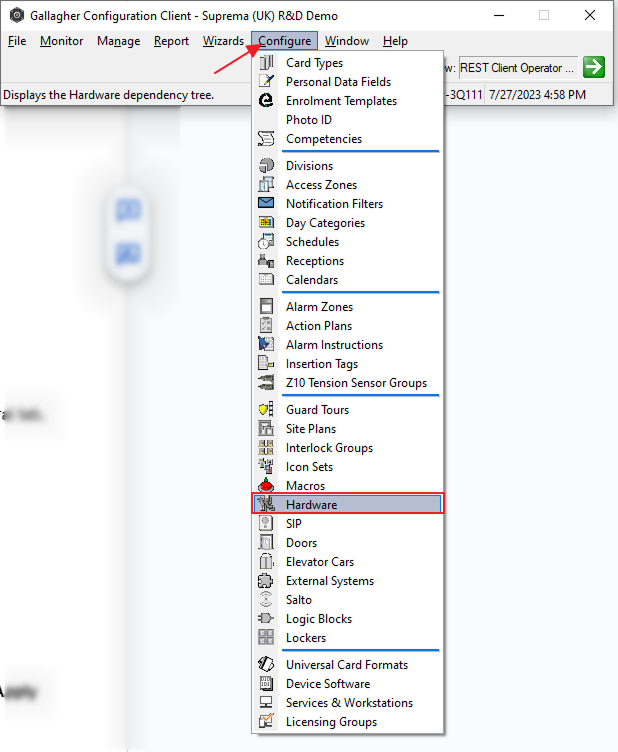
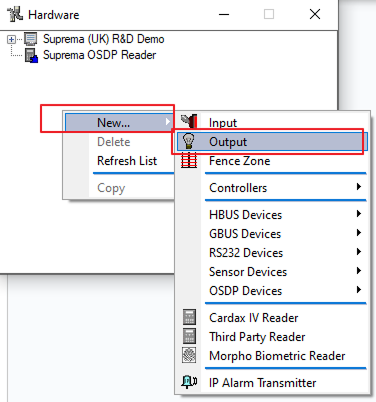
Go to Config Client Configure → Hardware.
Then Right click on the Window and create output and set the name as Wiegand Output in the general tab.
-
Now click on Advance on the left side set 1 second in the Output times option and press Apply and OK.

-
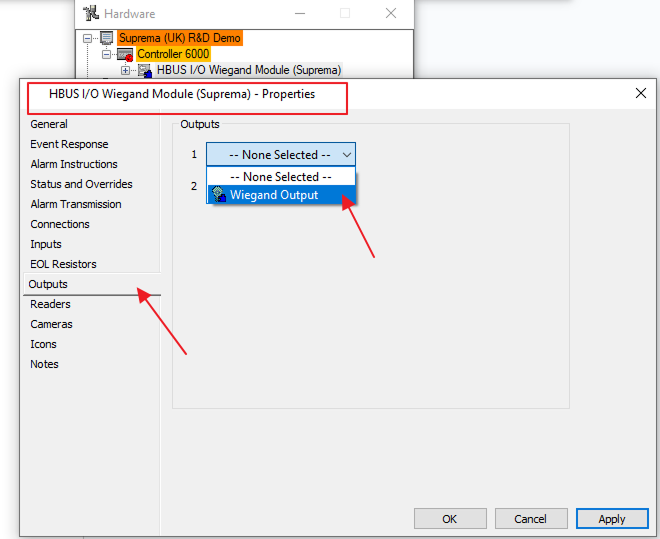
Now go to hardware window → double click on HBUS I/O Wiegand Module (Suprema) on the left side go to Outputs and select Wiegand Output press Apply and OK.
BioStar 2 Setup
-
To open BioStar 2 type
https://[Your system IP Address]/#/loginin your browser it will open the login form.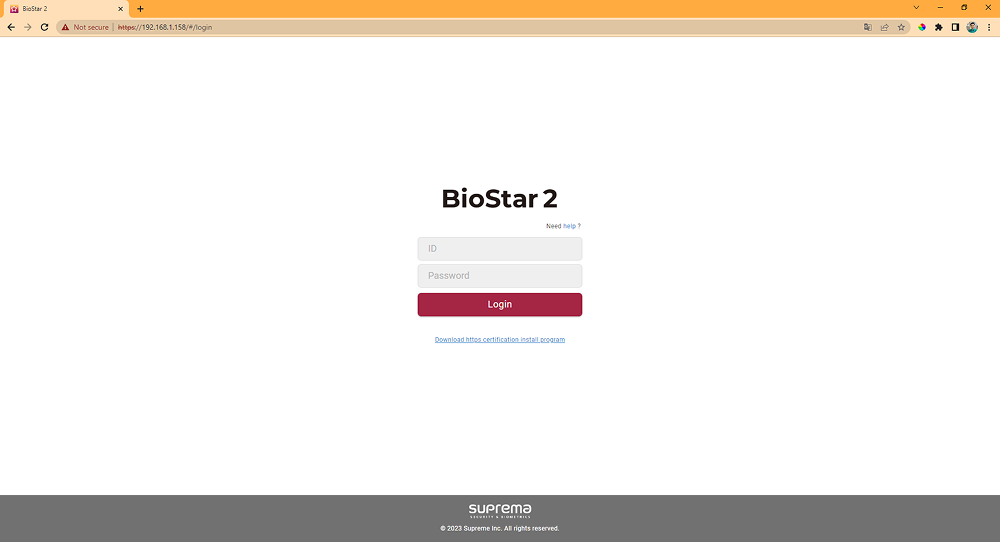
-
Fill in your BioStar 2 credentials to log in, go to the setting page, and select Card Format.

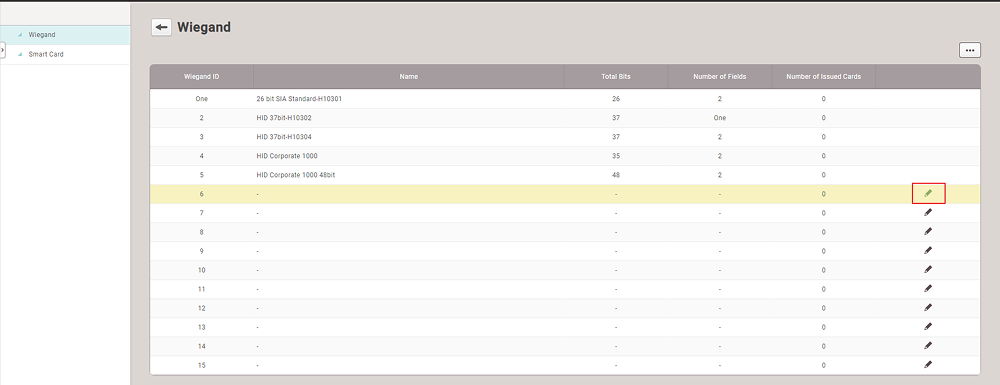
-
In the card, setting click on the edit button to create a new card format.
-
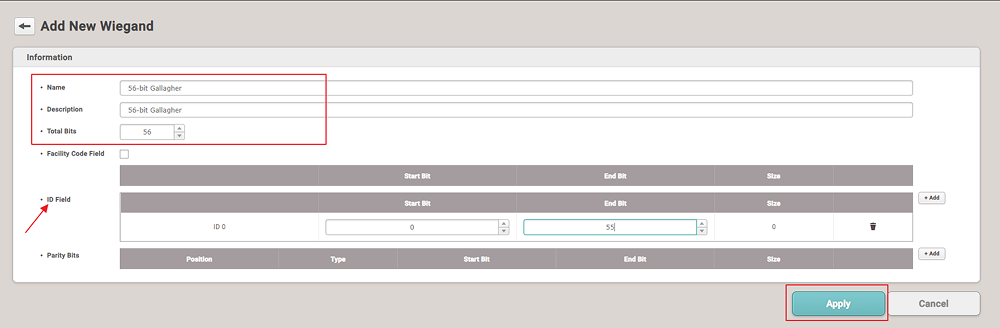
Here also we have to create three card types 56-bit, 32-bit, and 26-bit.
-
Set name as 56-bit Gallagher total bits as 56 and in ID field press add set start bit as 0 and end bit as 55.
-
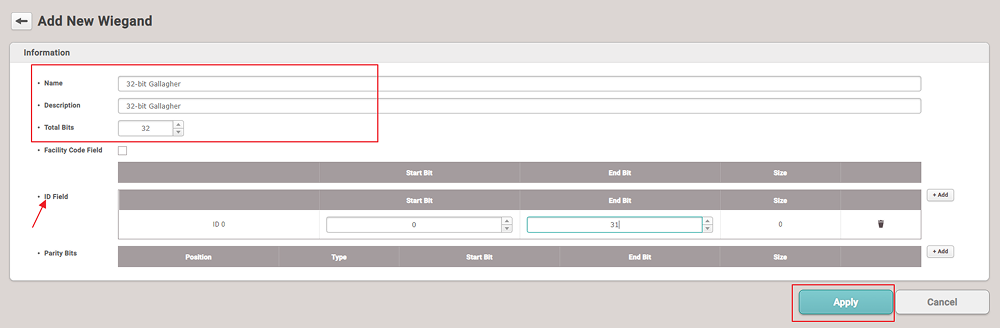
Set name as 32-bit Gallagher total bits as 32 and ID field and in the ID field press add & set start bit as 0 and end bit as 31.
-
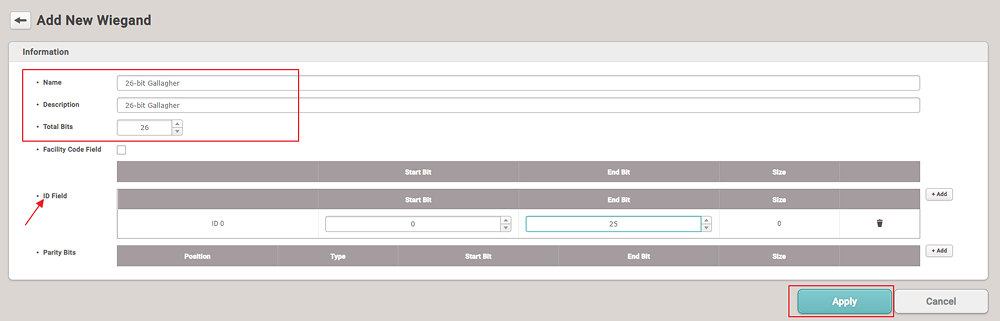
Set the name as 26-bit Gallagher total bits as 26 and ID field and in the ID field press add & set the start bit as 0 and end bit as 25.
-
-
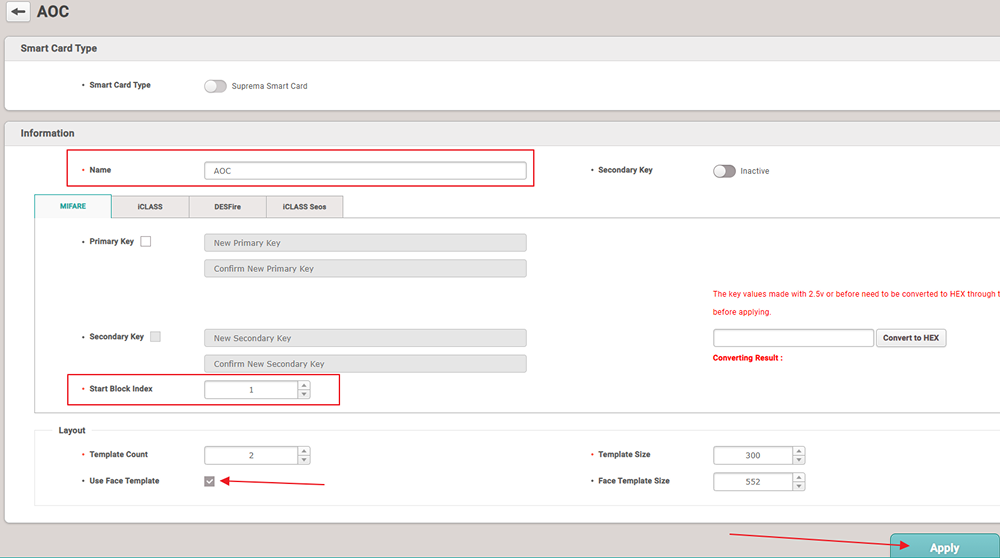
Now inside the card format go to the smart card section by pressing the smart card button and click on the ADD SMART CARD button.

-
Now enter the name as AOC Inside MIFARE type enter 1 for Start Block Index, tick the checkbox for Use Face template, and press the Apply button.
InformaciónIf you don’t want to use a visual face and only want to use a fingerprint on the smart card you can untick the checkbox.
-
To connect devices to the system go to the device panel and press the SEARCH DEVICE button.
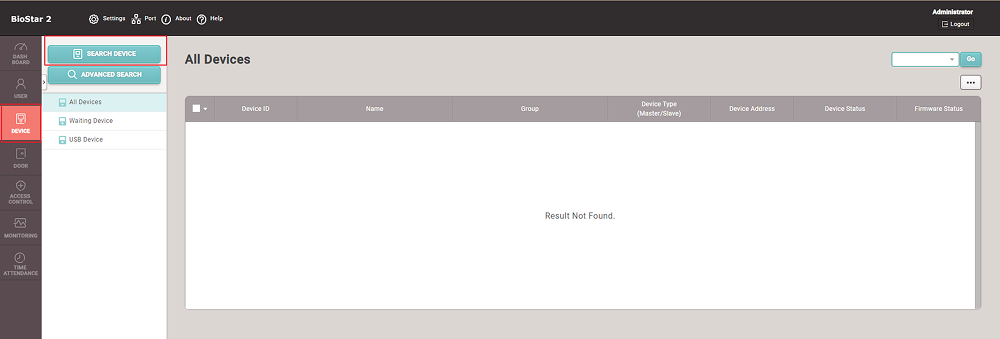
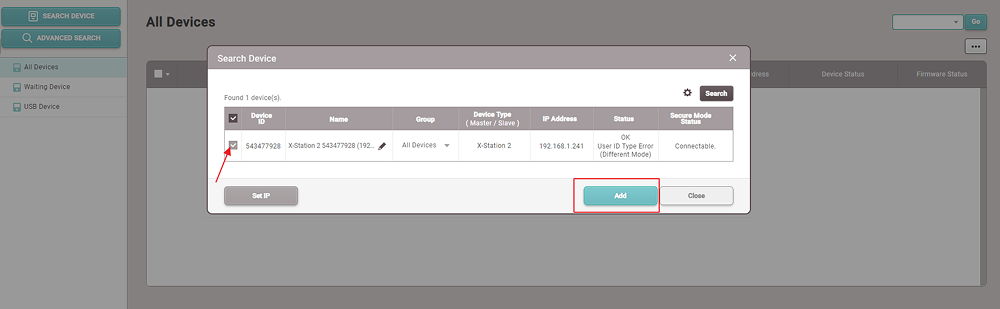
-
Now press the search button and select the device and press Add button.
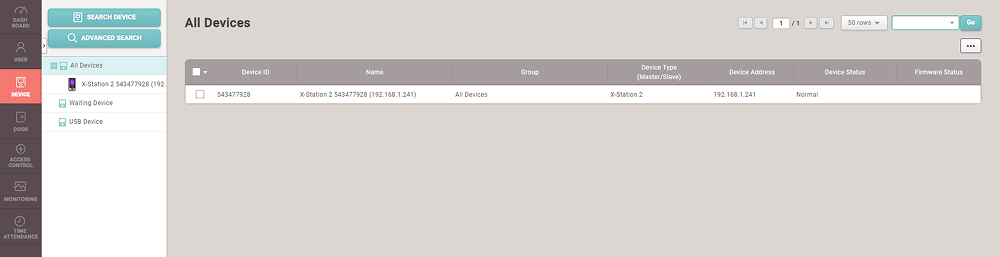
-
The connected devices will be listed on the device panel on the left side.
Wiegand’s READER CONNECTION
-
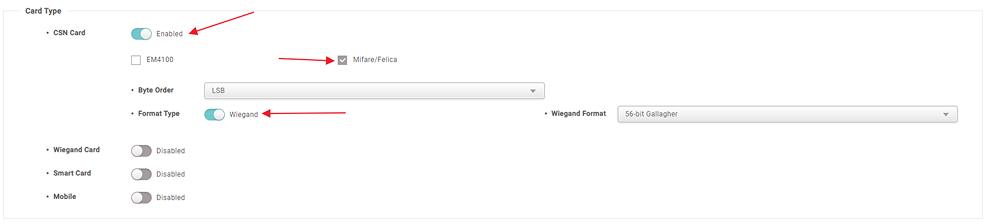
Click on the device that is connected via the Wiegand connection. Scroll down until you see Card Type.
Please turn on the CSN card, tick the Mifare/Felica, set the format type as Wiegand, Byte order as LSB, and Wiegand format as 56-bit Gallagher.
-
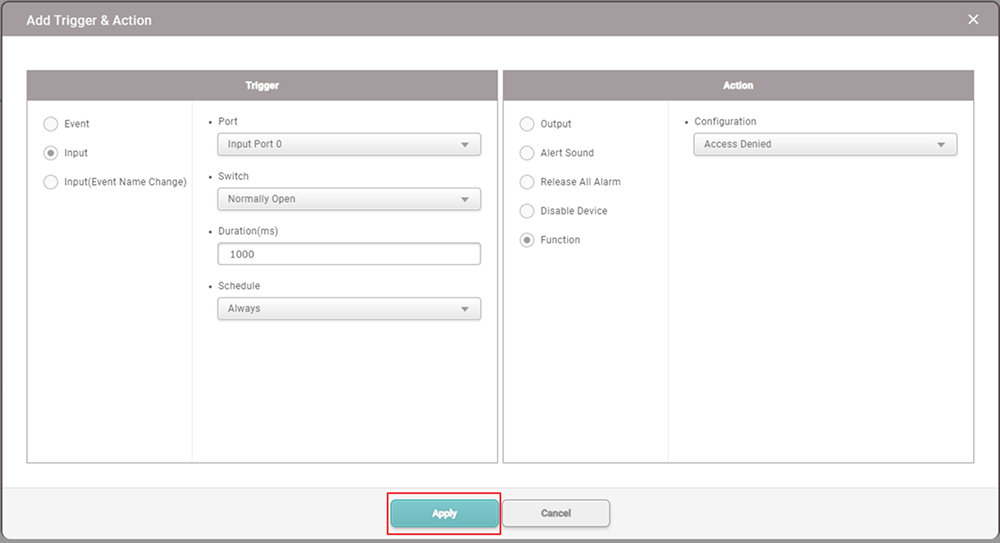
Now go to the advanced setting and scroll down until you see the trigger and action press add button, and set the field as shown in the image.
-
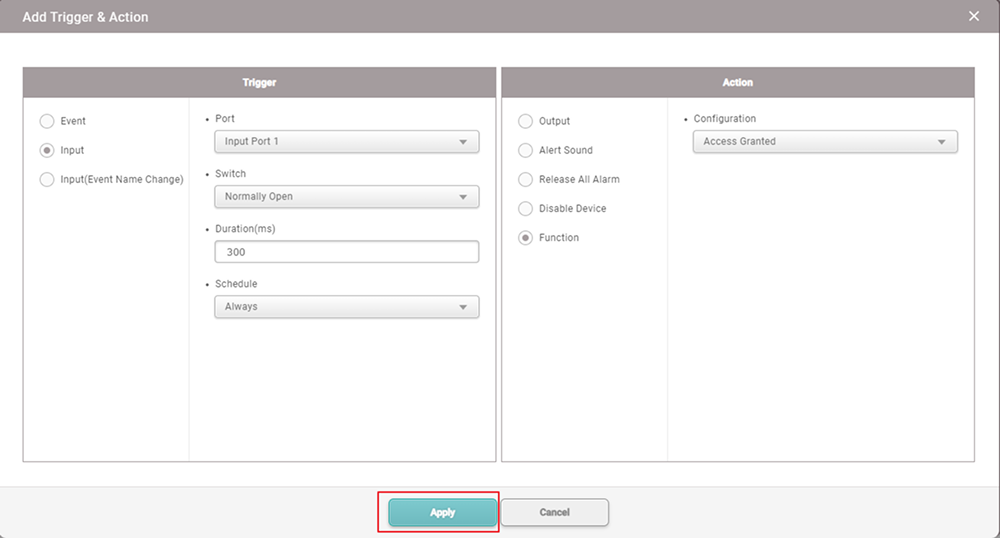
Again press the add button to add another trigger and action.
-
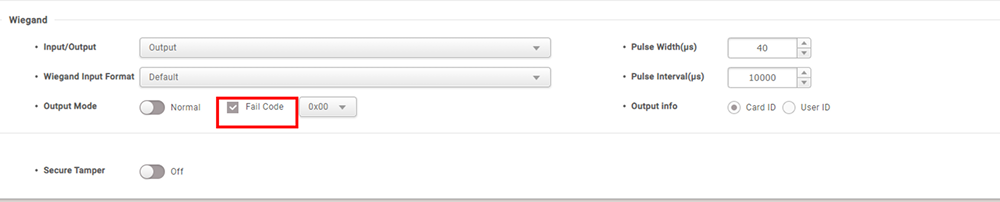
In the Advanced Section below Trigger & Action: Wiegand setting Input/Output should be set as Output, Wiegand Input Format as Default, Pulse width as 40, pulse interval as 10000, output mode as normal, check fail code, and output info to the Card ID.
OSDP READER CONNECTION
-
For OSDP connection click on the device that is connected to the OSDP panel and scroll down until you see Serial.
Set RS485 as Default and Baud rate as 115200.

-
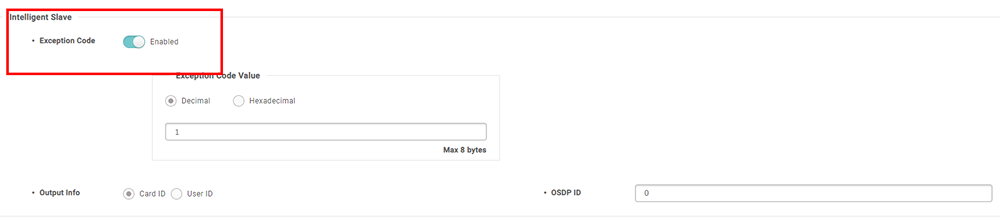
In intelligent slave expectation code as Enabled, output info as Card ID OSDP ID as 0.
InformaciónIf you have more OSDP devices then please change the OSDP ID to another number and for output, Info must be Card ID.
Email Configurations for QR Code
-
Email confirmations and Emails for user profiles are a must be required for QR Code.
-
Licenses are required for emails. Please contact the administrator to obtain the necessary licensing.
-
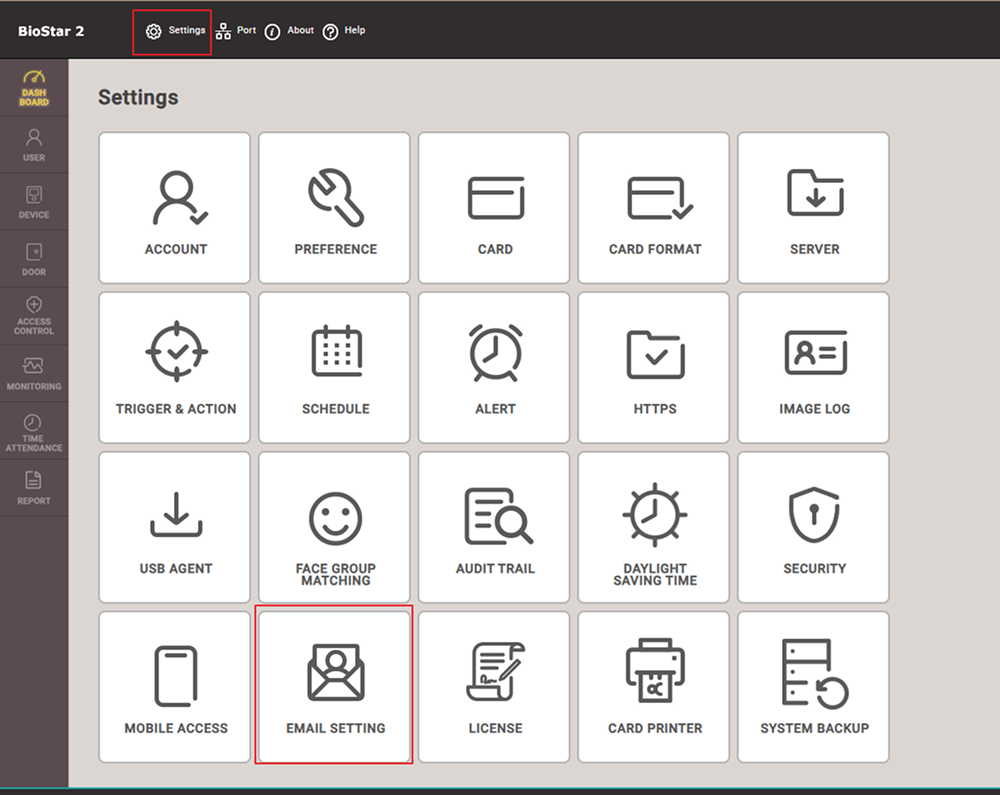
Go to the settings page and select Email Settings.
-
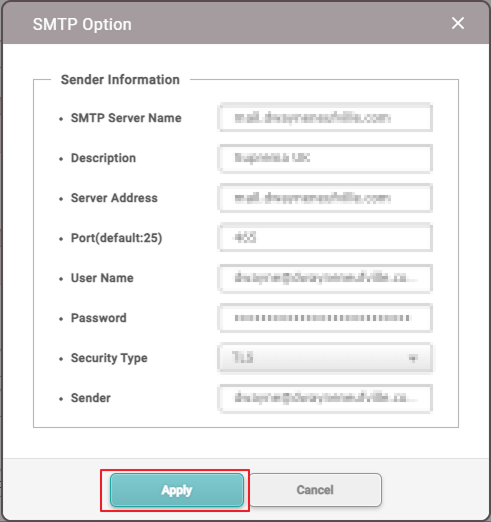
Press the SMTP setting button inside the email setting, fill in the details for the SMTP Option, and press the Apply button.
-
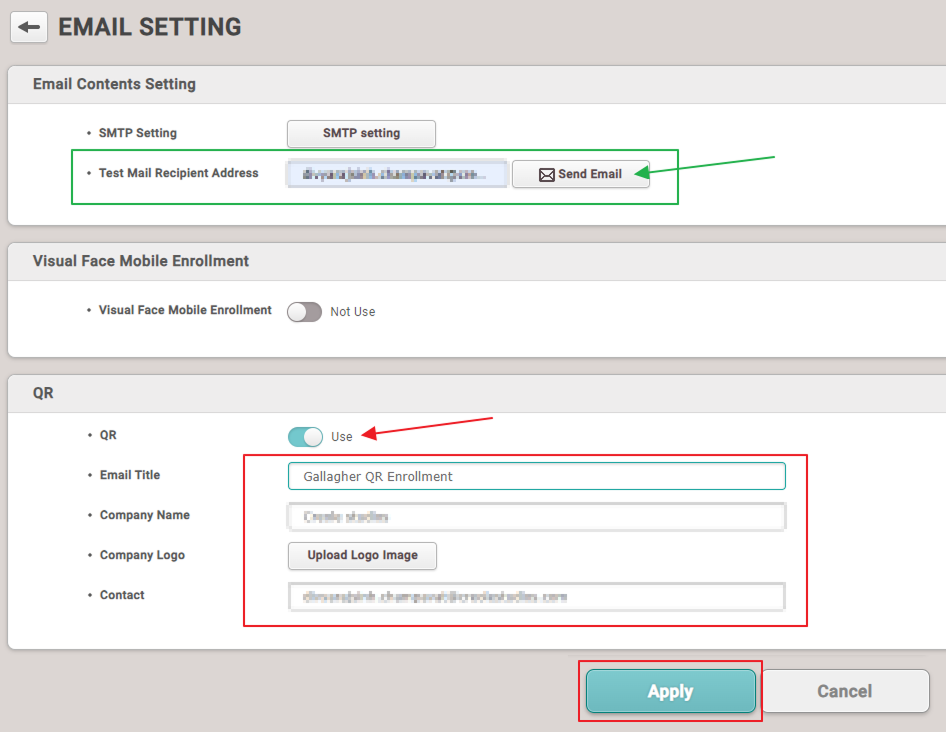
To cross-check, you can use the test mail functionality, where you need to put the email address you want to test with and press the send email button.
To use the QR Code card, enable the QR option inside the settings, Put the details as per requirements, and press the Apply button.
Suprema Integration with Gallagher v2.0
-
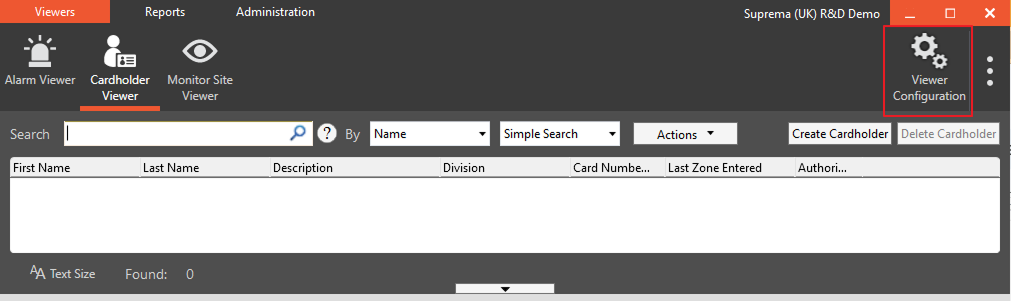
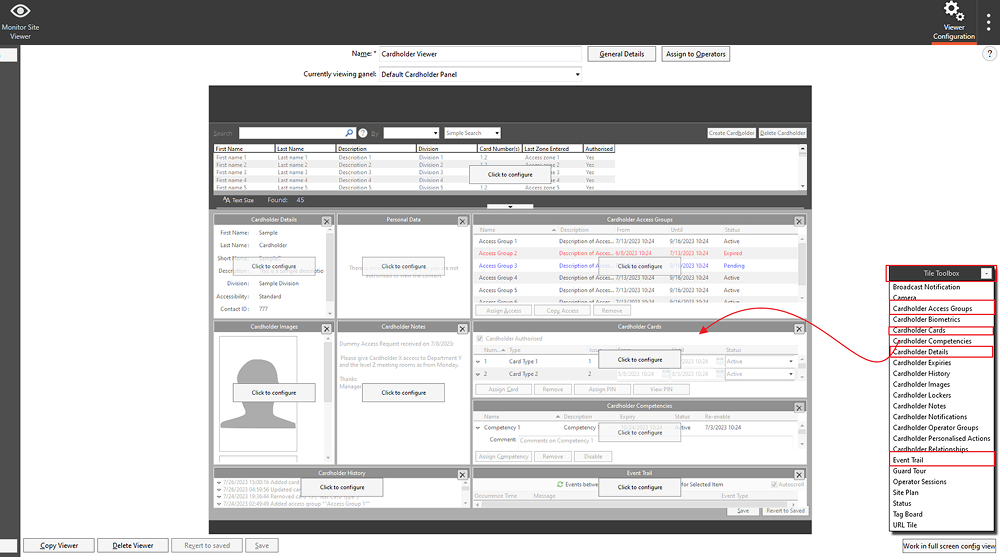
Open Gallagher Command Centre in the Cardholder viewer option and go to viewer configuration.
-
In Viewer Configuration, set windows as shown in the image below, and use the window toolbox to drag and drop windows.
-
Cardholder Details
-
Cardholder Access Groups
-
Cardholder Cards
-
Event trail
-
URL Tile
-
Cardholder Images
-
-
In the URL window press click to configure the set Specific URL to
<127.0.0.1>:28523and choose navigation as Disable Navigation. And press the save button to save the settings.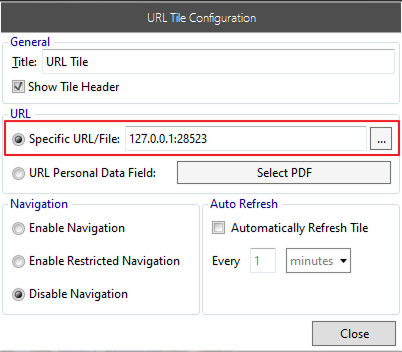
-
After completing the configuration press the save button then right-click on viewer configuration and reload the viewer to see the change.
-
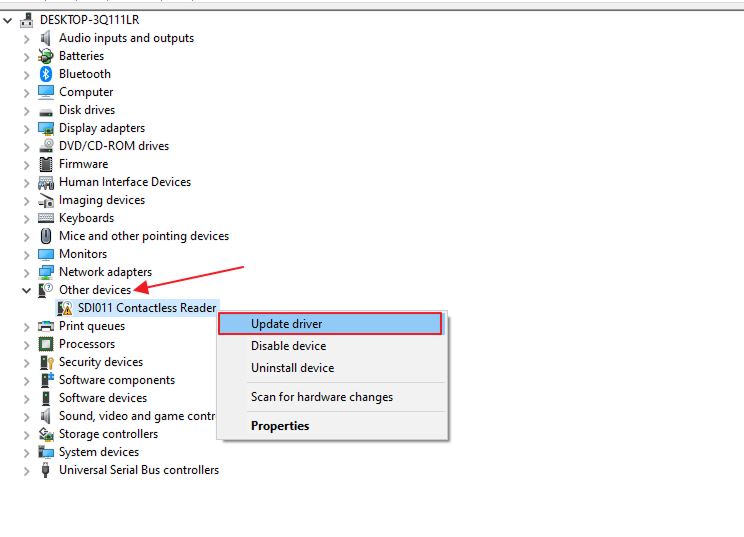
Connect the Mifare Encoder to the PC.
-
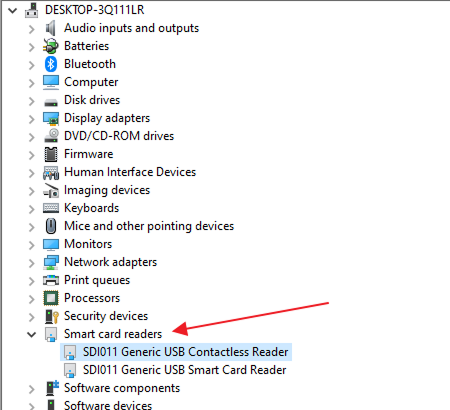
Go to the device manager in your system in other devices SDI011 Contactless Reader (In your case it can be a different device) right-clicking on that and choose the update driver.
-
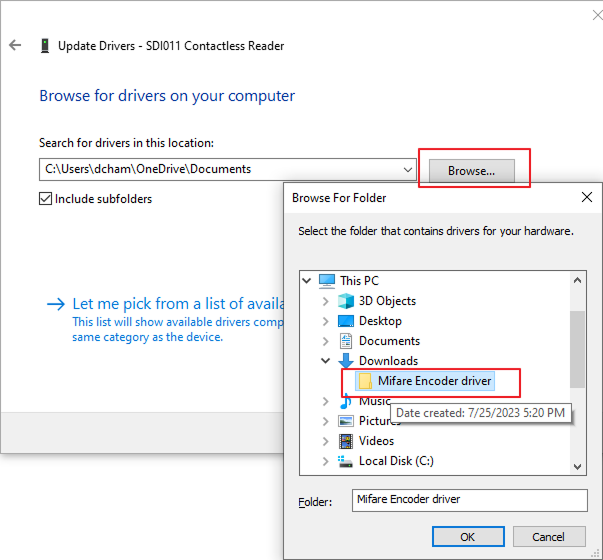
Browse my computer for the driver and select the folder that we have provided.
-
When you update the driver for the first time then a smart card reader will be available.
InformaciónThe name USB device name could differ from device to device.
-
Now we have to update the Contactless Reader driver again with the same file. After you will see the new smart card driver will be available.
Add Access Group
-
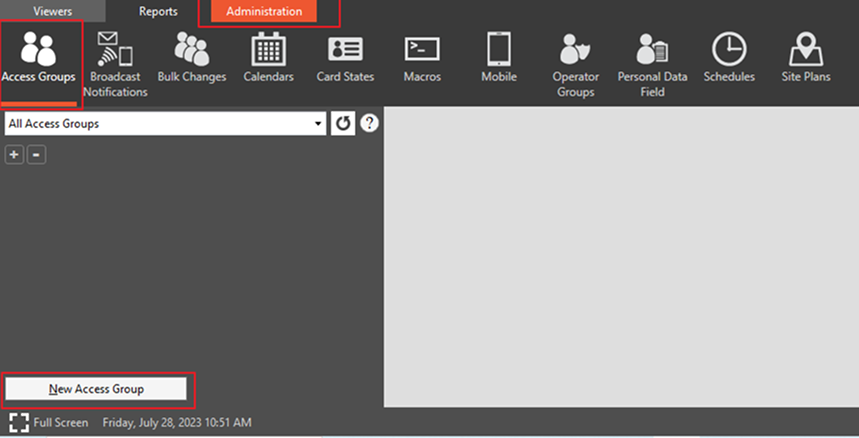
Go to Administration, where you can see Access Groups at the top left side click on that then you can see the New Access Group button at the bottom left side. Click on that button.
-
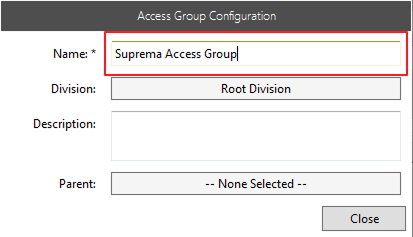
After clicking New Access Group button, a pop-up will be opened as shown below image set the Name as Suprema Access Group and click on the Close button then a pop-up will be closed.
-
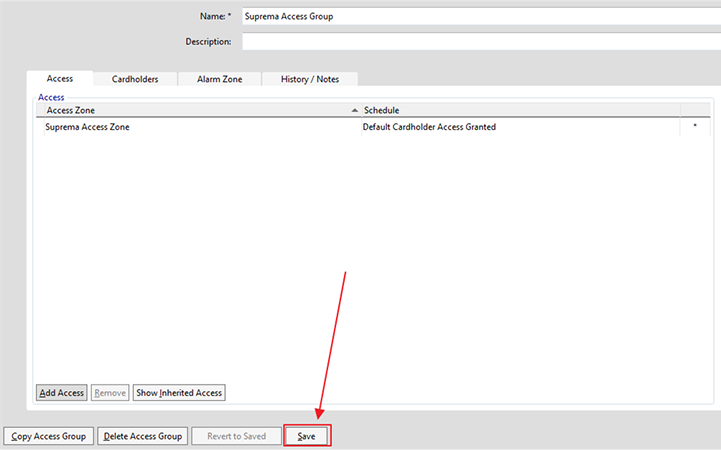
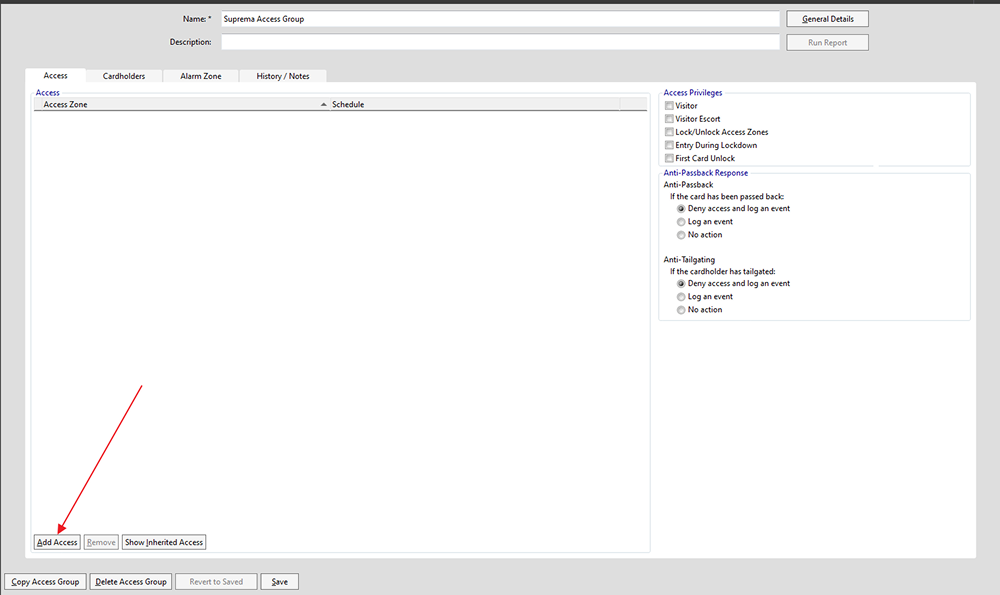
After clicking the close button, you will screen as shown in the below image, click on Add Access button at the left bottom corner.
-
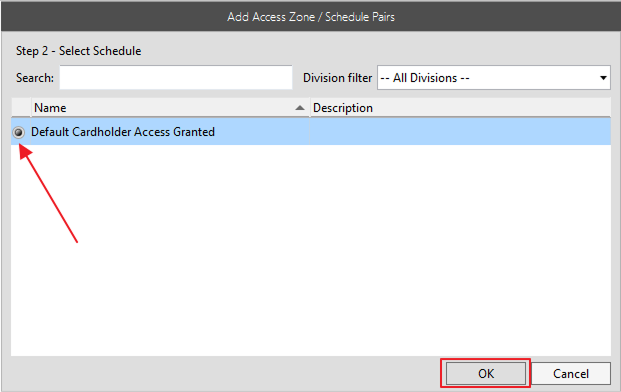
After clicking Add Access button, a pop-up will be opened as shown below image, in that checked the checkbox and then click on the Add Selection button.
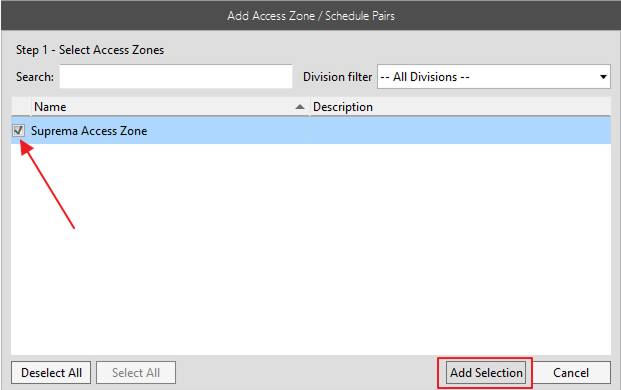
Then check the radio button and click on the OK button the pop-up will be closed.
-
Click on the Save button your Access Group will be added successfully.