Troubleshooting and FAQ
Setup
Upgrade only middleware to the new version (Manual process).
If you want to upgrade only middleware you just need to follow the steps shown below.
If you are upgrading middleware to V1.8.3, please refer: Create Migration Manually.
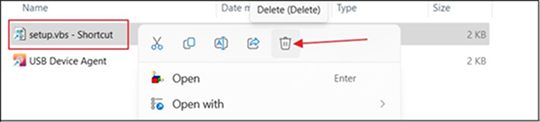
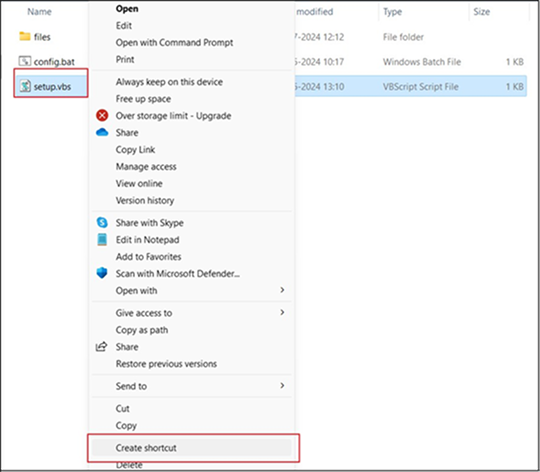
Delete the previous version setup.vbs - Shortcut.
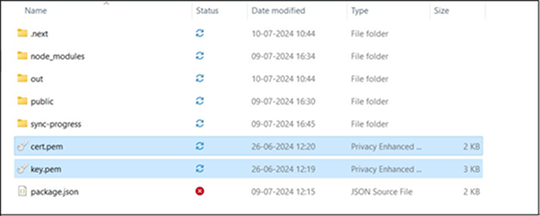
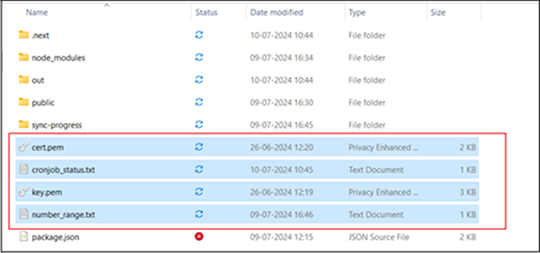
Cut cert and key files from the version you are currently using as shown in the below image.
The default path would be: C:\Program Files\Suprema Integration with Gallagher\Suprema Integration with Gallagher v(Current working version)\files
-
If you are upgrading from the 1.8.0 or above version you will need to cut a total of four files, Which are
key.pem,cert.pem,cronjob_status.txtandnumber_range.txt. -
In the 1.7.0 version only number_range is not available so cut the other three files.
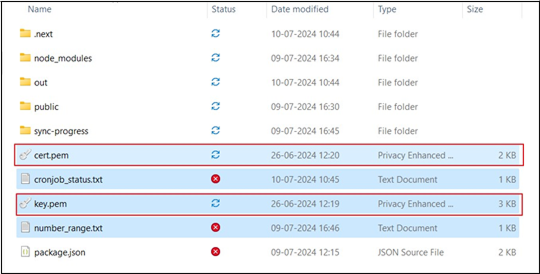
Now paste the files into the new version of Suprema integration with Gallagher V(new version)\files, as mentioned above if you are upgrading from 1.8.0 or more you will need to cut 4 file and below image show the image that are pasted to new version with 4 files, so in case if you dont have 4 files just paste 2 files from old version to new version.
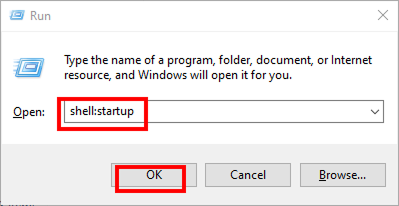
Create short cut of setup.vbs of the latest version of Suprema integration with Gallagher and cut the shortcut file.
Go Run Win + R and paste it on shell:startup and after that restart your desktop.
If the middleware is not getting started automatically.
First, make sure that the shortcut of the setup.vbs file is present on the shell:startup. If setup.vbs is not present please paste it to shell:startup and restart your system.
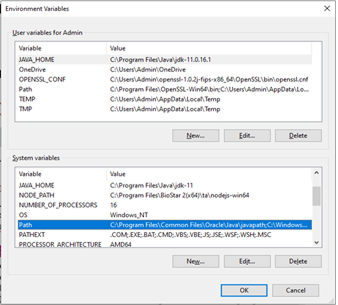
Still, the middleware is not getting started automatically then check for the environment variable, you can access it by pressing Inicio → Edit the system environment variables → click the Advanced tab → Environment variables button near the bottom of that tab.
In the Environment Variables window (pictured below), select the Path variable in the System Variables section and click the Edit button.
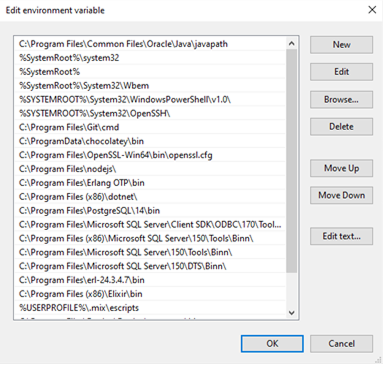
The edit environment variable window will be open (pictured below), click on the New button and add the C:\Program Files\nodejs\ path and press the OK button.
Press the OK button for the Environment Variables window then press the OK button for the system properties.
After creating or modifying the environment variables, restart the computer for those changes to take effect in Windows.
To uninstall the middleware prerequisites list.
So below are the steps to uninstall the middleware prerequisites,
-
Open the control panel and go to the Programs and Features section.
-
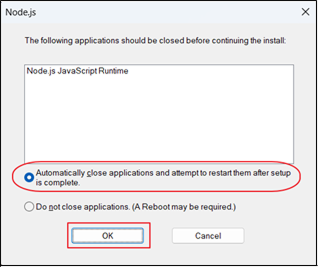
Scroll down and search Node.js, Right click on that and select Uninstall.
-
It asked to uninstall Node.js, press Yes and it started uninstalling.
-
After some time when it asks for Runtime application, Follow the below and press OK. Skip this step if it does not apply to you.
-
Now search for OpenSSL, Right click on that and press uninstall.
-
It asked to uninstall OpenSSL, press Yes and it started uninstalling.
-
Now search for PgAdmin 4, Right-click on that, and press uninstall.
InformaciónIf you are not able to see/uninstall the PgAdmin 4 just skip the step And follow the next steps.
-
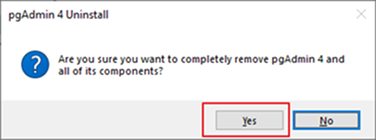
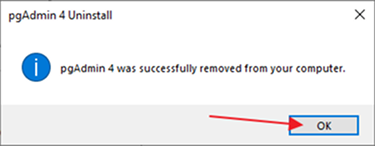
It asked to uninstall PgAdmin 4, press Yes and it started uninstalling.
-
Now search for PostgreSQL 14, Right click on that and press uninstall.
-
It asked to uninstall PostgreSQL 14, press Yes and it started uninstalling.
-
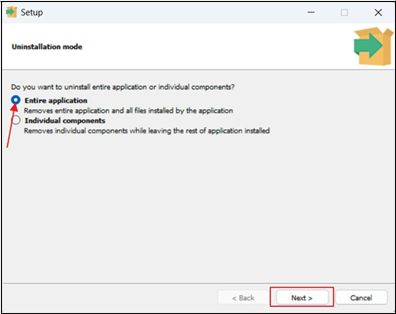
When Uninstallation mode is open, Select the Entire application Radio Box and press Next.
-
Now go to the
C:\Users\<YourUser>\AppData\Roaming\pgadmin\sessionsdelete all the files inside this folder.InformaciónIf not able to see the AppData folder: Open the AppData folder in Windows.

-
Now go to the
C:\Users\<Your User>\AppData\Localand select PgAdmin and PgAdmin4 folder and delete the folders. -
Now go to the
C:\Program Filesand delete the PostgreSQL folder.
How to Open the AppData folder in Windows.
So if you are using Windows 11, Inside the file manager click on the View tab and select Show and click on Hidden items.
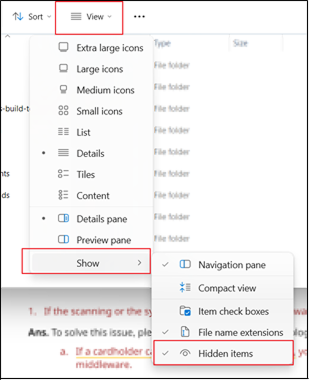
If you are using Windows 10, open File Manager and click on View and select Hidden items.

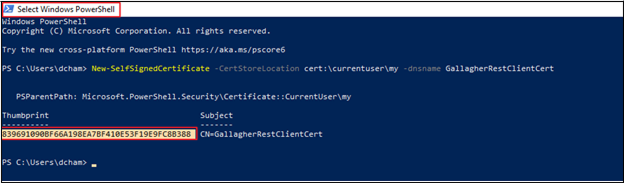
How to generate the thumbprint and certificate manually.
-
To generate Client Certificate Thumbprint, go to Windows PowerShell and run this command to get the certificate thumbprint.
New-SelfSignedCertificate -CertStoreLocation cert:\currentuser\my -dnsname GallagherRestClientCert
-
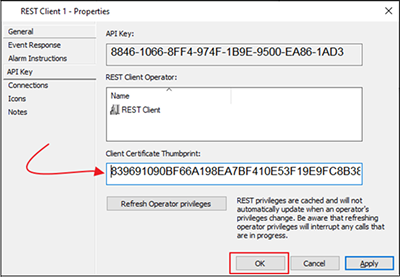
Copy the thumbprint and Paste the Client Certificate Thumbprint key into the Client Certificate thumbprint section press the OK button and also Close the Services and Workstations.
SSL Certificate Generation
-
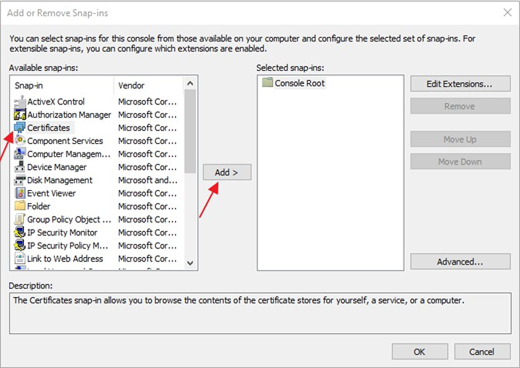
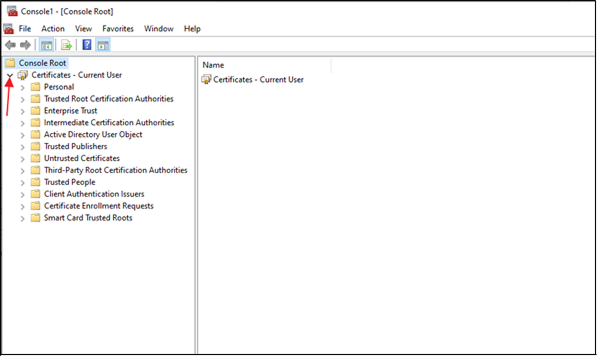
Go to the start menu and Open the MMC Application.
-
Go to File → Add/Remove Snap-in… you can see below screen.
-
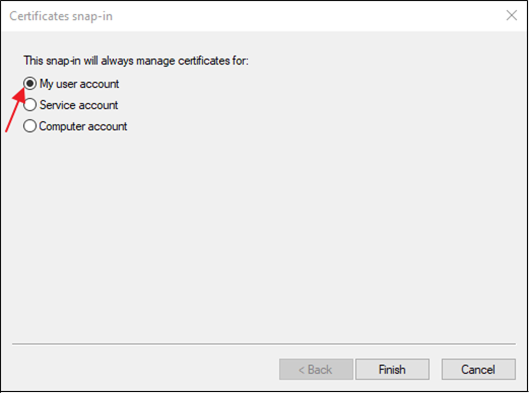
Select Certificates and click on Add button then you will see the below screen where select the My user account radio button and click on Finish button.
-
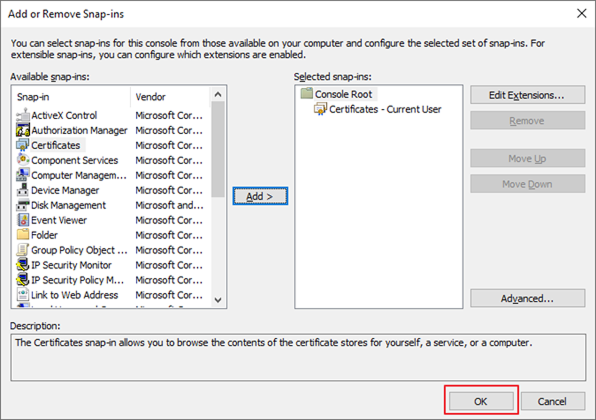
After clicking on the finish you will see the below screen now click on the OK button. The certificate will be added successfully.
-
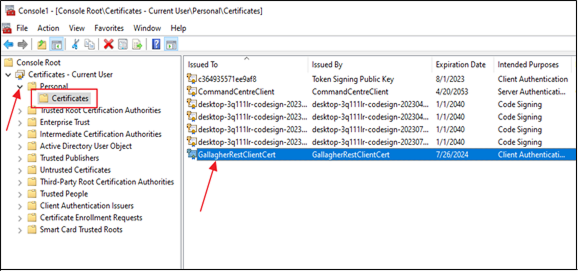
Now go to Certificates - Current User → Personal → Certificates and select GallagherRestClientCert certificate.
-
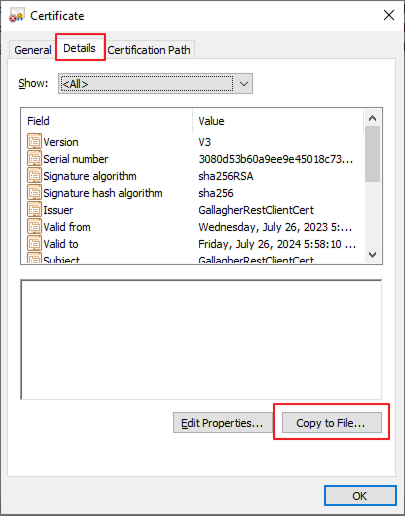
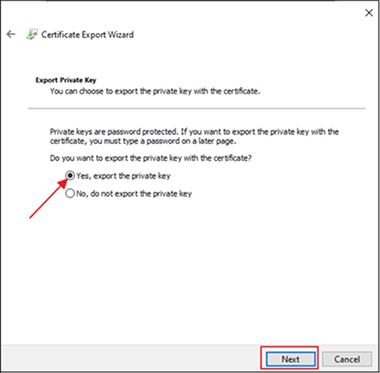
Go to Details and click on Copy to File.
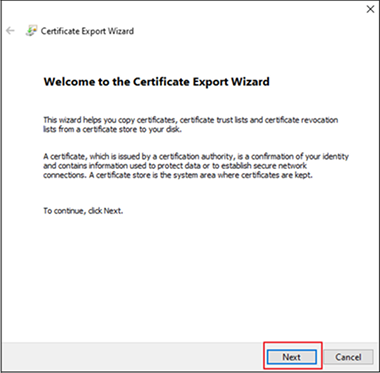
Now follow the below screenshots and click on next simultaneously.
InformaciónPlease validate that the Thumbprint is correct if you have more than one Certificate.
-
Now you will see the below screen check the password checkbox and set the password as the below password: G@ll@gher
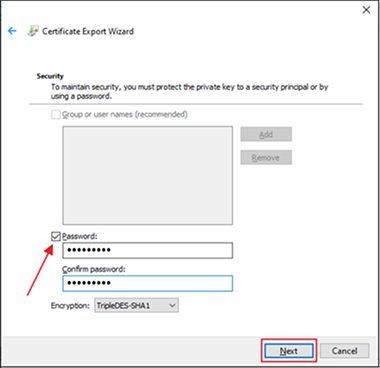
-
Now browse the path
C:\Program Files\Suprema Integration with Gallagher\Prerequisitesto export the file and save this file as GallagherRestClient.pfx then click on Next.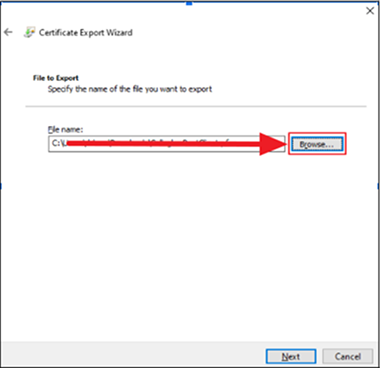
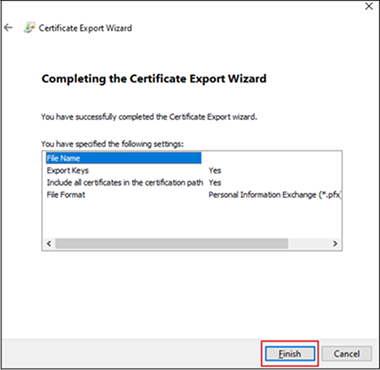
Click on Finish and your certificate will be exported successfully and close the certificate and MMC window.
-
Now, go to the path
C:\Program Files\Suprema Integration with Gallagher\Prerequisiteswhere we exported the GallagherRestClient.pfx certificate file, and double-click on the GallagherRestClient.pfx file, select the Current User radio button as shown below image then click on the Next.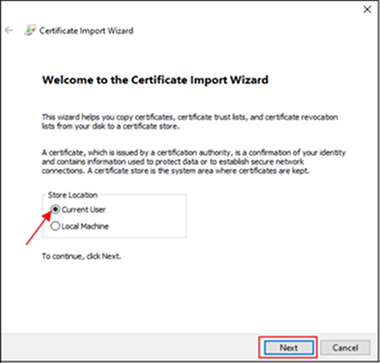
-
Now, browse the
C:\Program Files\Suprema Integration with Gallagher\Prerequisiteswhere we saved GallagherRestClient.pfx then click on the Next.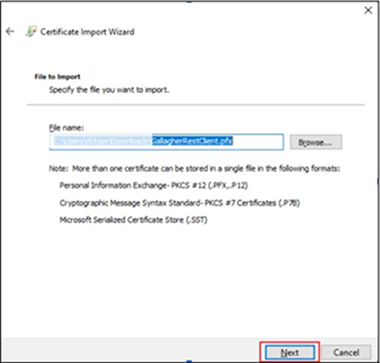
-
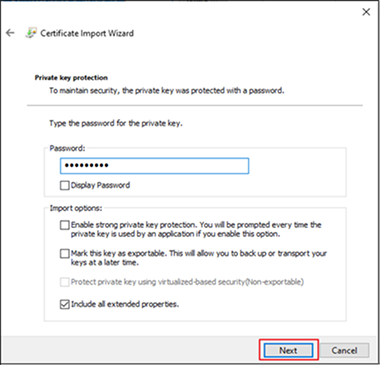
Now, Enter Password G@ll@gher and check the checkbox as shown below the image then click on the Next.
-
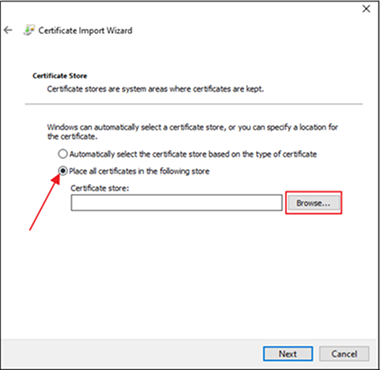
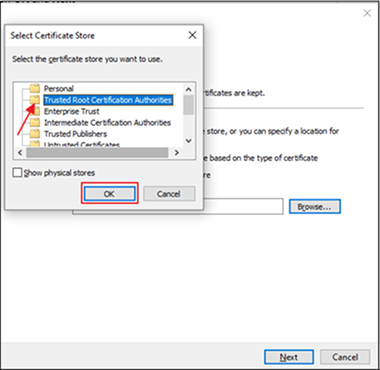
Select Place all certificates in the following store Radio button and browse the Trusted Root Certification Authorities folder then click on OK and Next.
-
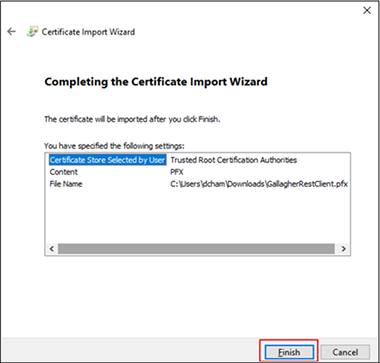
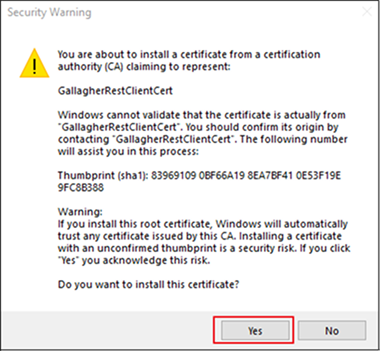
Click on Finish you will see a security Warning, click on Yes.
Now, go to the path
C:\Program Files\Suprema Integration with Gallagher\Prerequisiteswe saved GallagherRestClient.pfx file, open Powershell here, and Type PowerShell in the Folder URL to open PowerShell. -
Type the below command to Generate the key.pem file.
openssl pkcs12 -in Gallagherrestclient.pfx -nocerts -out key.pem
-
Next, it will ask for the password. So enter the password which you set earlier i.e, G@ll@gher.
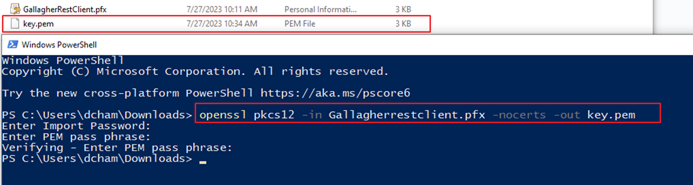
Your key.pem file will be generated successfully.
InformaciónYou need to enter the password three times here.
-
Next, type the below command to Generate a cert.pem file:
command: openssl pkcs12 -in Gallagherrestclient.pfx -clcerts -nokeys -out cert.pem
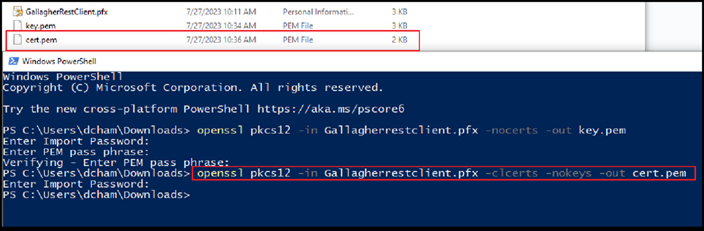
Next, it will ask for a password. So enter the password that we set earlier G@ll@gher.
Your cert.pem file will be generated successfully.
InformaciónYou need to enter the password One time here.
-
-
Next copy both file key.pem and cert.pem and paste that at below path
C:\Program Files\Suprema Integration with Gallagher\Suprema Integration with Gallagher v(lateast version)\files.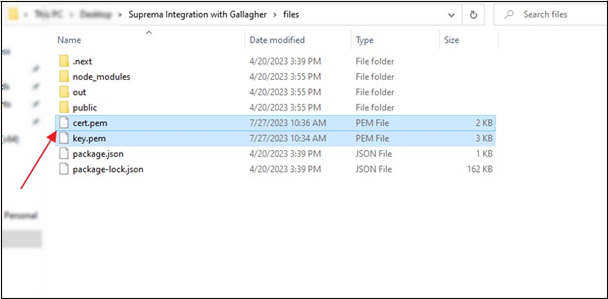
Upgrading the middleware from EXE application directly.
-
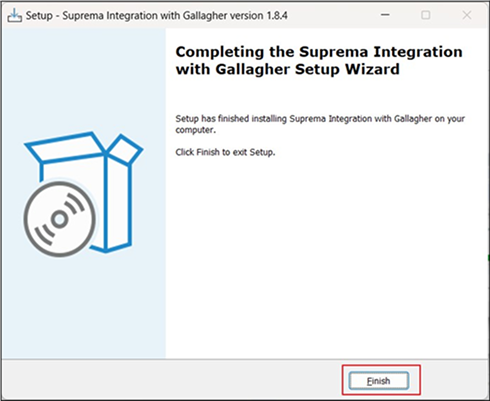
If you are upgrading the version, press OK on pop-up.
-
Then press Update button.
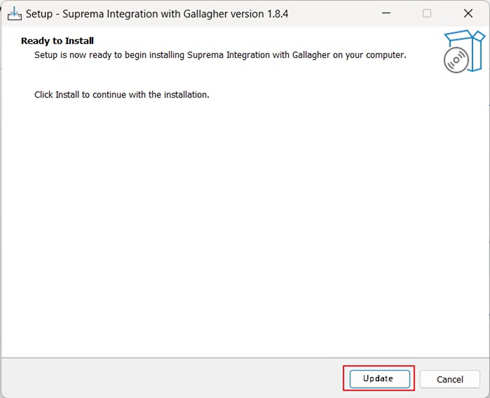
-
It will start upgrading the middleware.
-
After Successfully installing the middleware you need press Finish button.
InformaciónFor latest changes It is necessary to restart the system!
Uninstall the middleware from EXE application directly.
-
Press windows Inicio button, Search, and open Add or Remove programs.
-
Inside the Apps & features search list, search for Suprema integration with the Gallagher version, select the version, and click on Uninstall it shows a small pop-up press Uninstall another time.
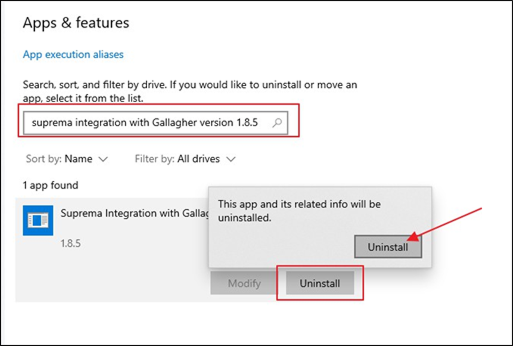
-
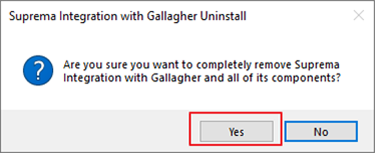
Press Yes on the remove all component of integration pop-up.
-
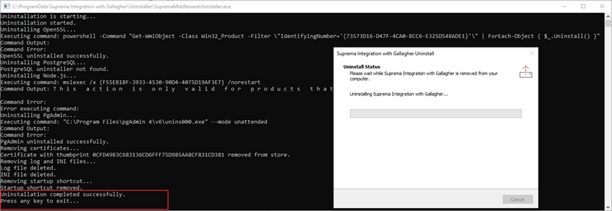
The uninstallation will start and you can see something like the screens below.
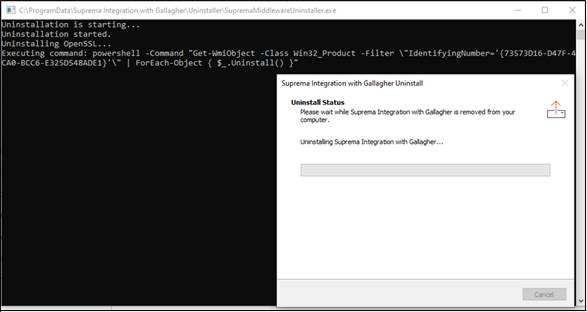
-
Press Yes on the below pop-up.
-
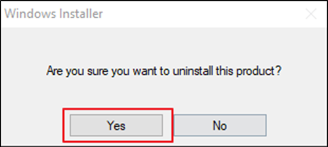
Press Yes for the below pop-up.
-
Press OK.
-
Now click inside the terminal and press enter to complete the uninstallation process.
-
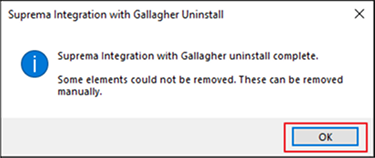
Press OK on the pop-up below and you have successfully removed the middleware.
InformaciónYou must need to restart the system to reflect the changes.
Middleware
If the scanning or the syncing of the data in the middleware is extremely slow.
-
To solve this issue, please click here and refer to the blog.
- You cannot see any card in the middleware if a cardholder card is automatically not created.
-
You need to add 3 privileges to the Operator Group.
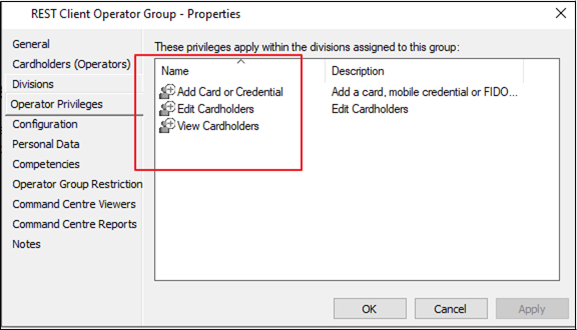
After adding these three privileges please restart your system.
There is an error on the log-in page stating that "LAN is disconnected or IP is changed for (IP Address)".
-
To solve this issue, please check the below troubleshooting scenarios:
-
Make sure the LAN cable is connected.
-
Check If the IP has not changed and if the IP address is the same for the BioStar 2 Server you have entered the wrong IP Address.
-
-
If you receive the error LAN is disconnected or IP is changed for (IP Address) on the login screen, you must press the click here to Reset button in the middleware.
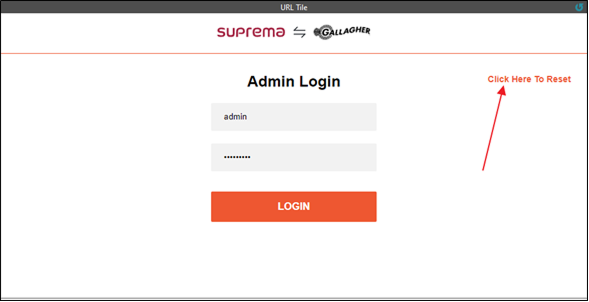
It asks for permission to reset the middleware, press the Yes button.

Once it is reset you can see the initial screen for the middleware and follow the further steps.
If you get an error for "LAN is disconnected or IP is changed for (IP Address)" between running the middleware on any page.
-
To solve this issue, please check the below troubleshooting scenarios:
-
Make sure the LAN cable is connected.
-
Check If the IP has not changed and if the IP address is changed for the BioStar 2 Server.
-
-
In this case, just go to the Settings → Admin Management → IP management section inside the middleware.
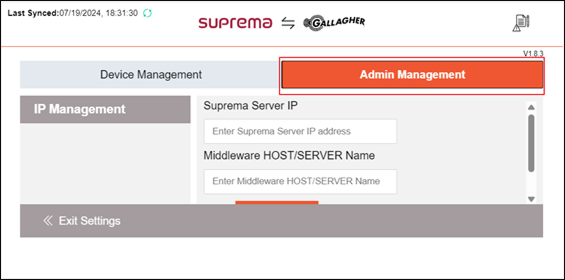
Now inside the text box enter the IP address of the BioStar 2 server and the HOST/SERVER name of the middleware press the Submit button to start the BioStar 2 services for the middleware.
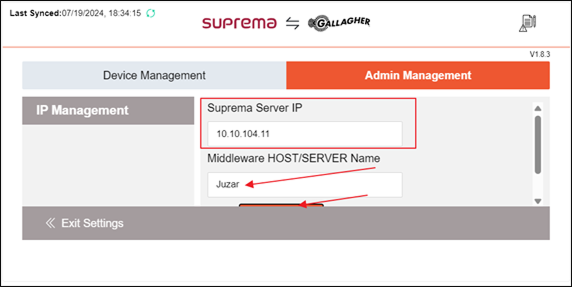
After pressing the submit button you get the success message for IP change and press the Exit setting button to leave the setting screen.
How to Use middleware on multiple servers on older versions.
From version 1.7.0 we have added one separate screen to get the BioStar 2 server IP address. So this is the solution for use with the middleware version below 1.7.0.
Below are the steps to change the IP address,
-
Go to Pgadmin → tables and right-click on the table and Tuncate → Truncate Restart Identity (for all three tables).
-
Go inside the Gallagher command center if you can't see the API key window and are just able to see the login screen, click on the reset middleware link and reset the middleware.

-
After entering the API key for the middleware do the login and open Pgadmin, right-click on the credential table, and view/edit data → All Rows.
-
It will load the data for the table. Now, change the IP address according to your BioStar server IP and press the F6 button to save the changes.

-
After this, you have to truncate the globaluserrecord table inside Pgadmin.
-
Restart the system to reflect the changes.
Run the middleware on a specific port on two different servers with specific IP addresses/Configure the inbound rules for the middleware.
Below are the instructions to run the middleware on a specific port on two different servers with specific IP addresses.
We found our middleware is using the 28523 port to call the backend of our application (middleware-backend) inside the backend we called the BioStar 2 server APIs so for that the only port used is 443 as it is the web server HTTPS default port.
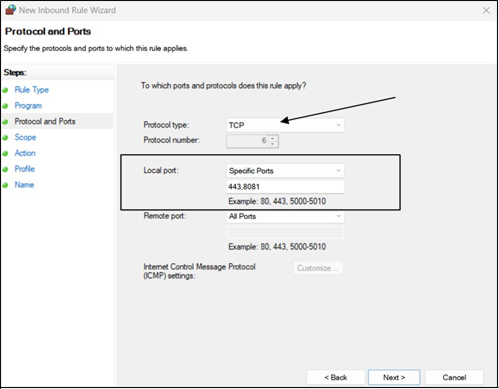
So for this inside the server2 which is the BioStar 2 server we have set the Protocol type as TCP and provide 443,8081 ports for the local port. Leave the remote port option as All ports.
Server 1 has Gallagher and Middleware within,
-
IP Address: 192.168.1.68
-
Subnet mask: 255.255.255.0
-
Default Gateway: 162.168.1.1
Server 2 has BioStar 2 within,
-
IP Address: 10.10.104.13
-
Subnet mask: 255.255.254.0
-
Default Gateway: 10.10.104.1
Here are the steps to create Inbound rules:
The below steps need to run on the BioStar 2 server.
-
Open Windows Defender Firewall Settings:
-
Press the Win + R to open the Run dialog.
-
Type
control firewall.cpland press Enter. This will open the Windows Defender Firewall settings.
-
-
Access Advanced Settings:
- In the Windows Defender Firewall window, you'll see options on the left-hand side. Click on Advanced settings. This opens the Windows Defender Firewall with the Advanced Security console.
-
Create New Inbound Rule:
-
In the Windows Defender Firewall with Advanced Security console, you'll see options on the left-hand side including Inbound Rules and Outbound Rules.
-
Click on Inbound Rules.
-
In the right-hand pane, click on New Rule.... This opens the New Inbound Rule Wizard.
-
-
Select Rule Type:
- In the New Inbound Rule Wizard, select Custom and click Next.
-
Configure Program:
- If you want to apply this rule to a specific program, you can specify it here. Since we're dealing with ICMP traffic, leave this as All programs and click Next.
-
Configure Protocol and Ports:
- In the Protocol and Ports window, select TCP as we are going to work with specific ports. Now inside the local port, we have to select specific Ports and enter 443, and 8081 ports. Leave the Remote Port as All Ports. Then click Next.
InformaciónHere we have assigned the 8081 port as BioStar 2 using it for USB devices.
-
Configure Scope:
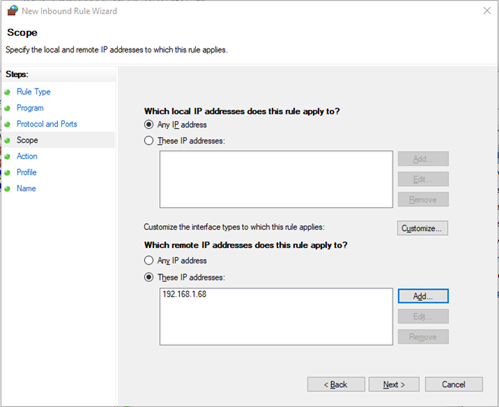
- In the Scope window, you can specify which IP addresses are allowed to send ICMP traffic to the server. So local IP addresses leave it as it is and for remote IP addresses fill in the IP address of the Gallagher&Middleware server, now choose These IP addresses: Click on the Add button then in the IP address wizard enter the IP Address of Gallagher&Middleware server, and press OK. Please refer below image for reference.
-
Configure Action:
- In the Action window, select Allow the connection and click Next.
-
Configure Profile:
- In the Profile window, select the profiles for which this rule will apply. Typically, you would want to enable this for all profiles (Domain, Private, Public). Then click Next.
-
Name and Description:
- Give your rule a name and description. For example, you can name it Allow ICMP Echo Request for middleware. Then click Finish.
-
Enable the Rule:
-
After creating the rule, you should see it listed in the Inbound Rules section of the Windows Defender Firewall with Advanced Security console.
-
Right-click on the rule you just created and select Enable Rule if it is not enabled automatically. This ensures that the rule is active and will allow ICMP traffic.
-
If the BioStar server IP changes and Middleware gets slow.
If you facing the error where your IP is changed, check the following link: https://support.supremainc.com/en/support/solutions/articles/24000041659--biostar-2-troubleshooting-when-the-server-ip-changed.
If a thumbprint is not generated while running the EXE file.
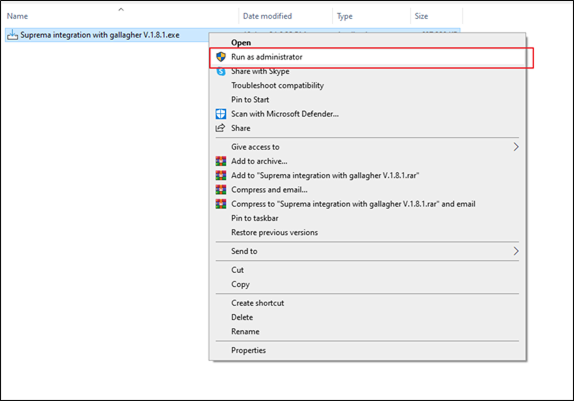
If you have installed middleware and a thumbprint is not generated then try again running our EXE file with administrator rights, to do this follow the below instructions.
Right-click on our Suprema integration with the gallagher.exe file and select Run as administrator option as shown in the below screenshot. Now it asks for permission click Yes to run our exe file.
Still, the thumbprint file is not generated, please go to the C:\TMP and share all the log Files with the development team.

Till then please refer to the article which helps to manually generate the thumbprint. Refer: How to generate the thumbprint manually.
Create Migration Manually.
We are doing the migrations because from the middleware V1.8.3 is supporting the Hostname so we can use our middleware using the Gallagher workstation client.
To create the migration manually Please follow the steps below:
-
Go to the Pgadmin. It asks for the password, Write The password G@ll@gher as it default password we set during the installation.
-
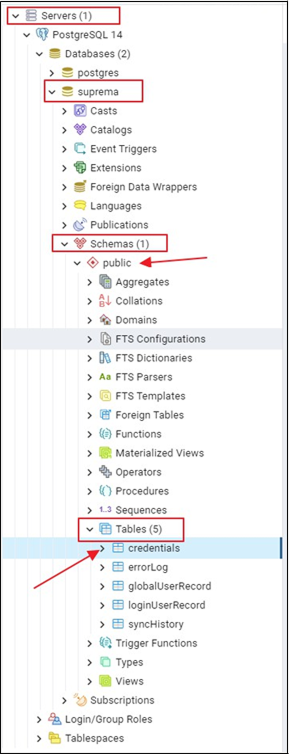
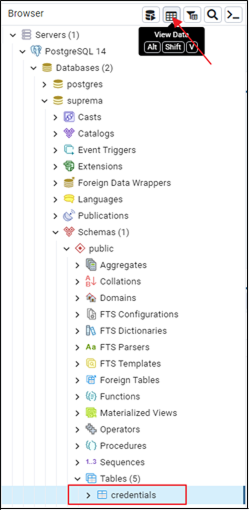
Now click on the Servers, If it asks for the password use the same G@ll@gher as Password, now click on the Databases and Expand the Suprema → Schemas → public → Tables. Now select the credentials table.
-
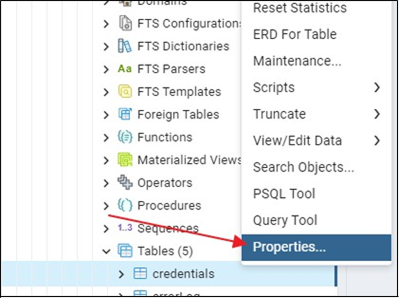
Now Right click on the credentials table, and select the Properties option from the list.
-
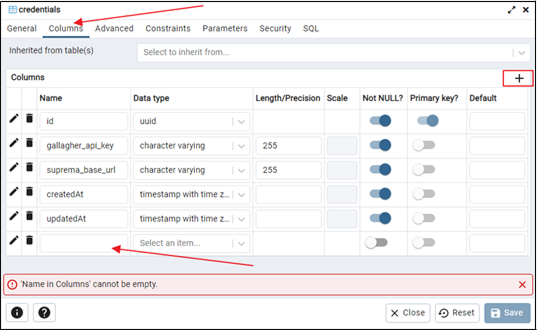
Now inside the window select the Columns option, then click on the + icon, it will generate the new column option for you as shown in the below image!
-
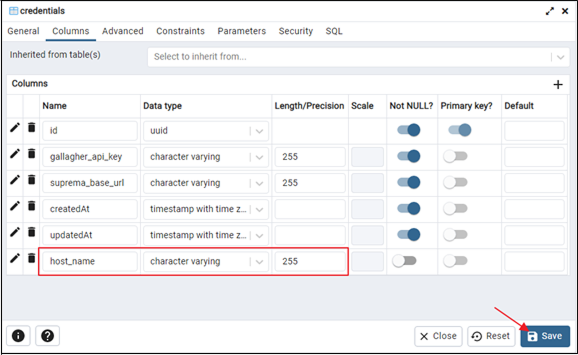
Now inside the Columns option, set the name as host_name, and set the datatype as the character varying, set the Length/Precision as 255 and hit the Save button.
-
Now select the credentials table, and click on the View Data button.
-
Now inside the column host_name, double-click on the box, and the pop-up will open.

-
Inside the pop-up write
https://[YOUR-HOST/SYSTEM-NAME]/apiand press OK.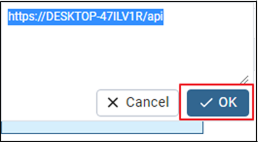
-
Now press F6 to save the changes.
Steps to Backup PostgreSQL 14 Database, Upgrade to Version 16, and Restore Database.
Backup Database in PostgreSQL 14
-
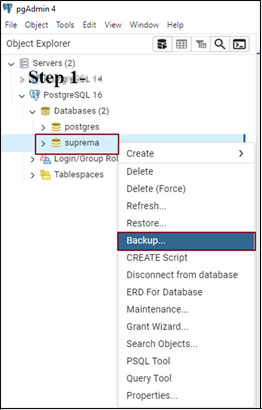
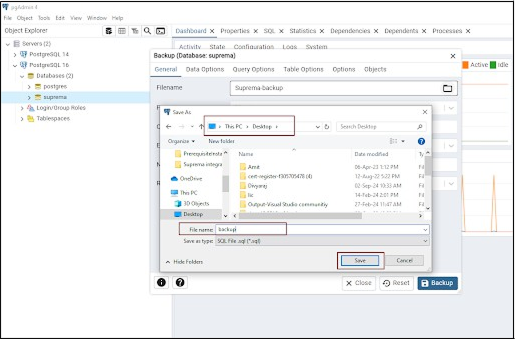
Open pgAdmin 4:
- Right-click on the Suprema database under the Databases section and select Backup.
-
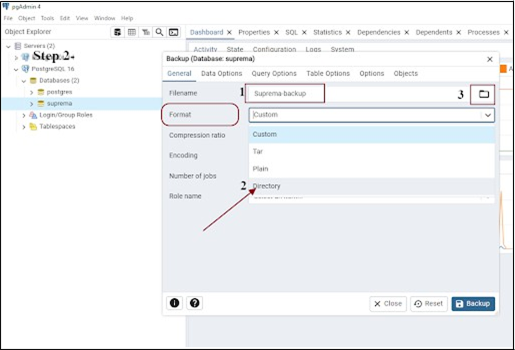
Set Backup File Name and Format:
-
In the File name field, enter Suprema-backup as the name, and choose Directory as the format.
-
Click the file icon to select a save location.
-
-
Choose Save Location:
- Select the directory where you'd like to save the backup (e.g., Desktop). Enter the file name and press Save.
-
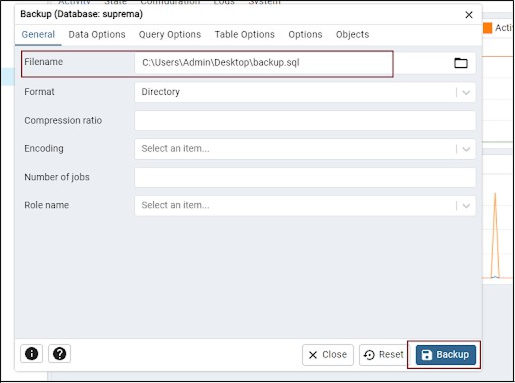
Start Backup:
- You’ll see the file name updated with the location you selected. Press the Backup button.
-
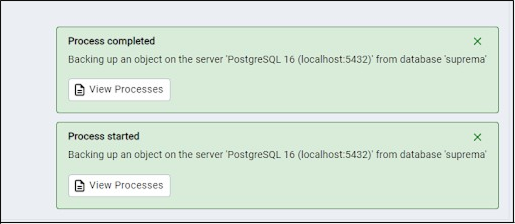
Confirm Backup Completion:
- A notification will appear once the backup is completed. Now, your database is safely backed up.
Upgrade PostgreSQL to Version 16
-
Stop Middleware and PostgreSQL Services:
- Stop running middleware and terminate PostgreSQL services by stopping processes on ports 28523 and 5432.
-
Update Password (if required):
- Set the password to G@ll@gher to ensure compatibility during the upgrade.
-
Install PostgreSQL 16:
- Download and install PostgreSQL 16 from the official PostgreSQL website, following the installation steps for your operating system, or refer to the link to directly get V16.4.1: https://drive.google.com/file/d/17ehlTpedaGeWezOHZiMd6-ircQhTqBAJ/view?usp=drive_link.
-
Migrate Data (Optional):
- Please refer to the Restore Database in Postgresql 16.
-
Uninstall PostgreSQL 14 (Optional):
- After confirming the upgrade, you may uninstall PostgreSQL 14 if it’s no longer needed. Refer: Uninstall the postgresql14 after upgrading to version 16.
Restore Database in PostgreSQL 16
-
Open pgAdmin 4 (connected to PostgreSQL 16).
-
Create a New Database:
-
In pgAdmin, right-click on Databases and select Create → Database.
-
Name the database Suprema and save.
-
-
Restore the Backup:
- Right-click on the newly created Suprema database, and select Restore.
-
Select Backup File:
- In the Filename field, select the directory backup file (Suprema-backup) you created earlier.
-
Initiate Restore:
- Click Restore. Wait for the process to complete.
-
Verify Restore Completion:
- Once the restore is finished, you should see a success message. You can now access and verify your data in PostgreSQL 16.
Uninstall Postgresql 14 after upgrading the Postgresql to version 16.
To uninstall Postgresql 14 follow the below steps,
-
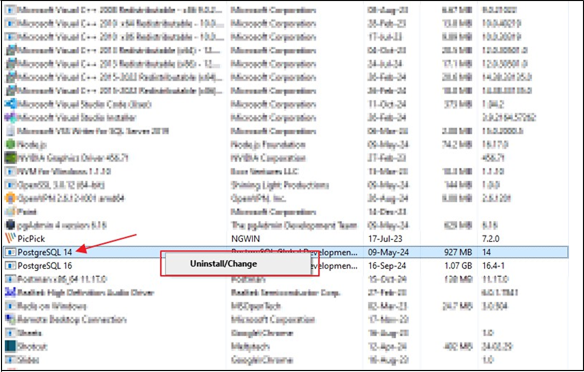
Go to Control Panel → Programs → Programs and Features.
-
Find PostgreSQL 14 in the list of installed programs.
-
Right-click on PostgreSQL 14 and select Uninstall. Follow the prompts to complete the uninstallation.
-
You might want to check the installation directory (usually in
C:\Program Files\PostgreSQL\14) and delete any remaining files or folders.
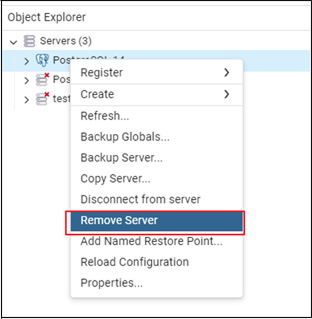
If PostgreSQL 14 still shows up in pgAdmin even after uninstalling it, it's likely because pgAdmin is still retaining the server configuration for it.
You can manually remove it from pgAdmin by following these steps:
-
Right-click on PostgreSQL 14 in the Object Explorer panel in pgAdmin.
-
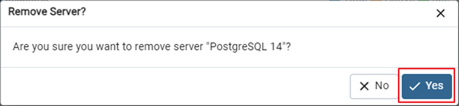
Select Delete/Remove Server from the context menu.
-
Confirm the deletion prompted.
This will remove the PostgreSQL 14 server configuration from pgAdmin without affecting your PostgreSQL 16 installation.