System Management
System Configuration
Prerequisites
License
-
Software license
-
Genetec
-
Security Center: 1ea.
-
SDK Connection: GSC-1SDK-SUPREMA-READ (One license supports 2 connection.)
-
Config Tool login: 2ea
-
Security desk login: 1ea
-
Suprema extractor plugin: 1ea per Genetec Security Center Server
-
Suprema device plugin: 1ea per Suprema device plugin
InformaciónOne device plugin supports up to 4 cloud links (256 Suprema devices), and you can add as many Suprema Device Plugin as you need.
- Needs total 3 GSC-1SDK-SUPREMA-READ per Server.
-
-
-
Suprema
- Plugin license: INT_GEN_GSC
-
-
Device license
-
Genetec
- GSC-Sy-X-1R(E): 1ea per Suprema device assigned to door as reader.
-
Suprema
-
Only devices that it's ID is registered in Server license can be registered in Plugin.
-
Sku: Device model - GEN.
-
-
Database
-
Permission for SQL database
To ensure proper operation of the Plugin (Device Plugin and Extractor DB), please grant the SQL account the following permissions:
-
Server roles:
-
db_creator
-
processadmin
-
public
-
-
Database roles:
-
db_backupoperator
-
db_datareader
-
db_datawriter
-
-
-
Database size requirements
The required database storage capacity varies depending on the number of users enrolled with biometric data. When face templates are enrolled, the Suprema Extractor Plugin generates and stores the corresponding templates in its Database.
-
Each face template requires approximately 104 KB of database space.
-
Ensure that sufficient storage capacity is allocated based on the expected number of biometric users.

-
RIO protocol
To ensure proper operation of the Plugin, please enable RIO protocol for Synergis Cloud Link or Softwire.
Process
-
Enter the following URL into your browser.
https://[Unit IP]/Features/DuiRIO/Enabled/Set?value=true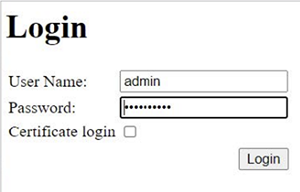
-
Login to Synergis Cloud Link or Softwire.
-
Click a URL
http://[IPaddress]/Features/DuiRIO/Enabled/Set?value=true.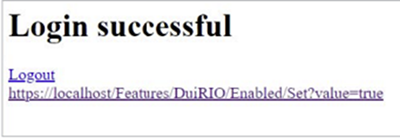
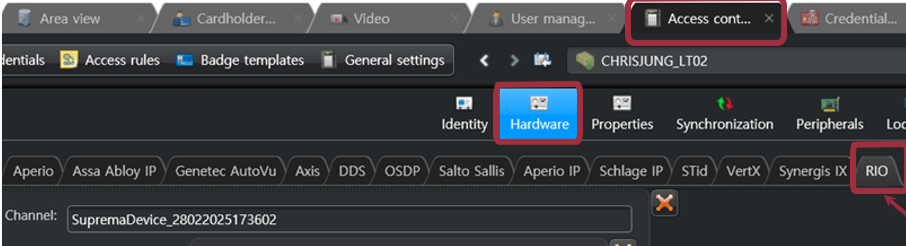
When the RIO protocol is enabled, the RIO tab becomes available on the Hardware page under Config Tool → Access Control → Cloud Link.
Profile image quality setting
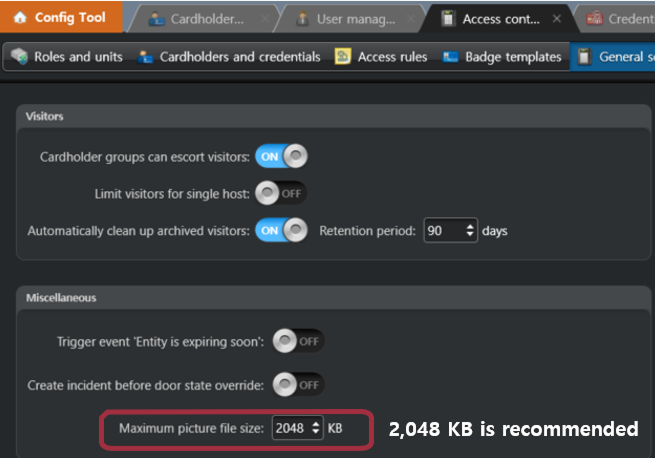
If you'd like to extract face templates from cardholder profile images in GSC, please adjust picture size to ensure picture quality.
-
Path: Config Tool → Access Control → General settings
Device setting
-
Removing all users and logs from devices.
-
Factory reset devices.
-
Set User ID type as Alphanumeric.
InformaciónDefault IP and PW for device admin.
-
ID: su
-
PW: 1234
You can change PW from Config Tool → Suprema Plugin Configuration → Superadmin Credential page.
-
-
Network setting.
-
Supports DHCP.
-
Network settings required according to site policy.
-
-
User ID type setting.
The user ID type must be set to alphanumeric before connecting the device to the Suprema plugin.
Device Registration
-
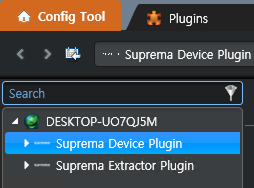
In the Config Tool, click the Plugins under Tasks.

-
Click the Suprema Device Plugin.
-
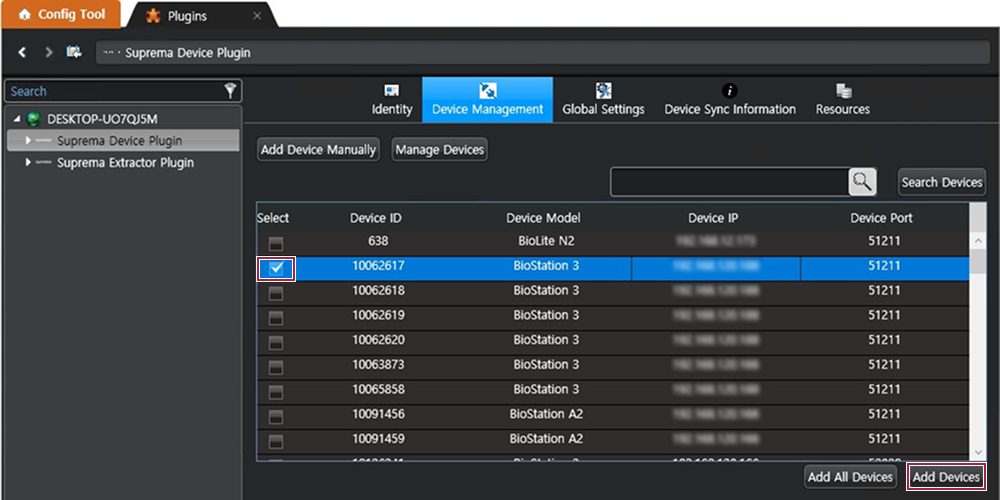
Go to Device Management tab.

-
Click the Search Device button. All available devices will appear.
If Device Communication Mode is set to Device To Server, please click the Refresh List button in the pane below.
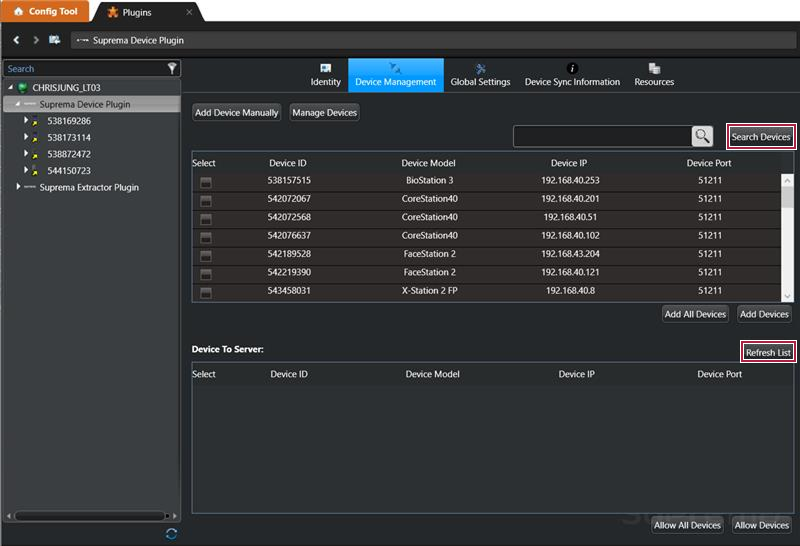
-
Select the device to add by checking the Select box, and click the Add Devices button. To register all devices, click the Add All Devices button.
View the Device Sync Information
-
In the Config Tool, click the Plugins under Tasks.
-
Click the Suprema Device Plugin.
-
Go to Device Sync Information tab.

-
Synchronization information of connected Suprema devices can be checked.


No. Item Description 1 Device ID Displays the Suprema device ID. 2 Device Name Displays the Suprema device name. 3 Online Status Displays the network status of the device.
- True / False4 Sync Status Displays the synchronization status of the device.
- Idle /Cache loading/ Biometric downloading/ Syncing5 Device Model Displays the Suprema device model. 6 IP Address Displays the Suprema device IP Address. 7 Device Port Displays the Suprema device port. 8 Device Firmware Version Displays the Suprema device firmware version. 9 Failed Users Allows checking users who failed to synchronize. 10 Doors (syncing / failed / total) Displays the synchronization status of the door. 11 Schedules (syncing / failed / total) Displays the synchronization status of the schedule. 12 Access Levels (syncing / failed / total) Displays the synchronization status of the access level. 13 Access Groups (syncing / failed / total) Displays the synchronization status of the access group. 14 Users (syncing / failed / total) Displays the synchronization status of the cardholder. 15 Last Trigger Time The time when synchronization with the device was last triggered. 16 Last Success Time The time when synchronization with the device was last completed successfully. InformaciónThe values displayed for each synchronization status are as follows:
-
syncing: Number of items currently being synchronized with the device.
-
failed: Number of items that failed to synchronize with the device.
-
total: Number of items that have been successfully synchronized.
-
Editing Device Settings and Information
Settings and information of registered devices can be edited.
-
In the Config Tool, click the Plugins under Tasks.
-
Open the left arrow of the Suprema Device Plugin and select a registered device. The Device Settings area will appear.
-
Set the desired options, then click the Apply button at the bottom to apply the edited settings.
Device Settings
Information
You can enter or edit the name and the group of a device. If a new firmware version is available, you can upgrade to it.
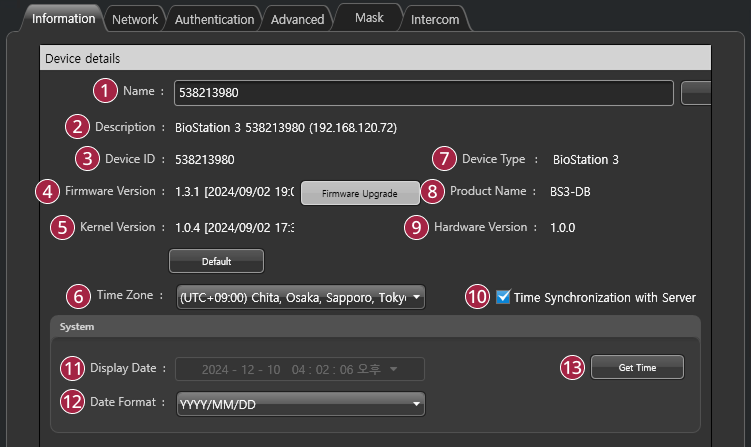
| No. | Item | Description |
|---|---|---|
| Name | Enter a device name. | |
| Description | View the product name, ID, and IP. | |
| Device ID | View the device ID. | |
| Firmware Version | Click Upgrade to install a new firmware version. | |
| Kernel Version | View the kernel version. | |
| Time Zone | Set the time zone of the device. | |
| Device Type | View the device type. | |
| Product Name | View the model name. | |
| Hardware Version | View the hardware version. | |
| Time Synchronization with Server | Select the option to synchronize the time information of the device with the server. | |
| Display Date | View the displayed time. | |
| Date Format | Select a date format. | |
| Get Time | Click the button to fetch the time set in the device. |
Network
You can configure the network connection settings of the device.
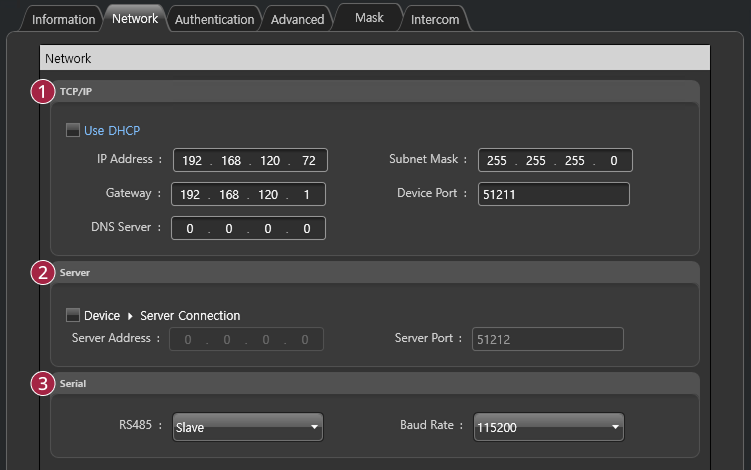
| No. | Item | Description |
|---|---|---|
| TCP/IP | You can configure the TCP/IP connection settings of the device.
| |
| Server | You can enter connection settings to use in the server mode.
| |
| Serial | You can configure the connection mode, and baud rate of devices connected over RS-485.
|
Authentication
You can configure the user authentication settings of the device.
Face Authentication Device
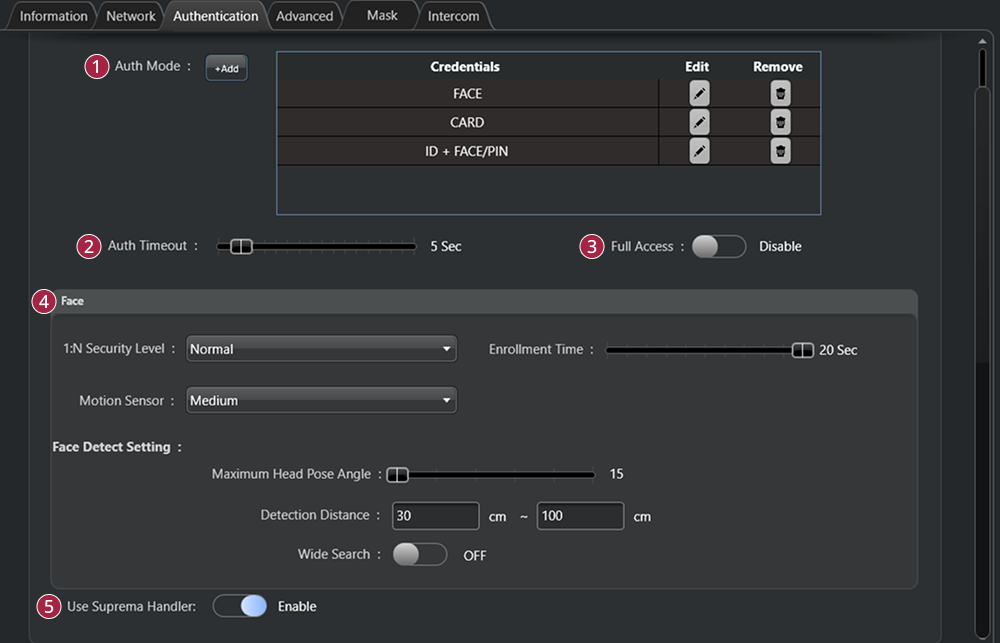
| No. | Item | Description |
|---|---|---|
| Auth Mode | You can configure the authentication modes of the device. Use any combinations of fingerprint, ID, card, PIN and face as authentication modes. Click +Add and create an authentication mode by dragging and dropping available options. | |
| Auth Timeout | When using a combination of multiple credentials in Auth Mode, the system waits for this length of time to authenticate the second credential. Set a timeout period for authenticating the second credential after authenticating the first credential. If the second credential is not authenticated within this time, the authentication fails. | |
| Full Access | You can grant full access to users registered within the device without setting any access groups. | |
| Face | You can configure the detail settings concerning face authentication.
| |
| Use Suprema Handler | This option enables or disables RIO communication between the Suprema device and the Cloud Link.
Disable this option when the Suprema device is used as a reader connected to a Mercury controller. |
Fingerprint Authentication Device
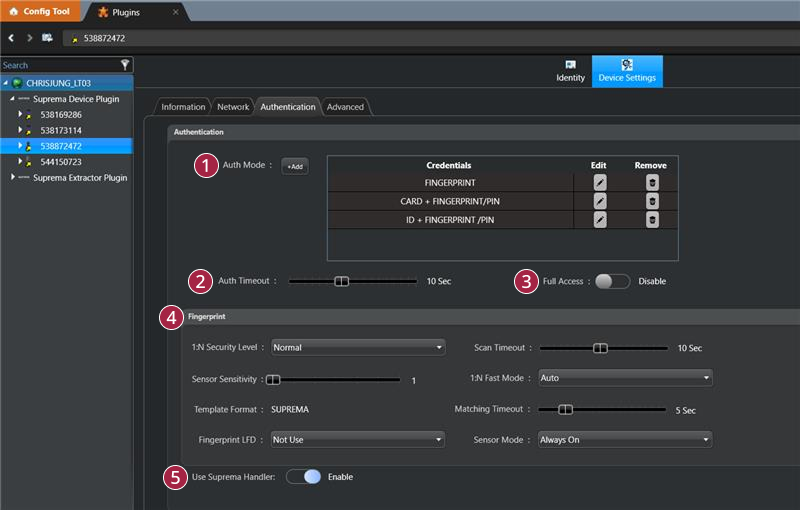
| No. | Item | Description |
|---|---|---|
| Auth Mode | You can configure the authentication modes of the device. Use any combinations of fingerprint, ID, card, PIN and face as authentication modes. Click +Add and create an authentication mode by dragging and dropping available options. | |
| Auth Timeout | When using a combination of multiple credentials in Auth Mode, the system waits for this length of time to authenticate the second credential. Set a timeout period for authenticating the second credential after authenticating the first credential. If the second credential is not authenticated within this time, the authentication fails. | |
| Full Access | You can grant full access to users registered within the device without setting any access groups. | |
| Fingerprint | You can configure the detail settings concerning fingerprint authentication.
| |
| Use Suprema Handler | This option enables or disables RIO communication between the Suprema device and the Cloud Link.
Disable this option when the Suprema device is used as a reader connected to a Mercury controller. |
Advanced
You can set the display/sound and wiegand.
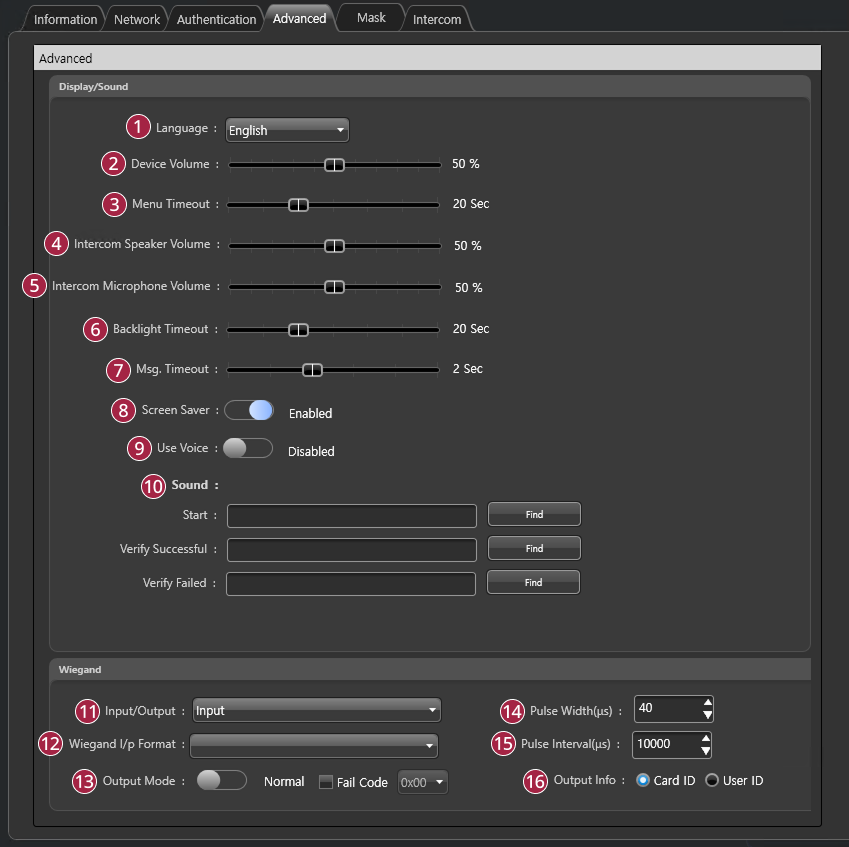
| No. | Item | Description |
|---|---|---|
| Language | Sets the display language of the device. | |
| Device Volume | Controls the device’s default volume. | |
| Menu Timeout | Sets the timeout for the menu screen. | |
| Intercom Speaker Volume | Sets the speaker volume when using the Intercom function. | |
| Intercom Microphone Volume | Sets the microphone volume when using the Intercom function. | |
| Backlight Timeout | Sets the timeout for the backlight. | |
| Msg. Timeout | Sets the timeout period for various messages to disappear automatically. | |
| Screen Saver | Sets this option to use the screen saver feature. It reduces unnecessary energy consumption by lowering the brightness of the LCD screen when the device is not in use. | |
| Use Voice | Enables voice guidance. | |
| Sound | Configures the sound effect for boot, authentication success, and authentication failure events. Click Find and select a *.wav file (less than 500 KB). | |
| Input/Output | You can select input/output mode. | |
| Wiegand I/p Format | You can set a format for Wiegand. | |
| Output Mode | You can set the Wiegand signal output mode. If it is set to Normal, a card will be scanned in the set Wiegand format. If it is set to ByPass, CSN will be sent regardless of Wiegand authentication. ByPass should be set when using the device without an entrance door control function. If it is set to Normal mode, it is possible to set Fail Code, and select a value to be transmitted when Wiegand card authentication fails. | |
| Pulse Width(μs) | You can set the pulse width of the Wiegand signal. | |
| Pulse Interval(μs) | You can set the pulse interval of the Wiegand signal. | |
| Output Info | You can select the information output to the device when the user authenticates. |
Mask
You can set the detailed settings of mask detection.
Face authentication devices can detect masks and restrict access to users without masks.
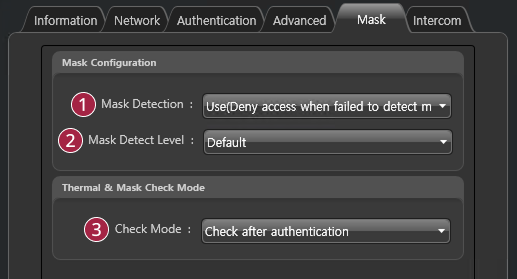
| No. | Item | Description |
|---|---|---|
| Mask Detection | You can set whether to use mask detection or not. If you select Use (Deny access when failed to detect mask), it refuses authentication of users who are not wearing a mask and saves event logs. If you select Use (Allow access after leaving log when failed to detect mask) users who are not wearing a mask can authenticate but event logs still be saved. | |
| Mask Detect Level | You can set sensitivity for mask detection. | |
| Check Mode |
|
Intercom
You can set the detailed settings of SIP Intercom.
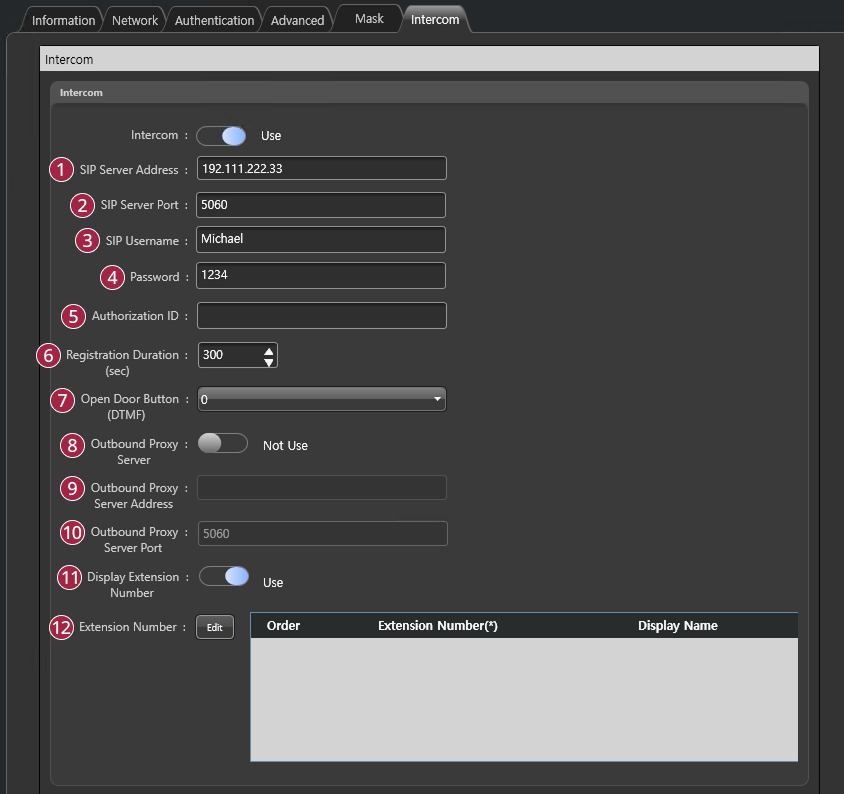
| No. | Item | Description |
|---|---|---|
| SIP Server Address | Enter SIP server address. | |
| SIP Server Port | Enter SIP server port. | |
| SIP Username | Enter username of your SIP account. | |
| Password | Enter password of your SIP account. | |
| Authorization ID | Enter authorization ID of your SIP account. | |
| Registration Duration(sec) | Enter Registration Duration in seconds. The device (SIP endpoint) tries to register to the SIP server every set Registration Duration. - Registration Duration can be set between 60 to 600 secs. | |
| Open Door Button(DTMF) | Set a button to open the door on the phone. | |
| Outbound Proxy Server | If your SIP service has a separate (outbound) proxy server, set this to Use. | |
| Outbound Proxy Server Address | Enter the outbound proxy server address. | |
| Outbound Proxy Server Port | Enter the outbound proxy server port. | |
| Display Extension Number | If you mind the device displaying extension numbers on the screen, set this to Not Use. | |
| Extension Number | Register extension numbers up to 128. Click Edit to add or delete. - Add: Add an extension number. - Delete: Delete an extension number. |
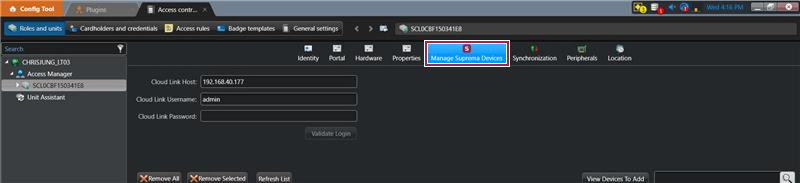
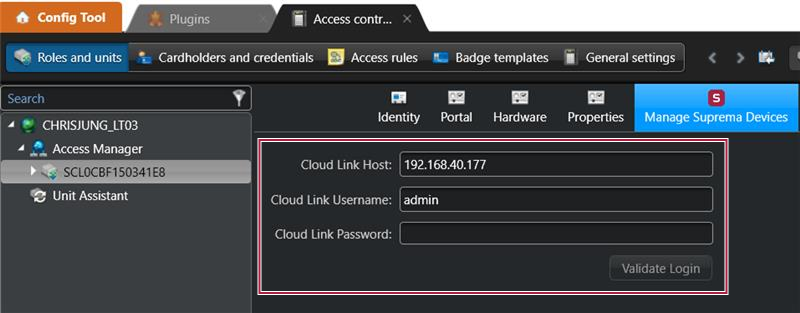
Assign Device to Cloud Link
-
In the Config Tool, click the Access Control under Tasks.
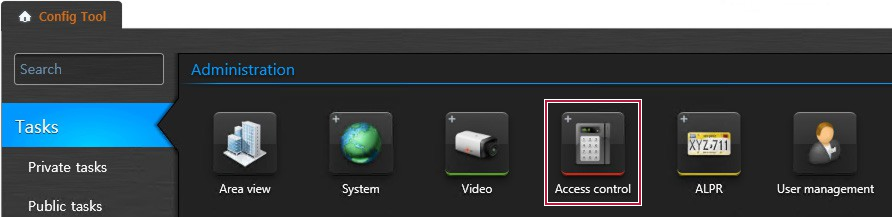
-
Go to Manage Suprema Devices tab at the top of the screen.
-
Enter the Cloud Link Host (IP address), Cloud Link Username (ID), and Cloud Link Password, and then click the Validate Login button.
-
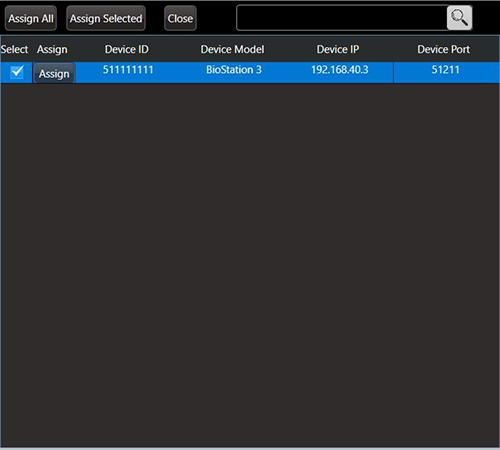
Click the View Devices To Add button.

-
Select the device to assign by checking the Select box, and click the Assign or Assign Selected button. To assign all devices, click the Assign All button.
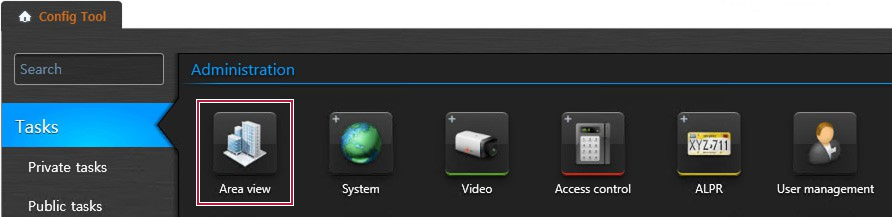
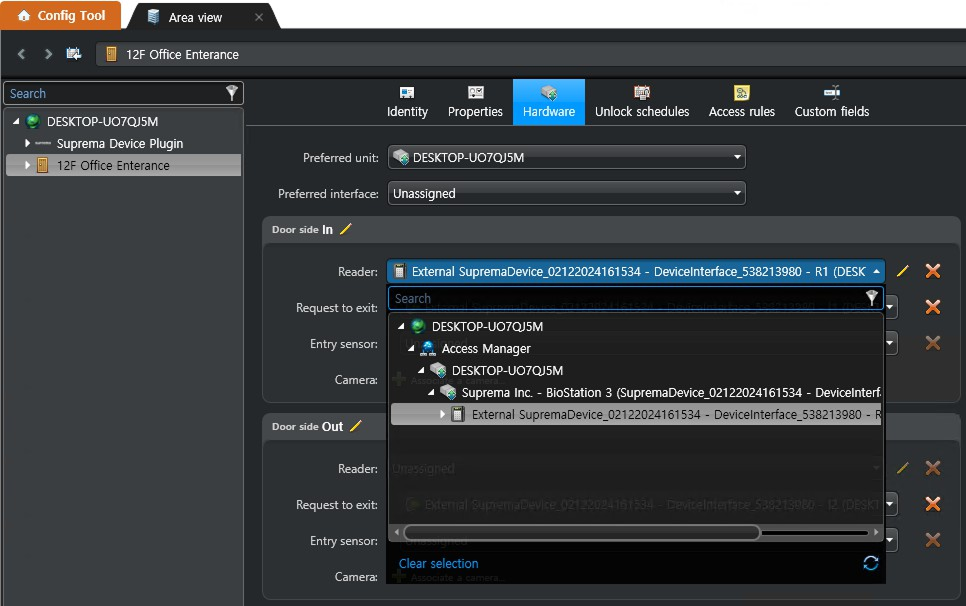
Door Configuration
-
In the Config Tool, click the Area view under Tasks.
-
Select the door and go to the Hardware tab.
-
Assign Suprema devices to Reader, Request to exit, and Entry sensor.
Input Configuration Limitation
In Suprema architecture, input types (e.g., REX, Door Contact) can only be configured after the device is mapped to a Door.
Root Cause:
-
Suprema SDK requires inputs to be assigned at the Door level, not at the device level.
-
Therefore, there is no way to pre-configure input types before assigning the device to a Door in Genetec.
 Caution
Any input type changes made via:
Config Tool → Access Control → Cloud Link → Peripherals Tab will not apply to the Suprema device directly.
Plugin’s Auto Assignment Logic
| Input Number | Input Type Assigned by Plugin |
|---|---|
| Odd Numbers | NO (Normally Open) |
| Even Numbers | NC (Normally Closed) |
This automatic assignment helps ensure compatibility when mapping inputs post-Door configuration.