Enrolling Biometrics from C•CURE 9000
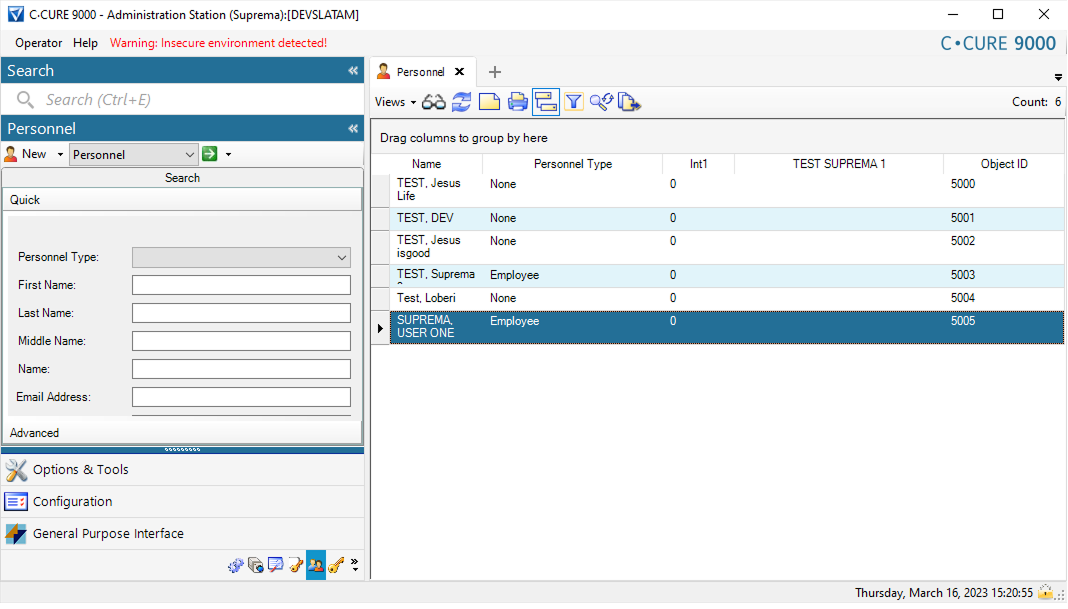
Please open the Administration Workstation, and locate in the Personnel View, click an existing user or create a new one.
Once you are in the Personnel View, please make sure you are in the Suprema Biometrics Enrollment View as shown below.
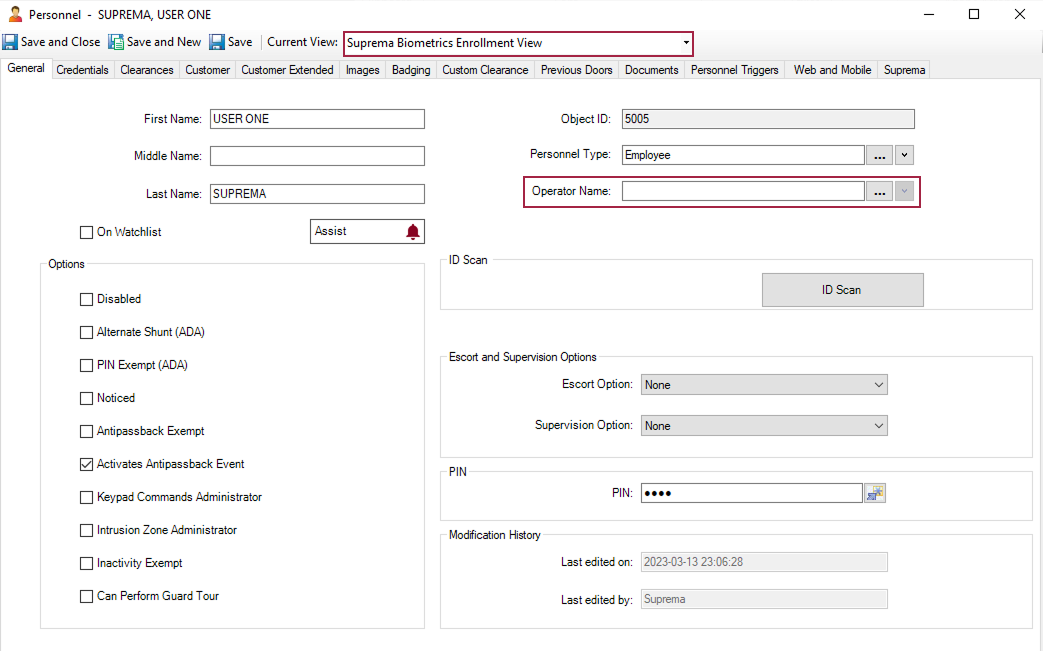
There you will find the Suprema TAB, located at the end of the Personnel View tabs.
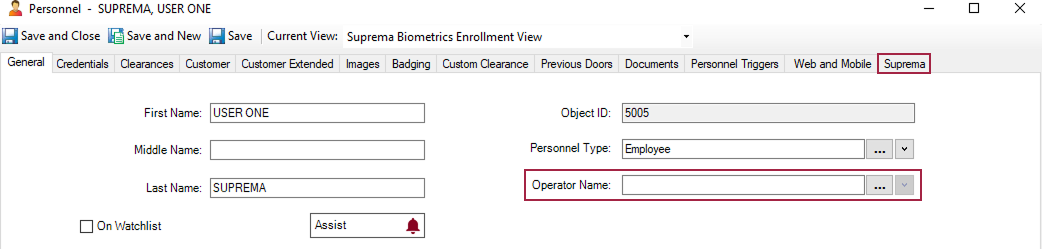
Please click and you will see:
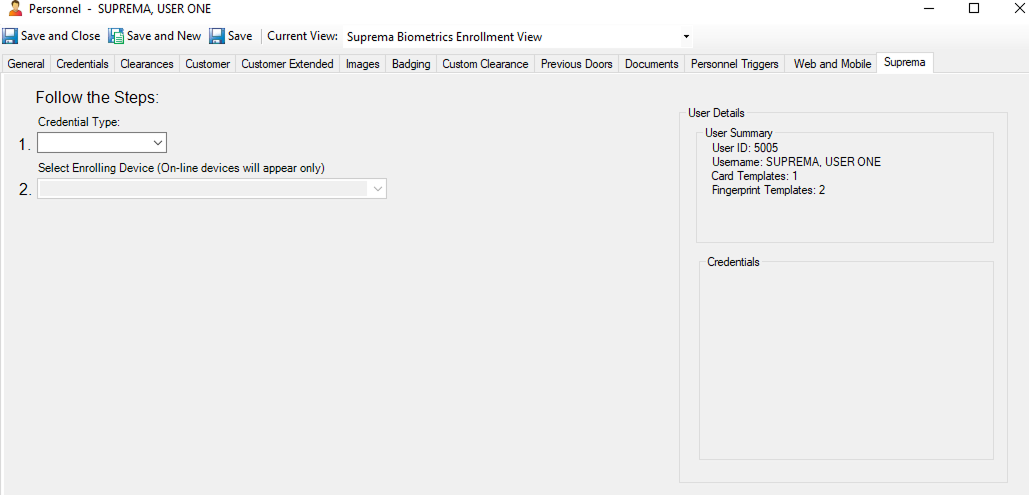
In the side panel on the right, you will see a summary for the current User.
-
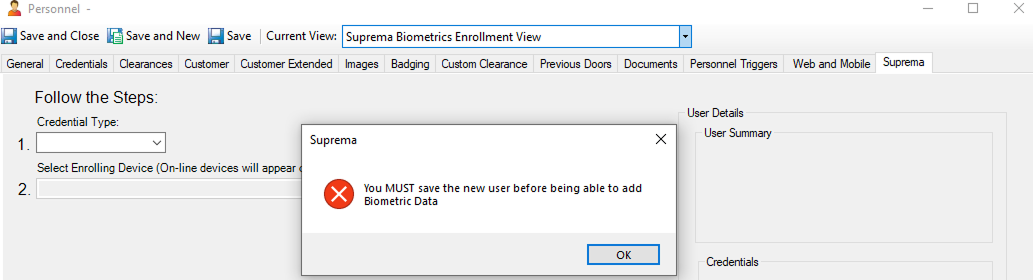
When the user is new, and it has not been saved to C•CURE 9000 yet: you will see this notice asking you to save the user before in order to enroll Biometric data.
-
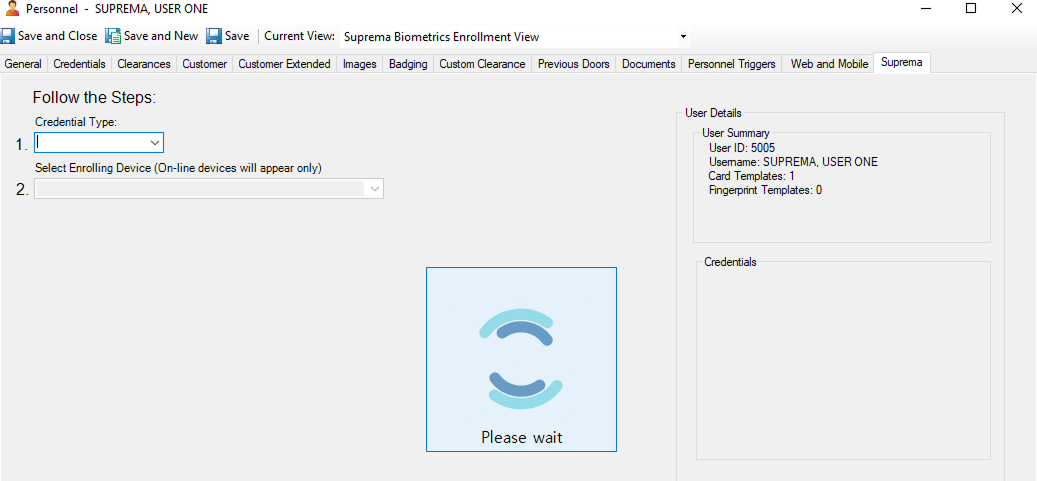
When the user is new to Suprema devices, right after saving the user and going to the Suprema TAB: you will notice:
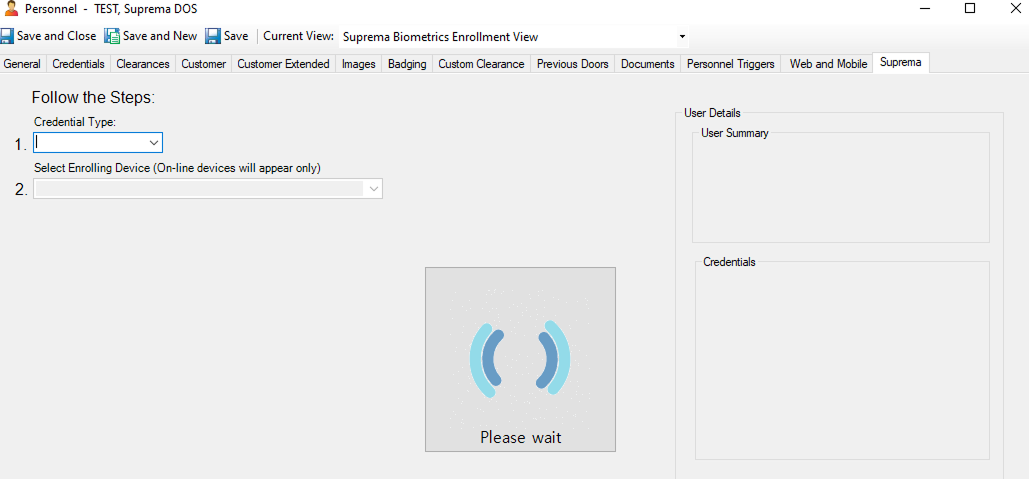
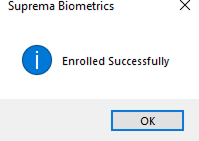
The Please wait dialog shows while the integration is synchronizing the user with the Suprema devices, once the process is done you will see something similar to:
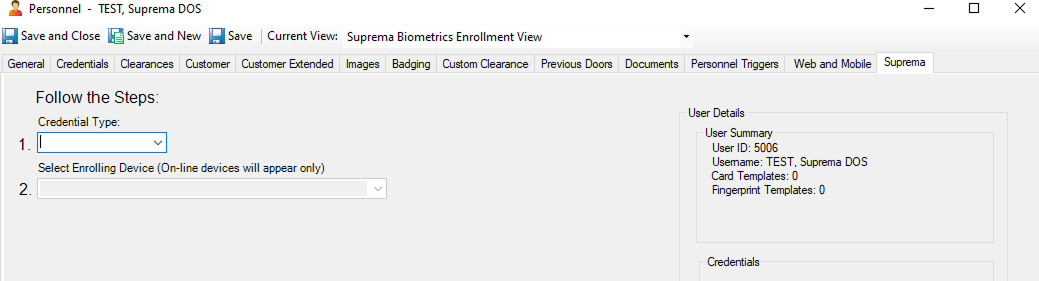
And as the user is newly created will show no templates, then let’s go and create them.
The first step is to add a RFID credential from the Credentials TAB.
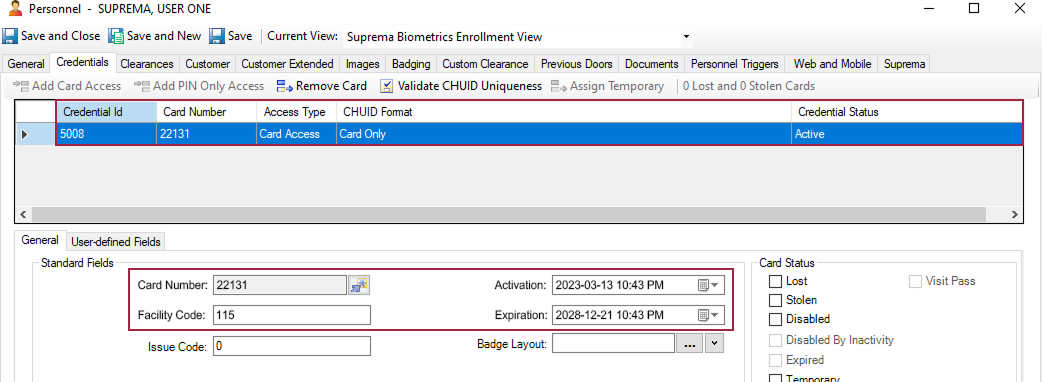
Please make sure you have configured at least the below fields:
-
Card Number.
-
Facility Code.
-
Activation datetime.
-
Expiration datetime.
After you have added at least these settings, please make sure you click the Save button previous to head to the Suprema TAB.
The newly added information will be transferred to the Suprema Devices.
The process can be as fast as a fraction of second or longer depending on how many devices the information needs to be synced with (please be patient).
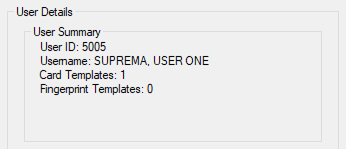
After the process has finished you will see the information box.
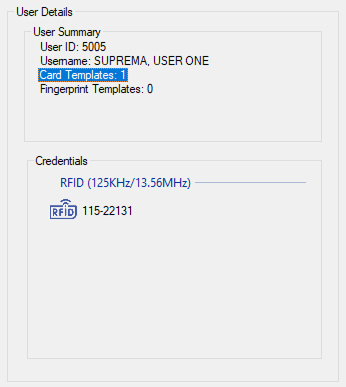
Now in the User Details side panel you will see the information updated.
When you have more than one card (up to five according to C•CURE maximum amount of credentials), you will see:
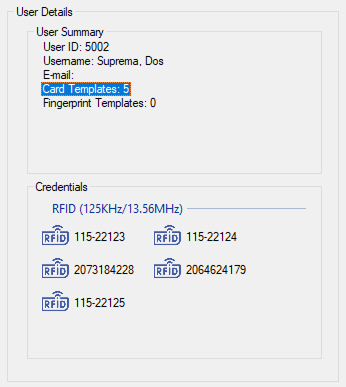 情報
情報The Basic version of this integration will sync only the first available card in the personnel Credentials pool.
Now we are ready to Enroll Biometrics to the current user:
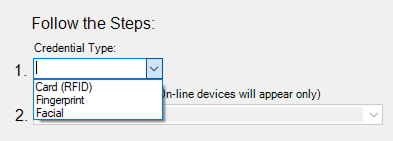
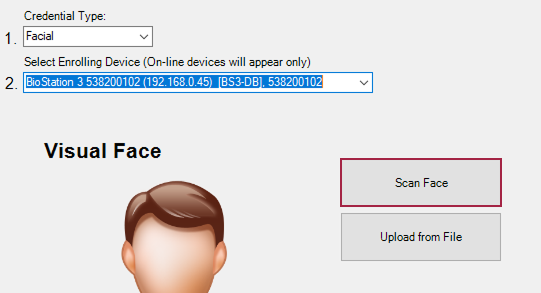
As you can see in the previous image, you are offered the options to enroll RFID Cards, Fingerprints, or Facial Credentials.
After you select one of them you will see a dynamic panel for each type of Credential in your screen, as reference:
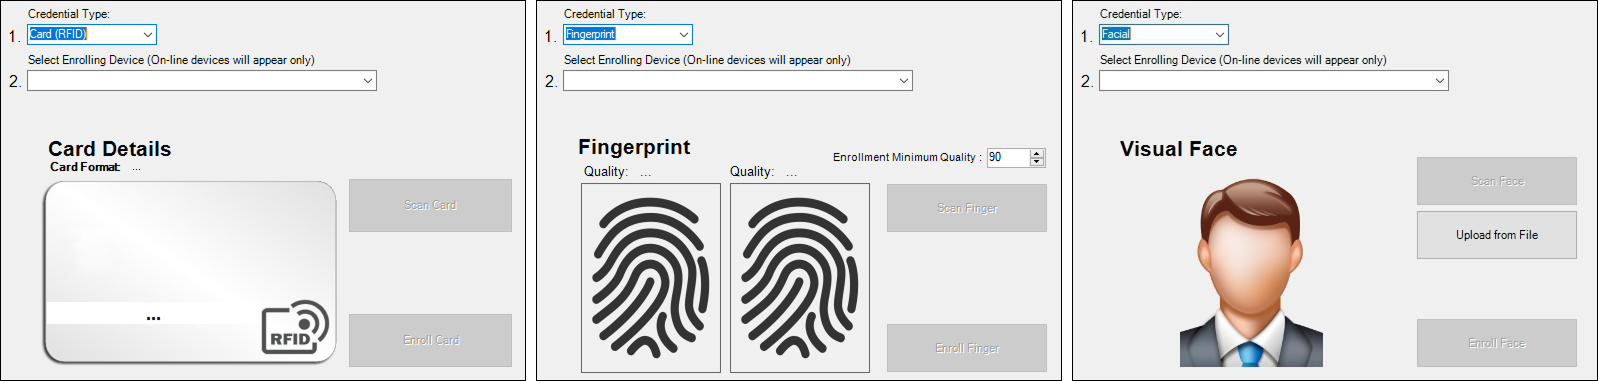
When you select the type of credential, the Integration can classify the devices according to their capabilities, hence showing you only those devices capable of handling the credential type you selected. For example:

Once you select a device, the options in the respective panels will enable to allow you proceed.
情報Whenever you select a type of Credential the Integration will select only the devices capable of handling the selected credential, if none is found the following message will be displayed.

-
Scanning a Card
Suprema Devices are multi-technology; hence you will be able to scan cards at least with the following characteristics: EM (125KHz), and in 13.56MHz: MIFARE, MIFARE Plus, DESFire EV1/ EV2, FeliCa.
With the other set of devices HID Prox is supported besides EM for 125KHz, and iCLASS SE/SR/SEOS as well.
If you have any questions about the specifics of what RF support does your Suprema device have, please look for the Device manual in https://www.supremainc.com/en/hardware/security-products-lineup.asp.
When you scan a card, you will see the following details:
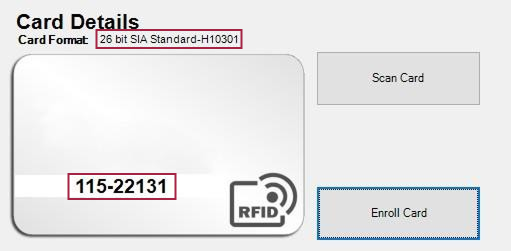
In Card Format: the format that was automatically recognized by the reader.
In the Card-on-Screen-design: the Card serial with the format Facility Code + Card Number (separated by a dash), making easier the way of card registration from the Credentials TAB, in case the card does not have the serial number physically printed out.
The Format you see recognized in the Card Format can also help you to verify whether or not the card you are about to register is compatible with the Selected Card Format under Card Formats and Keys configuration menu.
After you click the Enroll Card button you should click the Save button in the upper menu within the Personnel window for the changes made in the Suprema TAB to be reflected in C•CURE.
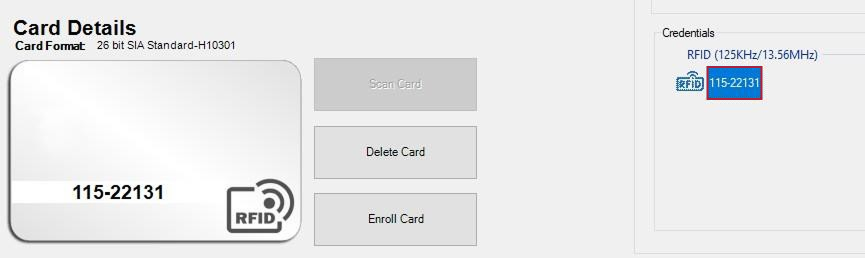
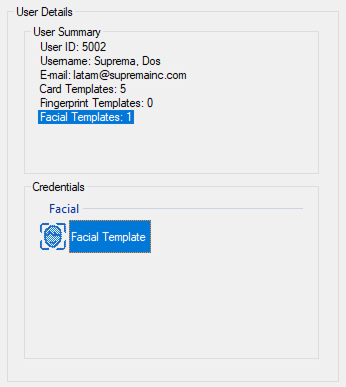
After the card has been registered, you can see or delete the credential by double clicking the Card Templates under User Summary:
If you double click on the Card showing under Credentials you will see the card displaying on the Card-on-Screen-design.
Delete a Card
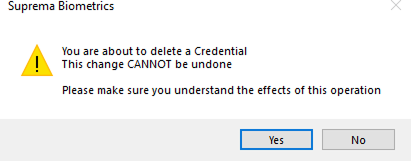
From there if you desire to delete the card from the Suprema Devices, please click the Delete button, a warning message will be displayed, click on Yes if you want to delete the card from the User profile in the Suprema Devices, click No otherwise.
Please be aware that if you delete this credential from the user profile, and the user does not have other card in its profile, or do not replace it by other card (in case of a Basic version), the Integration will replace it with the last card saved in the Personnel Credentials, and if you delete the credentials from both sides, that can lead to errors in the authentication against the iStar Panel.
Scanning Fingerprints
In order to improve the fingerprint authentication rate, enroll the fingerprint correctly. The Suprema Devices can recognize a fingerprint even if the angle and position of a user’s fingerprint input change. If you enroll the fingerprint with attention to the following matters, the authentication rate can be improved.
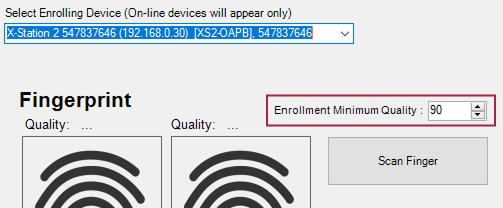
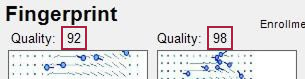
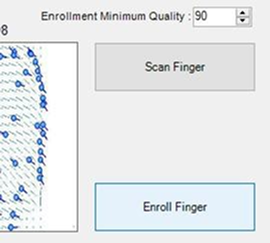
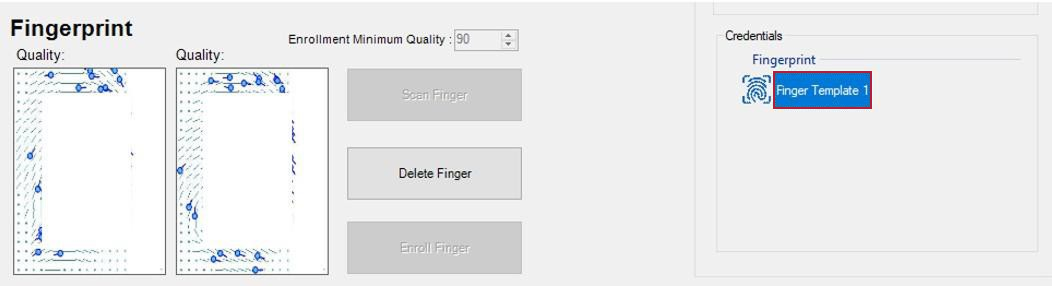
The Enrollment Minimum Quality ensures that the Finger is good enough to differentiate a person from another. The value of 90 or higher is preferred for a better authentication, however, if you encounter a problem with a person recognizing their fingerprint you can lower the value a bit.
Please be aware of the message both in the screen and the devices, in your screen will show an animation with the following messages:
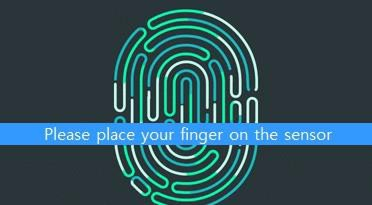

As the message in screen requests to place your finger on the sensor, and once the first scan is done, the message will change and will request you to place AGAIN your finger.
On each completed scan, the template will be displayed on the screen with the actual quality result from the scanning event:
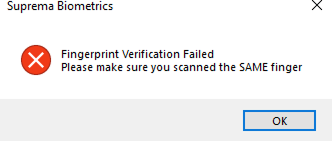
The Integration will ask you to scan your finger two times, in order to perform the following:
Verifications made:
-
The scanned result fulfilled the Enrollment Minimum Quality? This verification will run for each scanning, will fail if the minimum quality is not met.
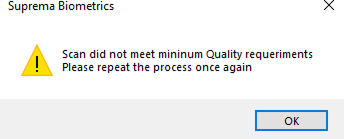
For security reasons the currently gotten information will be reset for you to have clear and compliant data for your biometrics data.
-
Was the same finger scanned twice? The verification will fail otherwise.
-
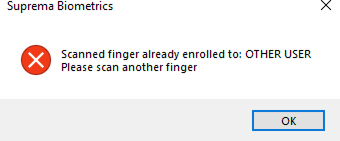
The finger is already enrolled in? The verification will fail if the finger is found to be already enrolled to the Same or Other user.
-
If the aforementioned are passed the Enrollment button will enable for you to register this finger to the current user.

Followed by enabling the Enroll Finger button.
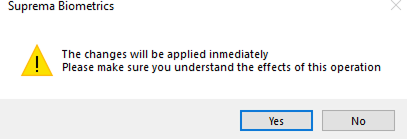
When the warning message is displayed and you click Yes, the data will be sent to the Suprema devices right away and will be available immediately. Click No to dismiss the dialog.
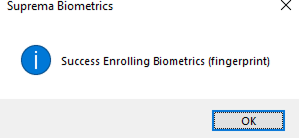
A confirmation message will be displayed when the process is finished.
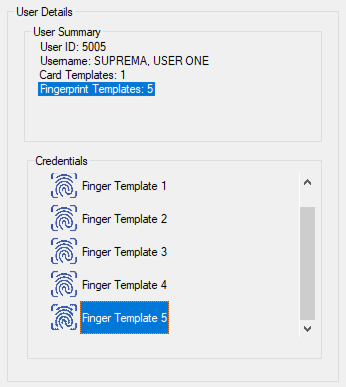
After the Fingerprint has been registered, you can see or delete the credential by double clicking the Fingerprint Templates under User Summary:
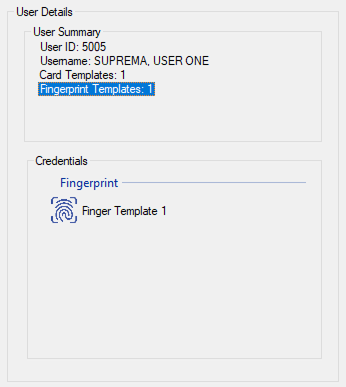
If you double click on the Finger Template showing under Credentials you will see the template displaying on the Fingerprints panel.
Delete a Fingerprint
From there if you desire to delete a fingerprint from the User’s profile in the Suprema Devices, please click the Delete button, a warning message will be displayed, click on Yes if you want to delete the credential from the User profile in the Suprema Devices, click No otherwise.
How many fingerprints can be added to each User?
The 10 fingerprints from the user’s hand can be added to the users profile, although index, medium and thumb fingers are those commonly used in the enrollment procedure, you are welcome to try enrolling all ten of them.
After double clicking each of the templates in the screen you will be able to see them on the fingerprints panel, from there you can edit them as well as described in the previous section.
Fingerprint enrolling method
-
When a message saying, "Place your finger on the sensor." is displayed on the LCD screen for enrolling the fingerprint, place the finger with the fingerprint you wish to enroll on the fingerprint authentication unit and press the finger gently for better authentication.

-
When the re-input screen is displayed after a beep sound, scan the fingerprint of the enrolled finger again (scan the fingerprint of a finger to be enrolled twice).
Some recommendations or cautions to bear in mind when scanning and enrolling a fingerprint.
When a fingerprint is recognized, it is compared with the initially registered fingerprint, so the initial fingerprint enroll is the most important. Pay attention to the following matters when enrolling the fingerprint.
-
Place the finger deep enough to contact with the sensor completely.
-
Place the center of the fingerprint in the center of the sensor.
-
If a finger has a cut or the fingerprint is blurry, select another finger for the fingerprint.
-
Scan the fingerprint correctly without moving according to the instruction on the screen.
-
If you make the finger upright so that the contact area with the sensor is decreased or the angle of finger is warped, fingerprint authentication may not be performed.

The Suprema devices can recognize a fingerprint regardless of a change in season or finger condition.
However, the authentication rate may vary according to the external environment or fingerprint input method. If the fingerprint authentication cannot be done smoothly, it is recommended to take the following measures.
-
If the finger is smeared with water or sweat, dry off the finger and then scan the finger.
-
If the finger is too dry, blow your breath on the fingertips and then scan the finger.
-
If the finger has a cut, register the fingerprint of another finger.
-
The initially enrolled fingerprint often may have not been scanned correctly, so enroll the fingerprint again according to recommendations aforementioned.
Working with Facial Credentials
Scanning a Face
Once you select a capable device, the Scan Face button will enable allow you to scan your face from it.
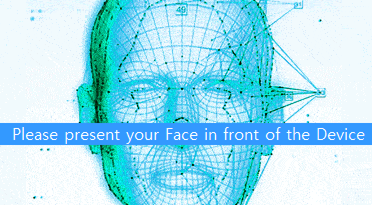
When you click the Scan Face button the following message with the animation will be shown to you requesting that you:
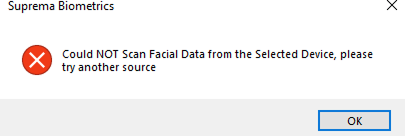
If within a time no face is presented in front of the device to capture, the following message will be shown.
In the other hand, when the person is in front the device his/her face will be captured and shown in the panel:
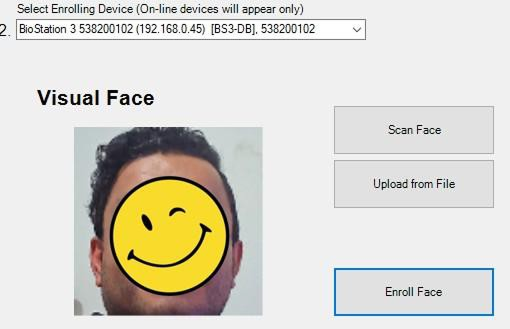
You will notice that the Enroll Face button will enable allowing you to proceed with the Facial Registration.
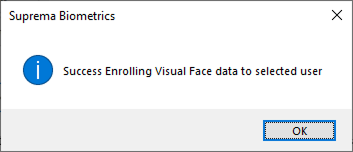
After the process has finished you will receive the confirmation dialog, click OK to continue:
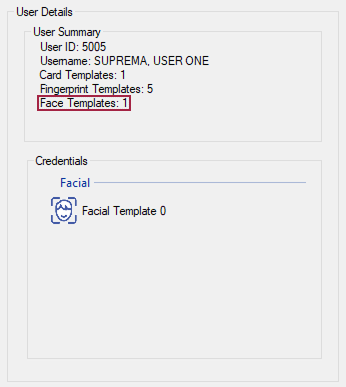
You will notice an update in the User Details panel located in the side panel on the right.
Please bear in mind the general guidelines for enrolling Visual Faces:
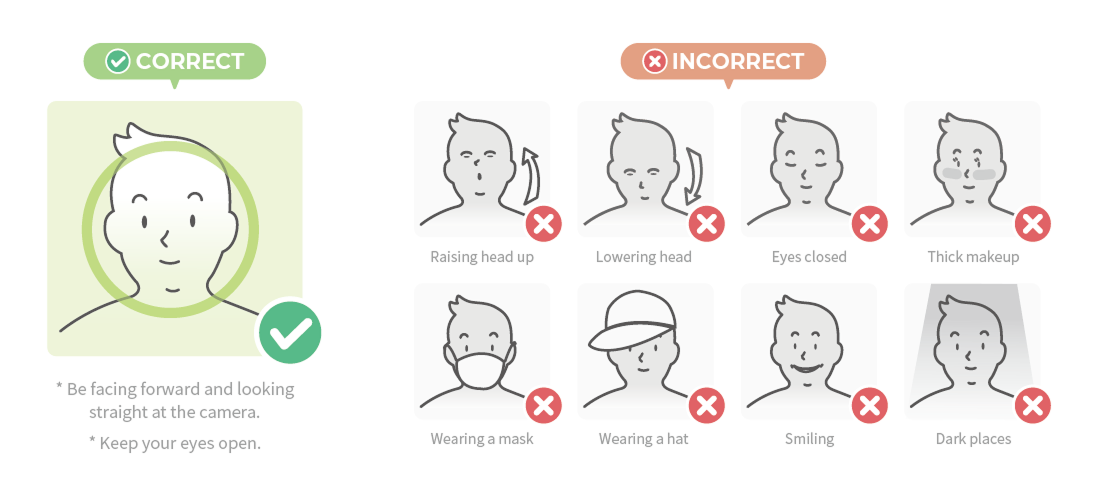
These guidelines apply for both scanning a face directly from the device or when uploading a facial picture for pre-enrollment.
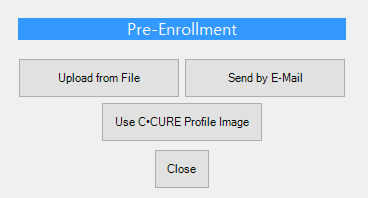
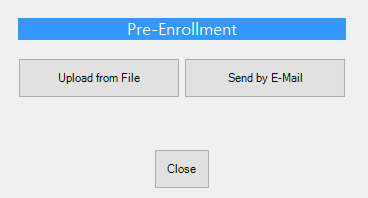
Pre-Enrollment
In the Advanced version when you click the Pre-Enroll button, in the facial credentials panel.

The following menu will be displayed.
-
Uploading a picture for pre-enrollment.

This is one of the options for non-presential enrollment. When you click the Upload from File button, a File Selector dialog will be shown for you to select the picture from the person you’re about to enroll.
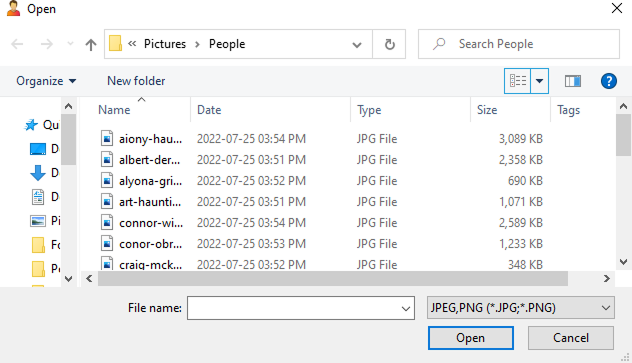
Select the picture from the person you’re about to enroll, click Open.
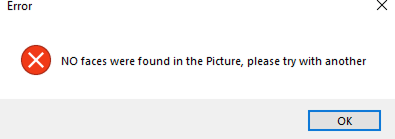
Please make sure the picture you select has a face, otherwise the process will not continue, and the following message will display:
As an example, please take into account the picture shall be from a person facing towards with a neutral expression and the face uncovered.
The following criteria shall be considered for the pre-enrollment process to succeed.
-
Resolution: Larger than 250 x 250 pixels
-
Image size: Up to 10 MB
-
Supported formats: JPG, JPEG or PNG only
After loading a picture, you will be provided with a cropping rectangle that will automatically recognize where is the face located, please help the tool selecting the facial area in case is not already completely selected.
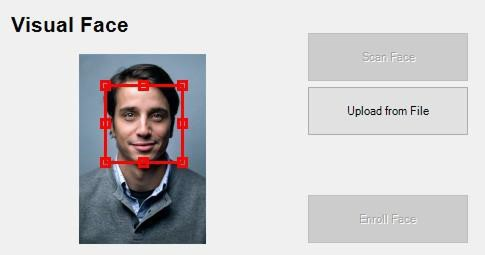
Double click on the image to complete the cropping procedure.
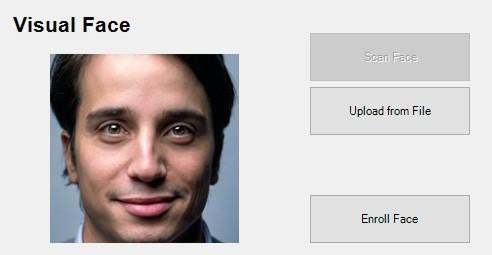
After you double click the facial image, the face will be automatically zoomed to fill the area and display on the panel, also you will see the Enroll Face button has been enabled allowing you to complete the facial enrollment process.
After the process has finished you will receive a confirmation message.
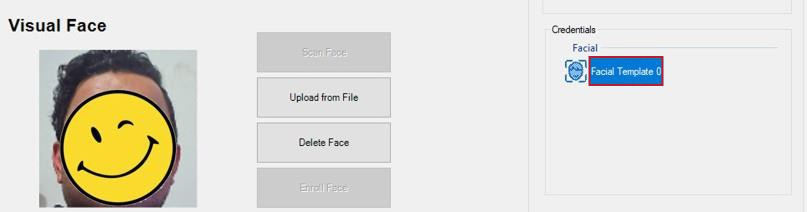
After the Face has been registered, you can see or delete the credential by double clicking the Facial Templates under User Summary:
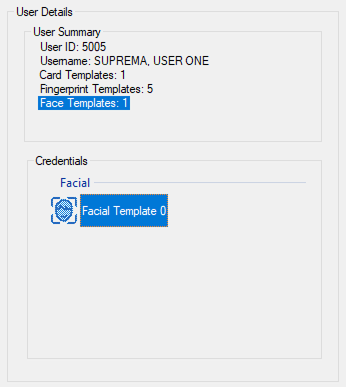
If you double click on the Face Template showing under Credentials you will see the template displaying on the Facial panel.
Send by E-Mail

This is the second option for non-presential Facial enrollment, this option allows you to send a safe pre-enrollment link through email where the user will be able to take a picture of oneself and in real time send that pre-enrollment data back to the customer’s server so that in the first time the user present in the customer facilities he/she will be biometrically recognized (depending on the Access Control Policies previously configured between C•CURE/BioStar 2).
The integration after performing the validations, if the user does not have an email address registered under its profile, will show the following panel to register an email address prior to send the Pre-Enrollment link.
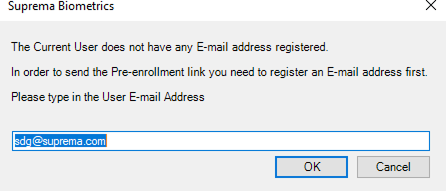
The integration will validate the entered data is a valid email address. After the validation is performed, the integration will save the newly entered data in BioStar 2 and C•CURE, therefore please make sure you hit Save before leaving the Personnel View window.
Once the email address is entered, the following notice will be displayed, click Yes to proceed, No to cancel.
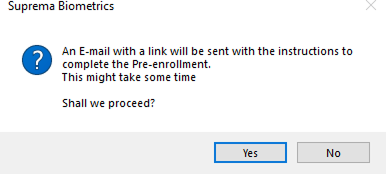
If the Yes option was clicked, the Integration will run one more check before sending the Pre-enrollment link, and this is to validate all required settings to accomplish this feature.
If any of them have not been properly configured yet, the following window will be shown:
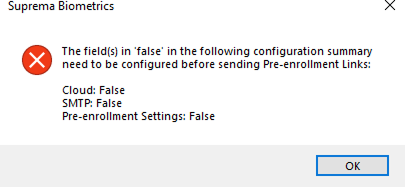
Indicating you which feature needs to be checked/configured before proceeding.
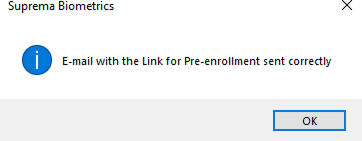
If everything was already configured, a confirmation notice will be displayed saying all was performed correctly.
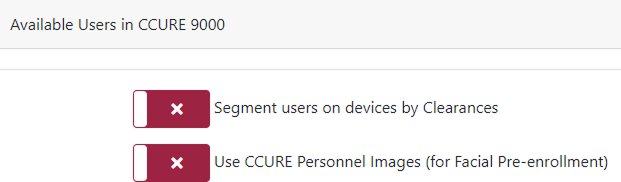
Use C•CURE Profile Image
If this option is activated and the user profile does not have a facial credential, when you open the Personnel View the integration will automatically attempt to use such profile image to create a pre-enrollment facial credential.
An AI algorithm is used by the integration to analyze the image and see if there is a human face in it, if not, the image will be rejected. If there is a human face, the integration will proceed with the next revisions where certain criteria is applied to know if the person image fulfills the minimum requirements. If it does, the image will be used as input for the facial pre-enrollment credential creation.
If the Use C•CURE Personnel Images (for Facial Pre-enrollment) option is not activated from the Integration Configuration Tool, the Pre-Enrollment menu will only display.
In order to activate/deactivate it you should go to the Integration Configuration Tool → Users menu:
The following notice will be displayed:
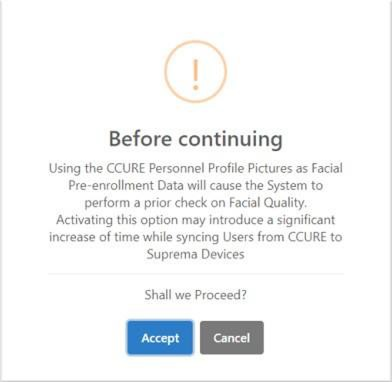
Click Accept to proceed, Cancel otherwise.
If you activated the option, you could go back to the Personnel View, open the Personnel profile and check the added option under the Pre-Enrollment menu:
Once you click the Use C•CURE Profile Image button, the integration will run the procedures to analyze the C•CURE profile image and if it fulfills the requirements described previously, the process will produce a valid Pre-enrollment facial credential.
Delete a Face
From there if you desire to delete a face from the User’s profile in the Suprema Devices, please click the Delete button, a warning message will be displayed, click on Yes if you want to delete the credential from the User profile in the Suprema Devices, click No otherwise.
How many Faces can be added to each User?
One facial record can be enrolled/pre-enrolled per user (two if done through BioStar 2), the reason behind this is the Deep Learning Algorithm implemented in the FaceStation F2 and BioStation 3 devices is highly accurate and the most important feature is that the self-learning algorithm can (as its name describes) learn by itself the variations a face can experiment, for example: with or without mask, glasses, beard, moustache.
However please be aware that although the benchmarking done for the Suprema’s Fusion Matching algorithm is top in the market it does not perform impossible tasks as recognizing a person wearing helmet if no facial features are exposed.
After double clicking each of the templates in their different types in the screen you will be able to see them on their respective panel, from there you can edit them as well as described in the previous section.
It is very important to emphasize that these changes are being performed online, and they will be enforced right away in the Suprema device, hence, please make sure you are doing the right changes, otherwise you can forbid the access to a person by mistake.
Miscellaneous
There is a helper section in the bottom panel of the Suprema TAB.
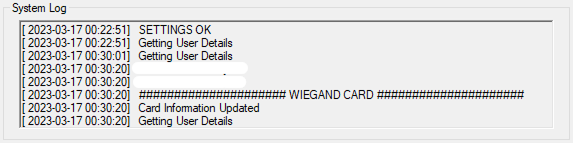
Here you will be able to visualize logging information that will also see the changes or response from the Suprema service.
In the first run or when a license is not properly validated or the Suprema - C•CURE Integration Service is not running, you will visualize.
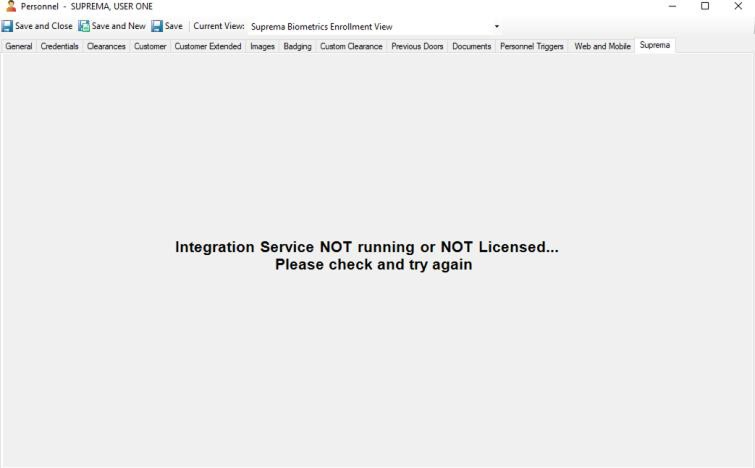
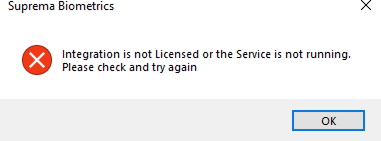
You will not be able to make use of the integration until you check your license validation or that the service is running.
If you are sure the license has been properly validated, and you still receive this error, please try closing the Personnel View and opening back again, if the latter doesn’t solve the problem please refer to the Troubleshooting section, number 2.